
Control Guide


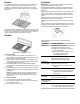

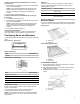


Table Of Contents
- Feature Guide_W11241798
- Surface Burners_W11281996
- Grates_GDOFSR_CG
- Griddle_W11085356
- Cookware_GDOFSR_CG
- Home Canning_GDOFSR_CG
- Oven Use_Ranges/Ovens_CG
- Electronic Oven Controls_W11241795
- Keep Warm_W11241795
- Sabbath Mode_W11241795
- Racks and Bakeware_W11241795
- Roll-out Rack_GDOFSR_CG
- Baking and Roasting_W11241798
- Broiling_GDOFSR_CG
- Lower Oven Convection Cooking_W11241795
- EasyConvect Conversion_GDOFSR_CG
- Slow Cook_GDOFSR_CG_W11241795A, W11241798A
- Cook Time_W11241795
- Feature Guide_W11241798_FR
- Surface Burners_W11281996_FR
- Grates_GDOFSR_CG_FR
- Griddle_W11085356_FR
- Cookware_GDOFSR_CG_FR
- Home Canning_GDOFSR_CG_FR
- Oven Use_Ranges/Ovens_CG_FR
- Electronic Oven Controls_W11241795_FR
- Keep Warm_W11241795_FR
- Sabbath Mode_W11241795_FR
- Racks and Bakeware_W11241795_FR
- Roll-out Rack_GDOFSR_CG_FR
- Baking and Roasting_W11241798_FR
- Broiling_GDOFSR_CG_FR
- Lower Oven Convection Cooking_W11241795_FR
- EasyConvect Conversion_GDOFSR_CG_FR
- Slow Cook_GDOFSR_CG_W11241795A, W11241798A_FR
- Cook Time_W11241795_FR

8
To Adjust Temperature (when Sabbath mode is running in
only one oven):
1. Press the number keypad as instructed by the scrolling text to
select the new temperature.
NOTE: The temperature adjustment will not appear on the
display, and no tones will sound. The scrolling text will be
shown on the display as it was before the keypad was
pressed.
2. Press START for the selected oven.
To Adjust Temperature (when Sabbath mode is running in
both ovens):
1. Press BAKE for the desired oven.
2. Press the number keypad as instructed by the scrolling text to
select the new temperature.
NOTE: The temperature adjustment will not appear on the
display, and no tones will sound. The scrolling text will be
shown on the display as it was before the keypad was
pressed.
3. Press START for the selected oven.
To Deactivate Sabbath Mode:
Press OPTIONS, then press “7” to return to regular baking, or
press OFF UPPER or OFF LOWER to turn off the oven(s).
Positioning Racks and Bakeware
Use the following illustrations and charts as a guide for positioning
racks.
Rack Positions - Upper Oven
Baking and Broiling
Food Rack Position
All foods 1
Rack Positions - Lower Oven
Food Rack Position
Large roasts or poultry 1
Roasted meats 2
Most baked goods, casseroles 3
Broiled meats, poultry, fish 4
Broiling/searing meats, hamburgers, steaks
5
Multiple Rack Cooking
2-rack: Use rack positions 2 and 4 for regular baking with the
roll-out rack in position 2.
2-rack (convection only): Use rack positions 2 and 4 for
convection baking with the roll-out rack in position 2.
NOTE: The roll-out rack in the lower oven sits midway between
adjacent rack positions. The roll-out rack should not be used in
rack position 5.
Bakeware
To cook food evenly, hot air must be able to circulate. Allow 2"
(5.0 cm) of space around bakeware and oven walls. Use the
following chart as a guide.
Number of Pan(s) Position on Rack
1 Center of rack
2 Side-by-side
3 or 4 Refer to the Baking Cakes image in the
Quick Start Guide.
Roll-out Rack
The roll-out rack allows easy access to position and remove food
in the oven. The roll-out rack should not be used in rack position 5.
Open position
A. Sliding rails
B. Sliding shelf
Closed and Engaged Position
A. Sliding rails
B. Sliding shelf
To Insert Roll-Out Rack
1. Angle rack assembly up, and then insert into the “V” cutout in
the rack guides of the oven cavity.
2. Keep rack assembly lifted up at an angle, and then push in to
bypass the lower “V” cutout.
3. Gently slide rack assembly into oven, bypassing the “V”
cutouts.
A. "V” cutout
B. Rack guides