
Control Guide
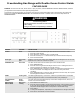
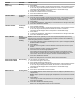
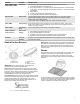
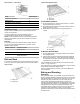

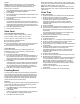
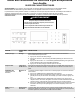
Table Of Contents
- Feature Guide_W11241795
- Sealed Surface Burners_GDOFSR_CG
- Grates_GDOFSR_CG
- Griddle_W11085356
- Cookware_GDOFSR_CG
- Home Canning_GDOFSR_CG
- Oven Use_Ranges/Ovens_CG
- Electronic Oven Controls_W11241795
- Keep Warm_W11241795
- Sabbath Mode_W11241795
- Racks and Bakeware_W11241795
- Roll-out Rack_GDOFSR_CG
- Baking and Roasting_W11241795
- Broiling_GDOFSR_CG
- Lower Oven Convection Cooking_W11241795
- EasyConvect Conversion_GDOFSR_CG
- Slow Cook_GDOFSR_CG_W11241795A, W11241798A
- Proofing Bread_GDOFSR_CG_W11241795
- Cook Time_W11241795
- Feature Guide_W11241795
- Sealed Surface Burners_GDOFSR_CG
- Grates_GDOFSR_CG
- Griddle_W11085356
- Cookware_GDOFSR_CG
- Home Canning_GDOFSR_CG
- Utilisation du four_Cuisinières/fours_CG
- Electronic Oven Controls_W11241795
- Keep Warm_W11241795
- Sabbath Mode_W11241795
- Racks and Bakeware_W11241795
- Roll-out Rack_GDOFSR_CG
- Baking and Roasting_W11241795
- Broiling_GDOFSR_CG
- Lower Oven Convection Cooking_W11241795
- EasyConvect Conversion_GDOFSR_CG
- Slow Cook_GDOFSR_CG_W11241795A, W11241798A
- Proofing Bread_GDOFSR_CG_W11241795
- Cook Time_W11241795
- Feature Guide_W11241795
- Sealed Surface Burners_GDOFSR_CG
- Grates_GDOFSR_CG
- Griddle_W11085356
- Cookware_GDOFSR_CG
- Home Canning_GDOFSR_CG
- Oven Use_Ranges/Ovens_CG
- Electronic Oven Controls_W11241795
- Keep Warm_W11241795
- Sabbath Mode_W11241795
- Racks and Bakeware_W11241795
- Roll-out Rack_GDOFSR_CG
- Baking and Roasting_W11241795
- Broiling_GDOFSR_CG
- Lower Oven Convection Cooking_W11241795
- EasyConvect Conversion_GDOFSR_CG
- Slow Cook_GDOFSR_CG_W11241795A, W11241798A
- Proofing Bread_GDOFSR_CG_W11241795
- Cook Time_W11241795

3
KEYPAD FEATURE INSTRUCTIONS
KEEP WARM UPPER
KEEP WARM LOWER
Hold warm Food must be at serving temperature before placing it in the warmed oven.
1. Press KEEP WARM for the desired oven.
2. Press the Time/Temp + or - keypad to set the desired temperature. Press and hold to
scroll quickly. The temperature will not scroll past the minimum or maximum allowable
temperature.
3. Press START.
4. To change the temperature, repeat steps 2 and 3.
5. Press CANCEL for the selected oven when finished.
DELAY START Delayed start The Delay Start keypad is used to enter the starting time for an oven function with a
delayed start. Delay Start should not be used for foods such as breads and cakes
because they may not bake properly.
To set a Cook Time or a Delayed Cook Time, see the “Cook Time” section.
COOK TIME Timed cooking Cook Time allows the oven to be set to turn on at a certain time of day, cook for a set
length of time, and/or shut off automatically. To set a Cook Time or Delayed Cook Time,
see the “Cook Time” section.
SELF CLEAN Self-cleaning
cycle
See the “Self-Cleaning Cycle” section in the Owner’s Manual.
START CONTROL
LOCK hold 5 sec.
Oven control
lockout
1. Check that the ovens and timers are off.
2. Press and hold START for 5 seconds.
3. If enabled, a tone will sound, and “CONTROL LOCK” will be displayed.
4. Repeat to unlock. No keypads will function with the controls locked.
OPTIONS Oven use
functions
Enables you to personalize the audible tones and oven operation to suit your needs. See
the “Oven Use” section.
Sealed Surface Burners
A. Burner cap
B. Burner base
C. Alignment pins
D. Igniter
E. Gas tube opening
IMPORTANT: Do not obstruct the flow of combustion and
ventilation air around the burner grate edges.
Burner cap: Always keep the burner cap in place when using
a surface burner. A clean burner cap will help avoid poor ignition
and uneven flames. Always clean the burner cap after a spillover
and routinely remove and clean the caps according to the
“General Cleaning” section in the Owner’s Manual.
Gas tube opening: Gas must flow freely throughout the gas tube
opening for the burner to light properly. Keep this area free of soil
and do not allow spills, food, cleaning agents, or any other
material to enter the gas tube opening. Keep spillovers out of
the gas tube by always using a burner cap.
A. 1-1
1
/
2
" (2.5-3.8 cm)
B. Burner ports
Burner ports: Check burner flames occasionally for proper size
and shape as shown in the previous illustration. A good flame is
blue in color, not yellow. Keep this area free of soil and do not
allow spills, food, cleaning agents, or any other material to enter
the burner ports.
Grates
The grates on this range cover the full width of the cooktop. The
two grates may interlock (on some models), using the hook
formed into one end of both grates. The flat end of one grate
drops onto the hook on the other grate as shown in the following
illustration.
On some models, the two grates are identical and can be used on
either the left or right side of the cooktop. Grates that are designed
for use on only one side of the cooktop will have either “LEFT” or
“RIGHT” embossed on the bottom side of the grate.