
Control Guide
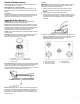
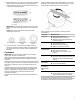
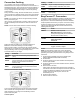
Table Of Contents
- Feature Guide_W11122599
- Grates_W11122565
- Griddle_W11085356
- AquaLift Self-Cleaning Tech_GFSR_CG
- Surface Temperatures_GFSR_CG
- Sealed Surface Burners_W11427482
- Cookware_W11102912
- Home Canning_GFSR_CG
- Oven Use_W11122565
- Electronic Oven Controls_W11122599
- Keep Warm_W11122599
- Sabbath Mode_W11122599
- Racks and Bakeware Positions_W11122599
- Baking and Roasting_W11122568
- Broiling_W11122599
- Convection Cooking_W11122599
- EasyConvect Conversion_GFSR_CG
- Proofing Bread_GDOFSR_CG_W11241795
- Cook Time_W11122599
- Feature Guide_W11122599_FR
- Grates_W11122565_FR
- Griddle_W11085356_FR
- AquaLift Self-Cleaning Tech_GFSR_CG_FR
- Surface Temperatures_GFSR_CG_FR
- Sealed Surface Burners_W11427482_FR
- Cookware_W11102912_FR
- Home Canning_GFSR_CG_FR
- Oven Use_W11122565_FR
- Electronic Oven Controls_W11122599_FR
- Keep Warm_W11122599_FR
- Sabbath Mode_W11122599_FR
- Racks and Bakeware Positions_W11122599_FR
- Baking and Roasting_W11122568_FR
- Broiling_W11122599_FR
- Convection Cooking_W11122599_FR
- EasyConvect Conversion_GFSR_CG_FR
- Proofing Bread_GDOFSR_CG_W11241795_FR
- Cook Time_W11122599_FR

5
5. Replace the burner cap, making sure it is properly aligned with
the burner base. If burner caps are not properly positioned,
surface burners will not light. The burner cap should not rock
or wobble when properly aligned.
A. Incorrect
B. Correct
IMPORTANT: The bottom of the small and medium caps are
different. Do not put the wrong size burner cap on the burner
base.
NOTE: Each round burner base is marked with a letter
indicating the burner size.
Small cap (Auxiliary) Medium cap (Semi
Rapid)
Large cap (Ultra
Rapid)
6. Turn on the burner. If the burner does not light, check cap
alignment. If the burner still does not light, turn off the burner.
Do not service the burner yourself. Contact a trained repair
specialist.
Cookware
IMPORTANT: Do not leave empty cookware on a hot surface
cooking area, element or surface burner.
Ideal cookware should have a flat bottom, straight sides and a
well-fitting lid, and the material should be of medium-to-heavy
thickness.
Rough finishes may scratch the cooktop or grates/coils. Aluminum
and copper may be used as a core or base in cookware. However,
when used as a base they can leave permanent marks on the
surfaces.
Cookware material is a factor in how quickly and evenly heat is
transferred, which affects cooking results. A nonstick finish has
the same characteristics as its base material. For example,
aluminum cookware with a nonstick finish will take on the
properties of aluminum.
Cookware with nonstick surfaces should not be used under the
broiler.
Check for flatness by placing the straight edge of a ruler across
the bottom of the cookware. While you rotate the ruler, no space
or light should be visible between it and the cookware.
Use the following chart as a guide for cookware material
characteristics.
Cookware Characteristics
Aluminum
■ Heats quickly and evenly.
■ Suitable for all types of cooking.
■ Medium or heavy thickness is best for
most cooking tasks.
Cast iron
■ Heats slowly and evenly.
■ Good for browning and frying.
■ Maintains heat for slow cooking.
Ceramic or
Ceramic glass
■ Follow manufacturer’s instructions.
■ Heats slowly, but unevenly.
■ Ideal results on low to medium heat
settings.
Copper
■ Heats very quickly and evenly.
■ May leave copper residues, which may be
diminished if cleaned immediately after
cooking.
Earthenware/
Stoneware
■ Follow manufacturer’s instructions.
■ Use on low heat settings.
Porcelain
enamel-on-
steel or cast
iron
■ See stainless steel or cast iron.
Stainless steel
■ Heats quickly, but unevenly.
■ A core or base of aluminum or copper on
stainless steel provides even heating.
For best results, the cookware should be centered above the
burner with the bottom sitting level on the grate. The flame should
be adjusted so that it does not extend up the sides of the pan.