THANK YOU for purchasing this high-quality product. If you should experience a problem not covered in TROUBLESHOOTING, please visit our website at www.kitchenaid.com for additional information. If you still need assistance, call us at 1-800-422-1230. In Canada, visit our website at www.kitchenaid.ca or call us at 1-800-807-6777. You will need your model and serial number, located on the inside wall of the refrigerator compartment.
IMPORTANT WARNING: SAFETY INSTRUCTIONS To reduce the risk of fire, electric shock, or injury when using your refrigerator, follow these basic precautions: • Plug into a grounded • Use nonflammable 3 prong outlet. • Do not remove ground prong. • Do not use an adapter. • Do not use an extension cord. • Disconnect cleaner. • Keep flammable materials and vapors, such as gasoline, away from refrigerator. • Use two or more people to move and install refrigerator.
Electrical Explosion Hazard Keep flammable materials and vapors, such as gasoline, away from refrigerator. Plug into a grounded To ensure proper ventilation for your refrigerator, allow for a V2" (1.25 cm) of space on each side and at the top. Allow for a 1" (2.54 cm) space behind the refrigerator. If your refrigerator has an ice maker, allow extra space at the back for the water line connections. When installing your refrigerator next to a fixed wall, leave a 33/4'' (9.
5. Wa_rPmssum Using a cordless drill, drill a V4"hole in the cold water pipe you have selected. A cold water supply with water pressure of between 35 and 120 psi (241 and 827 kPa) is required to operate the water dispenser and ice maker. If you have questions about your water pressure, call a licensed, qualified plumber.
. Fasten theplastic waterlinetotherefrigerator witha"P" clamp. Slidetheplastic waterlineintotheretainer. CompletetheInstallation A / C Electrical Shock Hazard Plug into a grounded 3 prong outlet. Do not remove ground \ Do not use an adapter. Do not use an extension A. Brass nut B. Compression 6. prong. cord. Failure to follow these instructions fire, or electrical shock. C. "P" Clamp can result in death, sleeve Turn on water supply to refrigerator and check for leaks. Correct any leaks.
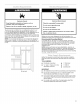
3. Starting withtheright-hand sidedoor,remove thepartsforthe tophingeasshowninTopHinge graphic. Lifttherefrigerator doorfromthebottomhingepin. 4. Remove thehingepincoverfromthebottomhingepinand keepitforlateruse.SeeBottom Hingegraphic. 5. Remove tophingecoverfromleftsiderefrigerator door. 6. Remove thefa£;ade fromthefrontofthetopofthecabinet. Remove thescrewonthebackside ofthecenter ofthe fa£_ade, thenslidethefa£;ade forward andoutfromunderthe hinge. 7.
Fa_:ade Top Hinges A. Screw A. Hinge Cover Screw B, Top Hinge Cover C, 5/18"Hex-Head Hinge Screws D. Top Hinge \\ \\ \\\\ Bottom Hinges \\ A B C \\ \\\ \\ \\\ A, Hinge Pin Cover B, Bottom Hinge C. Hinge Screws \\ \\ \ A. 3/32"or 1/8"Setscrew Wiring Plug Water Connection A A, 3/32" or 1/8"Setscrew iiiiiiiiiiiiiiiiiiiiiiiiiiiiiiiiiiiiiiiiiiiiiiiii I A.
REFRIGERATOR There are two refrigerator compartment doors. The doors can be opened and closed either separately or together. There is a vertically-hinged seal on the left refrigerator door. • When the left side door is opened, the hinged seal automatically folds inward so that it is out of the way. • When both doors are closed, the hinged seal automatically forms a seal between the two doors. USE Cooling On/Off To turn cooling off, press and hold the TEMP button on the dispenser panel for 3 seconds.
Freezer Controls Make sure FREEZER is selected. The up and down arrows on the display screen allow you to adjust the freezer compartment temperature. The set point range for the freezer is -5°F to 5°F (-21 °C to -15°C). • Press the down arrow to lower the set point. • Press the up arrow to raise the set point. Upload Photos to the Display 1. Remove the cover from the USB port. 2. With the Home Screen shown on the Display, press PHOTOS and insert the USB memory device.
Slideshow 1. From the Home screen, press PHOTOS. Photos previously uploaded will be displayed. 2. Press SLIDESHOW, and all uploaded photos will appear in the slideshow. NOTE: After 1 hour of slideshow running time, the display screen will automatically return to the Energy Save Mode (Sleep Mode). Touch the display screen to exit Energy Save Mode (Sleep Mode) and return to slideshow.
IM PO RTANT: 2. After connecting the refrigerator to a water source or replacing the water filter, flush the water system. Use a sturdy container to depress and hold the water dispenser lever for 5 seconds, then release it for 5 seconds. Repeat until water begins to flow. Once water begins to flow, continue depressing and releasing the dispenser lever (5 seconds on, 5 seconds off) until a total of 4 gal. (15 L) has been dispensed.
NOTE: The tray can be removed from the dispenser and carried to the sink to be emptied or cleaned. Pull the tray out until it hits the stop, then gently lift up on the back of the tray and slide it out the rest of the way. 3. Remove the glass OR release the button to stop dispensing. NOTE: Ice may continue to dispense for up to 10 seconds after removing the glass from the pad or releasing the button. The dispenser may continue to make noise for a few seconds after dispensing.
Removing and Replacing Ice Storage Bin To Remove the Ice Storage Bin: NOTE: It is not necessary to turn off the ice maker when removing the storage bin. 1. Pull the handle to unlock the ice storage bin. 2. Hold both sides of the ice storage bin, tilt the bin forward and lift slightly to remove. To Replace the Ice Storage Bin: IMPORTANT: The ice storage bin must be locked in place for proper ice dispensing. 1. 2. Replace the ice storage bin on the door.
IMPORTANT: This cleaner is for stainless steel parts only! Clean the Interior 1. Unplug refrigerator or disconnect power. 2. Using a clean sponge or soft cloth and a mild detergent in warm water, hand wash, rinse, and dry removable parts and interior surfaces thoroughly. Plug in refrigerator or reconnect power. 3. Do not allow the Stainless Steel Cleaner and Polish to come into contact with any plastic parts such as the trim pieces, dispenser covers or door gaskets.
The refrigerator seems noisy There is interior Refrigerator noise has been reduced over the years. Due to this reduction, you may hear intermittent noises from your new refrigerator that you did not notice from your old model. Below are listed some normal sounds with explanations. • Buzzing - heard when the water valve opens to fill the ice maker Pulsating - fans/compressor performance • Humid room? Contributes • Door(s) opened often or left open? Allows humid air to enter refrigerator.
• Off-taste, • odor or gray color in the ice Refrigerator connected to a cold water pipe? Make sure the refrigerator is connected to a cold water pipe. See "Water Supply Requirements." New plumbing connections? New plumbing connections can cause discolored or off-flavored ice. WATER FILTER CERTIFICATIONS Ice stored too long? Discard ice. Wash ice bin. Allow 24 hours for ice maker to make new ice. Odor transfer from food? Use airtight, moisture proof packaging to store food.
PRODUCT DATA SHEETS Interior Water Filtration System Model UKF8001AXX-750 Capacity 750 Gallons (2839 Liters) System tested and certified by NSF International against NSF/ANSI Standard 42 for the reduction of Chlorine Taste and Odor, Particulate Class I*; and against NSF/ANSI Standard 53 for the reduction of Lead, Mercury, Atrazine, Benzene, p-Dichlorobenzene, Carbofuran, Toxaphene, Cysts, Turbidity, Asbestos, Tetrachloroethylene and Lindane.
Interior Water Filtration System Model UKF8001AXX-200 Capacity 200 Gallons (757 Liters) Chlorine Taste and Odor, Particulate Class I*; and against NSF/ANSI Standard 53 for the reduction of Lead, Atrazine, Benzene, System Mercury, tested and certified by NSFp-Dichlorobenzene, International against Carbofuran, NSF/ANSI Toxaphene, Standard 42 Cysts, for the Turbidity, reduction of Asbestos, O-Dichlorobenzene, Ethylbenzene, Chlorobenzene, Endrin, Tetrachloroethylene and Lindane.
KITCHENAID ®REFRIGERATOR WARRANTY LIMITED WARRANTY For one year from the date of purchase, when this major appliance is operated and maintained according to instructions attached to or furnished with the product, KitchenAid brand of Whirlpool Corporation or Whirlpool Canada LP (hereafter "KitchenAid") will pay for factory specified parts and repair labor to correct defects in materials or workmanship that existed when this major appliance was purchased.
NousvousREMERCIONS d'avoiracheteceproduitdehautequalit&Sivousrencontrez unprobleme nonmentionne dansla sectionDI_PANNAGE, veuillez visiternotresiteWebwww.kitchenaid.com pourdesinformations supplementaires. Sivousavez toujours besoind'assistance, veuillez noustel6phoner au1-800-422-1230. AuCanada, visiteznotresiteWebwww.kitchenaid.ca outel6phonez-nous au1-800-807-6777. Vousaurezbesoindevosnum@os demodele etdes@iesituessurlaparoiinterne ducompartiment derefrig@ation.
Mise au rebut de votre vieux r frig rateur Avant de jeter votre vieux r_frig6rateur • Enlever les portes. • ou cong61ateur : Laisser les tablettes en place de sorte que les enfants ne puissent pas y pen6trer facilement. Risque de suffoquer Enlever les portes de votre vJeux r_frig_rateur. Le non-respect de cette instruction peut causer un d_c_s ou des I_sions c_r_brales. IMPORTANT : L'emprisonnement et I'etouffement des enfants ne sont pas un probleme du passe.
REMAROUE : II est recommande de ne pas installer le refrig6rateur pres d'un four, d'un radiateur ou de toute autre source de chaleur. Ne pas installer le refrigerateur dans un endroit oQ la temperature baissera au-dessous de 55°F (13°C). / I _. c_l ,.., i_5 >.4, bl?e(]li'l{RIlOl'IS ,I_:I ,3111 _,_ lll:R Ii11, II ,.+ c_'l Rassembler les outils et pieces necessaires avant de commencer I'installation. Lire et suivre les instructions fournies avec les outils indiques ici.
Lire toutes les instructions avant de commencer. IMPORTANT : Si on doit utiliser le refrig6rateur avant qu'il soit raccorde & la canalisation d'eau, placer la commande de la machine & glagons a la position OFF (arr_t). Raccordement _ une canalisation d'eau 1. 2. 3. Debrancher le refrig6rateur ou deconnecter la source de courant electrique. FERMER le robinet principal d'arrivee d'eau. OUVRIR le robinet de puisage le plus proche pendant une periode suffisante pour que la canalisation d'eau se vide.
Style 2 1. Enlever le capuchon de plastique de la valve d'entree d'eau. Connecter le tube en cuivre au robinet d'eau en utilisant un ecrou et une bague de compression tel qu'illustr& Serrer I'ecrou de compression. Ne pas serrer excessivement. Verifier que le tube en cuivre est fixe solidement en tirant sur le tube en cuivre. 2. Creer une boucle de service avec le tube de cuivre. 12viter les deformations en pliant le tube de cuivre.
R_installation des portes et des charni_res 1. Assembler les pieces des charnieres superieures. Voir I'illustration de la charniere superieure. Ne pas completement serrer les vis. 2= Replacer les pieces de la charniere inferieure. Voir I'illustration de la charniere inferieure. Serrer les vis. Replacer la porte du refrigerateur. REMARQUE • Prevoir un support additionnel des portes pendant la reinstallation des charnieres.
Charni_res sup_rieures Panneau de fagade c A. Vis A. Vis du cache B, Cache de/a de/a C. Vie de chamiere de 5/18" D. Chamiere charniere charniere superieure a t_te hexagonale superieure \\\ \\ Charni_res inf_rieures \',\\ \\ \\\\ \\ \\ A, Couvercle de raxe de la chamiere B, Charniere infefieure C. Vis de charniere \ \\ \\ A, Vis de reglage de 3/32"ou 1/8" Fiche de branchement Raccordement @ d'eau A A, Vis de reglage de 3/32" ou 1/8" iiiiiiiiiiiiiiiiiiiiiiiiiiiiiiiiiiiiiiiiiiiiiiiii A
UTILISATION p p DU REFRIGERATEUR Pour faire passer le texte de I'ecran d'affichage du frangais & I'anglais, appuyer sur le bouton HOME (accueil) du panneau de distribution. Sur I'ecran d'affichage, appuyer sur OPTIONS, puis PR¢:F¢:RENCES, et enfin LANGUE. Selectionner ANGLAIS, attendre 15 secondes ou appuyer sur RETOUR, et le texte de I'ecran sera modifi& II y a deux portes pour le compartiment de r6frigeration. Les portes peuvent 6tre ouvertes et fermees separ6ment ou ensemble.
Si I'on doit maintenir les portes ouvertes et que I'on souhaite que I'alarme reste muette pendant plus Iongtemps que 5 minutes, appuyer sur RESET (reinitialisation) sur I'ecran d'affichage. Ualarme reste desactiv6e jusqu'& ce que les deux portes soient fermees, puis se reactive Iorsque I'une des portes est de nouveau laissee ouverte pendant 5 minutes.
IMPORTANT : Le tel6chargement sera interrompu si I'une des situations suivantes se produit : • Si I'on appuie sur I'un des boutons FILL (remplissage), I'une des plaques du distributeur ou sur CANCEL (annulation). • Si I'alarme de porte entrouverte se declenche ou si une panne de courant survient durant le tel6chargement. • Si I'on retire le dispositif de memoire USB.
Preferences Permet de regler la langue de pref6rence. Voir "Utilisation des commandes". Permet de regler les pref6rences relatives aux gla£;ons, & I'eau et & la distribution. Voir "Distributeurs d'eau et de gla£;ons". que I'eau commence & couler, repeter I'operation (appui sur la plaque du distributeur pendant 5 secondes puis rel&chement pendant 5 secondes) jusqu'& ce que vous ayez distribue 4 gallons (15 L) au total.
REMARQUE • Le distributeur quitte automatiquement I'ecran Measured Fill (remplissage mesure) apres 15 secondes d'inactivit& 2. 3. 4. Le plateau peut etre legerement tire & I'exterieur pour un meilleur soutien des grands recipients. II est con£:u pour recuperer les legers renversements et permettre un nettoyage facile. II n'y a pas de conduit d'ecoulement dans le plateau. II est possible de p.uiser I'eau en once, en tasse ou en litre. Appuyer sur UNITES pour selectionner I'unite de mesure desiree.
A partir de I'ecran d'accueil, il est possible de voir I'historique de coupure de courant pour le refrig6rateur. Appuyer sur OPTIONS, puis sur COUPURE DE COURANT. )c@ Tenir le verre pres de I'ouverture du distributeur gla(_ons ne tombent pas & c6te du verre. pour que les IMPORTANT : II n'est pas necessaire d'exercer une pression importante sur la plaque ou le bouton pour activer le distributeur de gla(_ons.
ENTRETIEN DU REFRIGERATEUR Le temoin lumineux de I'etat du filtre & eau vous permettra de savoir quand changer votre filtre & eau. Lorsque I'ecran d'affichage de I'etat du filtre a eau passe de "NORMAL" & "COMMANDER", cela signifie qu'il est presque temps de changer la cartouche du filtre a eau. Remplacer la cartouche du filtre & eau Iorsque I'ecran d'affichage indique "REMPLACER". L'ic6ne "REMPLACER" (rouge) clignotera et un signal sonore retentira une fois apres la distribution de I'eau.
Nettoyage des surfaces ext_rieures Debrancher le refrig6rateur ou deconnecter la source de courant electrique. Laver les surfaces exterieures en acier inoxydable ou en metal peint avec une @onge propre ou un linge doux et un detergent doux dans de I'eau tiede. 1, 2. • Pour que votre refrigerateur en acier inoxydable conserve son aspect neuf et pour enlever les petites egratignures ou marques, il est suggere d'utiliser le nettoyant et poll pour acier inoxydable n° 4396920 approuve par le fabricant.
Sifflement/cliquetis - ecoulement de liquide refrig6rant, mouvement des conduites d'eau ou d'objets poses sur le dessus du refrig6rateur Gr_sillement/gargouillement - de I'eau tombe sur I'el6ment de chauffage durant le programme de degivrage Bruit d'_clatement - contraction/expansion des parois internes, particulierement Iors du refroidissement initial Bruit d'_coulement d'eau - peut _tre entendu Iorsque la glace fond Iors du programme de degivrage et que I'eau s'ecoule dans le plateau de degivrage , y a u
Go_t,odeuroucouleurgrisedesglagons • Les raccords de plomberie sont-ils neufs? Des raccords de plomberie neufs peuvent causer une decoloration ou un mauvais goQt des gla_ons. Les gla_ons ont-ils _t_ gard_s trop Iongtemps? Jeter les gla_ons. Laver le compartiment & gla_ons. Accorder 24 heures pour la fabrication de nouveaux gla_ons. L'eau coule du syst_me de distribution REMARQUE : II est normal de constater une ou deux gouttes d'eau apr_s la distribution d'eau.
p FEUILLES DE DONNEES Syst me ModUle @ SUR LE PRODUIT de filtration d'eau int rieur UKF8001AXX-750/Capacite : 750 gallons (2839 litres) Systeme teste et certifie par NSF International en vertu de la norme NSF/ANSI 42 (reduction du goQt et de I'odeur du chlore, et particules (classe I*)); et en vertu de la norme NSF/ANSI 53 (reduction de plomb, mercure, atrazine, benzene, p-dichlorobenzene, carbofuran, toxaphene, kystes, turbidite, amiante, tetrachloro6thylene, et lindane).
Syst me ModUle @ de filtration d'eau int rieur UKF8001AXX-200/Capacite : 200 gallons (757 litres) Systeme teste et certifie par NSF International en vertu de la norme NSF/ANSI 42 (reduction du goQt et de I'odeur du chlore, et particules (classe I*)); et en vertu de la norme NSF/ANSI 53 (reduction de plomb, mercure, atrazine, benzene, p-dichlorobenzene, carbofuran, toxaphene, kystes, turbidite, amiante, O-dichlorobenzene, ethylbenzene, chlorobenzene, endrine, tetrachloro6thylene, et lindane).
KITCHENAID ®REFRIGERATOR WARRANTY LIMITED WARRANTY For one year from the date of purchase, when this major appliance is operated and maintained according to instructions attached to or furnished with the product, KitchenAid brand of Whirlpool Corporation or Whirlpool Canada LP (hereafter "KitchenAid") will pay for factory specified parts and repair labor to correct defects in materials or workmanship that existed when this major appliance was purchased.
Pour des informations supplementaires Au Canada, visiter www.kitchenaid.ca. sur le produit, aux €:.-U., visiter www.kitchenaid.com. Si vous n'avez pas acces & Internet et que vous necessitez une assistance pendant I'utilisation du produit ou que vous souhaitez prendre un rendez-vous, vous pouvez contacter KitchenAid au numero ci-dessous. Ayez votre numero de modele a disposition. interne du compartiment de refrigeration.