
Specification

5
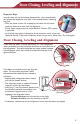
Door Closing, Leveling and Alignment
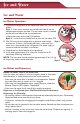
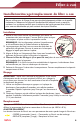
Dispenser Drips
Ice and water will continue to be dispensed for a few seconds after
you release the dispenser pad. Wait a few seconds before removing
the glass.
• Flush the water system. Air trapped in the water line will cause
water to continue to flow from the dispenser.
• Check water supply pressure; check Reverse Osmosis (RO) system
if applicable.
• Ice shavings may collect in dispenser chute and melt, which causes the
dispenser to drip. Clean the ice delivery chute using a warm, damp cloth. Dry thoroughly.
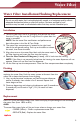
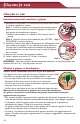
Door Closing, Leveling and Alignment
If you want the doors to close more easily, or if the refrigerator
seems unsteady, turn the brake feet clockwise to raise the front of
the refrigerator. Turn both brake feet the same amount to keep
the refrigerator level, then make sure the brake feet are firmly
against the floor.
If the doors are uneven at the top, align the
doors. To ensure best alignment, make
adjustments after food has been stored in
the doors.
• Keeping both refrigerator doors closed,
pull out the freezer drawer.
• The alignment screw is inside the bottom
hinge pin of the right-hand door.
• Insert the
1
⁄8" hex key wrench (packed with
the Handle Installation Instructions) into
the bottom hinge pin until it is fully
engaged in the alignment screw.
To raise the door, turn the hex key to the right.
To lower the door, turn the hex key to the left.
• If necessary, continue to turn the alignment screw until the doors are aligned.
A
B
¹⁄₄"
A
Brake foot
Bottom
hinge pin
1
⁄8" Hex key wrench
(provided)