KFP0718
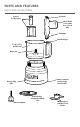
PARTS AND FEATURES PARTS AND ACCESSORIES 2-piece food pusher Lid latch Work bowl cover with 2-in-1 feed tube Lid hinge Handle hinge 7-cup (1.
ENGLISH FOOD PROCESSOR SAFETY IMPORTANT SAFEGUARDS When using electrical appliances, basic safety precautions should always be followed, including the following: 1. Read all instructions. 2. To protect against risk of electrical shock, do not put Food Processor in water or other liquid. 3. Close supervision is necessary when any appliance is used by or near children. 4. Unplug from the outlet when not in use, before putting on or taking off parts, and before cleaning. 5. Avoid contacting moving parts. 6.
FOOD PROCESSOR SAFETY 8. Do not use outdoors. 9. Do not let cord hang over edge of table or counter. 10. Keep hands and utensils away from moving blades or discs while processing food to reduce the risk of severe injury to persons or damage to the Food Processor. A scraper may be used, but must be used only when the Food Processor is not running. 11. Blades are sharp. Handle carefully. 12. To reduce the risk of injury, never place cutting blade or disc on base without first putting bowl properly in place.
ENGLISH USING THE FOOD PROCESSOR ACCESSORIES SELECTION GUIDE ACTION SETTING Chop Low or Pulse Mince or Purée High or Pulse Mix FOOD ACCESSORY Cheese Chocolate Fruits Fresh herbs Nuts Tofu Vegetables Multipurpose stainless steel blade + Low Pasta Sauce Pesto Salsa Sauces Batters Doughs Low Fruit (soft) Potatoes Tomatoes Vegetables (soft) High Cheese Chocolate Fruits (hard) Vegetables (hard) Low Potatoes Vegetables (soft) Reversible slicing/shredding disc (shredding side) High Cabbage C
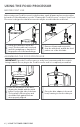
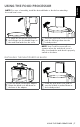
USING THE FOOD PROCESSOR BEFORE FIRST USE Before using your Food Processor for the first time, wash all parts and accessories either by hand or in the dishwasher (see the “Cleaning the Food Processor” section). Your Food Processor is designed so that all accessories may be stored inside the work bowl. 1 Lift up the lid latch to unlock the cover. Tilt the work bowl cover back and lift it straight up so that the lid hinge pulls out of the handle hinge.
NOTE: For ease of assembly, install the desired blade or disc before attaching the work bowl cover. 3 To attach the work bowl cover, hook the lid hinge into the handle hinge on the work bowl and close the cover. 4 Once the work bowl cover is closed, push the lid hinge down into the locked position. NOTE: Your Food Processor will not operate unless the work bowl cover is fully closed and the work bowl is properly seated on the base.
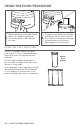
USING THE FOOD PROCESSOR INSTALLING THE REVERSIBLE SLICING/SHREDDING DISC Process Storage 1 To slice: Turn the disc so that the raised slicing blade is facing up. To shred: Turn the disc so that the small, raised shredding blades are facing up. The disc can be placed in two different positions: level with the top of the bowl for processing, and lower, inside of the bowl, for storage. NOTE: While the disc will operate in storage position, it will not perform as well.
OPERATING THE FOOD PROCESSOR Before operating the Food Processor, be sure the work bowl, blades/disc and work bowl cover are properly assembled on the base (see the “Assembling the Food Processor” section). Rotating Blade Hazard Always use food pusher. Keep fingers out of openings. Keep away from children. Failure to do so can result in amputation or cuts. 1 To turn on, press LOW or HIGH. The Food Processor will run continuously and the indicator light will glow.
USING THE FOOD PROCESSOR 3 When finished, press the OFF/PULSE button. The indicator light will go out and the blade or disc will slow to a stop. 4 Wait until the blade or disc comes to a complete stop before removing the work bowl cover. Be sure to turn off the Food Processor before removing the work bowl cover, or before unplugging the Food Processor. USING THE 2-IN-1 FEED TUBE The 2-in-1 feed tube features a 2-piece food pusher.
REMOVING PROCESSED FOODS 1 Turn the Food Processor off: Press the OFF/PULSE button and unplug the Food Processor before disassembling. 3 If using the disc, remove it before removing the bowl. Holding the disc by the center hub, lift it straight up. 5 Lift the work bowl off of the base to remove food from the bowl with a spatula. 2 Lift the lid latch to unlock the work bowl cover, then lift cover to remove. 4 Remove the drive adapter and multipurpose blade, if using.
TIPS FOR GREAT RESULTS USING THE MULTIPURPOSE BLADE To chop fresh fruits or vegetables: Peel, core, and/or remove seeds. For more consistent results, cut food in 1 to 1½-inch (2.5-3.75 cm) pieces. Process food to desired size, using Pulse or Low speed. Scrape sides of bowl, if necessary. To puree cooked fruits and vegetables (except potatoes): Add 1/4 cup (60 mL) liquid from recipe per cup (235 mL) of food. Process food, using short pulses, until finely chopped.
USING THE REVERSIBLE SLICING/SHREDDING DISC To slice or shred fruits and vegetables that are small, such as strawberries, mushrooms, and radishes: Position food vertically or horizontally in layers within the feed tube. Fill feed tube in order to keep food positioned properly. Process using even pressure with the food pusher, or use the small feed tube in the two-piece food pusher. Position food vertically in the tube and use the small food pusher to process food.
TIPS FOR GREAT RESULTS HELPFUL HINTS • To avoid damage to the blade or motor, do not process food that is so hard or firmly frozen that it cannot be pierced with the tip of a sharp knife. If a piece of hard food, such as a carrot, becomes wedged or stuck on the blade, stop the processor and remove the blade. Gently remove food from the blade. • Do not overfill work bowl. For thin mixtures, fill work bowl up to 1/2 to 2/3 full. For thicker mixtures, fill work bowl up to 3/4 full.
ENGLISH CARE AND CLEANING CLEANING THE FOOD PROCESSOR IMPORTANT: The BPA-free bowl requires special handling. If you choose to use a dishwasher instead of hand washing, please follow these guidelines. 2 Wipe the base and cord with a warm, damp cloth. Thoroughly dry with a soft cloth. Do not use abrasive cleaners or scouring pads. Do not immerse base in water or other liquid. 1 Press the OFF/PULSE button, then unplug the Food Processor before cleaning. 3 All parts are top rack dishwasher safe.
TROUBLESHOOTING If your Food Processor should malfunction or fail to operate, check the following: 1. Is the Food Processor plugged in? 2. Make sure that the bowl and lid are properly aligned and locked in place. 3. Have you pressed more than one button at the same time? 4. Unplug the Food Processor, then plug it back into the outlet. 5. Is the fuse in the circuit to the Food Processor in working order? If you have a circuit breaker box, be sure the circuit is closed. 6.
KITCHENAID ® FOOD PROCESSOR WARRANTY FOR THE 50 UNITED STATES, THE DISTRICT OF COLUMBIA, PUERTO RICO, AND CANADA This warranty extends to the purchaser and any succeeding owner for Food Processors operated in the 50 United States, the District of Columbia, Puerto Rico, and Canada. Length of Warranty: One Year Full Warranty from date of purchase. KitchenAid Will Pay for Your Choice of: Hassle-Free Replacement of your Food Processor.
WARRANTY AND SERVICE HASSLE-FREE REPLACEMENT WARRANTY – 50 UNITED STATES, DISTRICT OF COLUMBIA, AND PUERTO RICO We’re so confident the quality of our products meets the exacting standards of KitchenAid that, if your Food Processor should fail within the first year of ownership, KitchenAid will arrange to deliver an identical or comparable replacement to your door free of charge and arrange to have your original Food Processor returned to us.
PIÈCES ET CARACTÉRISTIQUES PIÈCES ET ACCESSOIRES Poussoir en 2 parties Couvercle du bol avec goulotte d'alimentation 2-en-1 Charnière du couvercle Charnière de la poignée Bol de 7 tasses (1,7 L) Axe d'entraînement Cordon d’alimentation et range-cordon (non illustré) Base robuste Tige d'entraînement Disque éminceur/ déchiqueteur réversible Lame polyvalente en acier inoxydable FRANÇAIS Loquet du couvercle
SÉCURITÉ DU ROBOT CULINAIRE CONSIGNES DE SÉCURITÉ IMPORTANTES Lors de l’utilisation d’appareils électriques, il faut toujours observer certaines précautions élémentaires de sécurité, y compris les suivantes : 1. Lire toutes les instructions. 2. Pour éviter tout risque de choc électrique, ne pas immerger le robot culinaire dans de l’eau ou tout autre liquide. 3. Une surveillance attentive s’impose lorsqu’un appareil ménager est utilisé par ou à proximité d’enfants. 4.
7. L’utilisation d’accessoires non recommandés ou non vendus par KitchenAid peut causer un incendie, un choc électrique ou des blessures. 8. Ne pas utiliser à l’extérieur. 9. Ne pas laisser le cordon pendre par dessus le bord d’une table ou d’un plan de travail. 10. Garder les mains et les ustensiles à l’écart des lames ou disques lors de la préparation des aliments pour éviter tout blessure corporelle grave ou dommage au robot culinaire.
UTILISATION DU ROBOT CULINAIRE GUIDE DE SÉLECTION DES ACCESSOIRES ACTION RÉGLAGE Hacher Basse ou impulsion Hacher ou réduire en purée Élevée ou impulsion Mélanger ACCESSOIRE Fromage Chocolat Fruits Herbes fraîches Noix Tofu Légumes Lame polyvalente en acier inoxydable Basse Sauce pour pâtes Pesto Salsa Sauces Pâtes à frire Pâtes Basse Fruits (mous) Pommes de terre Tomates Légumes (mous) Élevée Fromage Chocolat Fruits (durs) Légumes (dures) Basse Pommes de terre Légumes (mous) Élevée Chou
UTILISATION DU ROBOT CULINAIRE AVANT LA PREMIÈRE UTILISATION FRANÇAIS Avant d’utiliser le robot culinaire pour la première fois, laver tous les pièces et accessoires à la main ou au lave-vaisselle (voir la section “Nettoyage du robot culinaire”). Ce robot culinaire est conçu pour que tous les accessoires puissent être rangés à l’intérieur du bol. 1 Soulever le loquet du couvercle pour déverrouiller le couvercle.
UTILISATION DU ROBOT CULINAIRE REMARQUE : Pour faciliter l’assemblage, installer la lame ou le disque désiré avant de fixer le couvercle du bol. 3 Pour fixer le couvercle du bol, accrocher la charnière du couvercle dans la charnière de la poignée sur le bol, puis fermer le couvercle. 4 Une fois le couvercle du bol fermé, pousser la charnière du couvercle vers le bas dans la position verrouillée.
UTILISATION DU ROBOT CULINAIRE ASSEMBLAGE DU DISQUE ÉMINCEUR/DÉCHIQUETEUR RÉVERSIBLE Rangement 1 Pour trancher : Tourner le disque de sorte que la lame éminceur soit orientée vers le haut. Pour déchiqueter : Tourner le disque de sorte que la lame déchiqueteur soit orientée vers le haut. Le disque peut être placé dans deux positions différentes : au niveau avec le haut du bol pour la transformation des aliments et à l’intérieur du bol pour le ranger.
UTILISATION DU ROBOT CULINAIRE FONCTIONNEMENT DU ROBOT CULINAIRE Avant d’utiliser le robot culinaire, s’assurer que le bol du robot, la lame/le disque, et le couvercle du bol sont correctement assemblés sur la base (voir la section “Assemblage du robot culinaire”). 1 Pour mettre en marche, appuyer sur LOW (basse) ou HIGH (élevée). Le robot culinaire fonctionnera sans s’arrêter et l’indicateur lumineux s’allume.
FRANÇAIS UTILISATION DU ROBOT CULINAIRE 3 Après avoir terminé, appuyer sur le bouton OFF/PULSE (arrêt/impulsion). Le témoin lumineux s’éteindra et la lame ou le disque ralentira jusqu’à l’arrêt. 4 Attendre que le disque ou la lame soit complètement arrêté(e) avant d’ôter le couvercle du bol de préparation. Veiller à éteindre le robot culinaire avant de retirer le couvercle du bol de préparation ou de le débrancher.
UTILISATION DU ROBOT CULINAIRE RETRAIT DE LA PRÉPARATION OBTENUE 1 Éteindre robot culinaire : Appuyer sur le bouton OFF/PULSE (arrêt/ impulsion) et débrancher le robot culinaire avant de le démonter. 3 Si le disque est utilisé, l’ôter avant de retirer le bol. Tenir le disque par le moyeu central et le soulever tout droit vers le haut. 5 Soulever le bol de la base pour retirer les aliments du bol à l’aide d’une spatule.
CONSEILS D‘UTILISATION POUR DES RÉSULTATS IMPECCABLES Pour hacher les fruits et les légumes frais : Peler, évider et/ou épépiner les aliments. Pour des résultats plus consistants, couper les aliments en morceaux de 1 à 1 ½ po (2,5 à 3,75 cm). Réduire les aliments à la taille souhaitée en utilisant Pulse (impulsion) ou vitesse basse. Racler les parois du bol, au besoin.
CONSEILS D‘UTILISATION POUR DES RÉSULTATS IMPECCABLES Pour faire fondre le chocolat nécessaire à une recette : Dans le bol de préparation, ajouter le chocolat et le sucre compris dans la recette. Les hacher finement. Chauffer le liquide indiqué par la recette. Introduire le liquide chaud dans la goulotte d’alimentation alors que le robot est en marche. Mixer jusqu’à l’obtention d’un mélange homogène.
Pour trancher ou hacher les fruits et les légumes de petite taille, tels que les fraises, les champignons et les radis : Placer les aliments dans la goulotte d’alimentation, en rangées horizontales ou verticales. Remplir la goulotte d’alimentation de sorte que les aliments soient bien maintenus en place. Transformer les aliments en utilisant une pression uniforme à l’aide du poussoir, ou utiliser le petit tube d'alimentation dans le poussoir en deux parties.
CONSEILS D‘UTILISATION POUR DES RÉSULTATS IMPECCABLES • Les aliments plus fins comme les carottes ou le céleri peuvent parfois tomber en dehors de la goulotte d’alimentation et de ce fait entraîner un tranchage irrégulier. Pour minimiser ce risque, couper les aliments en plusieurs morceaux et les tasser dans la goulotte d’alimentation. La petite goulotte d’alimentation dans le poussoir à 2 pièces convient particulièrement à la préparation de petits ingrédients.
ENTRETIEN ET NETTOYAGE NETTOYAGE DU ROBOT CULINAIRE 2 Essuyer la base et le cordon avec un chiffon chaud et humide. Bien sécher avec un linge doux. Ne pas utiliser de nettoyants abrasifs ou de tampons à récurer. Ne pas immerger la base dans de l’eau ou tout autre liquide. FRANÇAIS IMPORTANT : Le bol sans BPA nécessite un soin particulier. Si vous choisissez d’utiliser un lave-vaisselle au lieu d’un nettoyage manuel, veuillez suivre les instructions suivantes.
DÉPANNAGE En cas de dysfonctionnement ou de non fonctionnement du robot culinaire, vérifier les points suivants : 1. Le robot culinaire est-il branché? 2. S’assurer que le bol et le couvercle sont correctement alignés et bien verrouillés. 3. L’utilisateur a-t-il appuyé sur plus d'un bouton en même temps? 4. Débrancher le robot culinaire et le rebrancher dans la prise. 5.
GARANTIE ET DÉPANNAGE La présente garantie couvre l’acheteur et les propriétaires suivants du robot culinaire lorsqu’il est utilisé dans les 50 États des États-Unis, le district fédéral de Columbia, à Porto Rico et au Canada. Durée de la garantie : Garantie complète d’un an à compter de la date d’achat. KitchenAid prendra en charge les éléments suivants à votre choix : KitchenAid prendra en charge les éléments suivants à votre choix : Remplacement sans difficulté du robot culinaire.
GARANTIE ET DÉPANNAGE GARANTIE DE REMPLACEMENT SANS DIFFICULTÉ – 50 ÉTATS DES ÉTATS-UNIS, DISTRICT FÉDÉRAL DE COLUMBIA ET PORTO RICO Nous sommes tellement certains que la qualité de nos produits satisfait aux normes exigeantes de KitchenAid que si le robot culinaire cesse de fonctionner au cours de la première année suivant son acquisition, KitchenAid livrera gratuitement à votre porte un appareil de remplacement identique ou comparable et prendra les dispositions nécessaires pour que le robot culinaire d’o
PIEZAS Y CARACTERÍSTICAS PIEZAS Y ACCESORIOS Empujador de alimentos de 2 partes Pestillo de la tapa Tapa para tazón de trabajo con tubo de alimentación 2 en 1 Bisagra de la tapa Bisagra del mango Tazón de trabajo de 7 tazas (1,7 L) Eje de accionamiento Cable de alimentación y almacenamiento del cable (no se muestra) Base resistente Adaptador de la transmisión Disco reversible para rallar y rebanar Cuchilla de acero inoxidable multiuso
SEGURIDAD DEL PROCESADOR DE ALIMENTOS SALVAGUARDIAS IMPORTANTES Al utilizar aparatos eléctricos, se deben seguir las precauciones básicas de seguridad, entre las que se incluyen las siguientes: 1. Lea todas las instrucciones. 2. Para protegerse contra el riesgo de choque eléctrico, no ponga el procesador de alimentos en agua ni en ningún otro líquido. 3. Se debe supervisar atentamente cuando cualquier electrodoméstico sea utilizado por niños o cerca de ellos. 4.
7. El uso de aditamentos no recomendados o no vendidos por KitchenAid puede provocar un incendio, choque eléctrico o lesiones. 8. No lo use al aire libre. 9. No deje que el cable cuelgue del borde de la mesa o del mostrador. 10. Mantenga las manos y los utensilios lejos de las cuchillas o los discos mientras estos se mueven al picar los alimentos; esto reducirá el riesgo de lesiones serias a personas o daños al procesador de alimentos.
USO DEL PROCESADOR DE ALIMENTOS GUÍA DE SELECCIÓN DE ACCESORIOS ACCIÓN AJUSTE Picar Bajo o pulso Triturar o hacer puré Alto o pulso Mezclar ACCESORIO Queso Chocolate Frutas Hierbas frescas Nueces Tofu Verduras Cuchilla de acero inoxidable multiuso Bajo Salsa para pasta Pesto Salsa Salsas Batidos Masas Bajo Fruta (suave) Papas Tomates Vegetales (suaves) Alto Queso Chocolate Frutas (duras) Verduras (duras) Bajo Papas Verduras (suaves) Alto Repollo Queso Chocolate Frutas (duras) Verduras (du
USO DEL PROCESADOR DE ALIMENTOS ANTES DEL PRIMER USO 1 Levante el pestillo de la tapa para desbloquear la cubierta. Incline la tapa del tazón de trabajo hacia atrás y levántela hacia arriba para que la bisagra de la tapa se salga de la bisagra del mango. ESPAÑOL Antes de usar el procesador de alimentos por primera vez, lave todas las piezas y los accesorios a mano o en la lavavajillas (vea la sección “Limpieza del procesador de alimentos”).
USO DEL PROCESADOR DE ALIMENTOS NOTA: Para un montaje simple, instale la cuchilla o el disco deseado antes de fijar la cubierta del tazón de trabajo. 3 Para fijar la cubierta del tazón de trabajo, enganche la bisagra de la tapa en la bisagra del mango del tazón de trabajo y cierre la cubierta. 4 Cuando se haya cerrado el tazón de trabajo, empuje la bisagra de la tapa hacia abajo a la posición de bloqueo.
USO DEL PROCESADOR DE ALIMENTOS INSTALACIÓN DEL DISCO REVERSIBLE PARA RALLAR Y REBANAR Procesamiento 1 Para rebanar: Gire el disco, de manera que la cuchilla para rebanar elevada esté mirando hacia arriba. Para rallar: Gire el disco, de manera que las cuchillas pequeñas, elevadas para rallar estén mirando hacia arriba. El disco se puede ubicar en dos posiciones diferentes: nivelado con la parte superior del tazón, para procesar alimentos, y más abajo dentro del tazón, para almacenarlo.
USO DEL PROCESADOR DE ALIMENTOS USO DEL PROCESADOR DE ALIMENTOS Antes de usar el procesador de alimentos, asegúrese de que el tazón de trabajo, la cuchilla/el disco, y la tapa del tazón de trabajo estén correctamente ensamblados sobre la base (consulte la sección “Montaje del procesador de alimentos”). 1 Para encender, presione LOW (bajo) o HIGH (alto). El procesador de alimentos funcionará continuamente y la luz indicadora se iluminará.
3 Cuando termine, presione el botón OFF/PULSE (apagado/pulso). La luz indicadora se apagará y la cuchilla o el disco reducirá la velocidad hasta detenerse. 4 Espere hasta que la cuchilla o el disco se detenga por completo antes de retirar la tapa del tazón de trabajo. Asegúrese de apagar el procesador de alimentos antes de retirar la tapa del tazón de trabajo o de desenchufarlo. CÓMO USAR EL TUBO DE ALIMENTACIÓN 2 EN 1 El tubo de alimentación 2 en 1 incluye un empujador de alimentos de 2 partes.
USO DEL PROCESADOR DE ALIMENTOS EXTRACCIÓN DE LOS ALIMENTOS PROCESADOS 1 Cómo apagar el procesador de alimentos: Presione el botón OFF/ PULSE (apagado/pulso) y desenchufe el procesador de alimentos antes de desmontarlo. 3 Si usó el disco, retírelo antes de retirar el tazón. Tome el disco por el eje central; levántelo en sentido recto hacia arriba. 5 Levante el tazón de trabajo de la base para retirar los alimentos del tazón con una espátula.
CONSEJOS PARA OBTENER RESULTADOS ÓPTIMOS USO DE LA CUCHILLA MULTIUSO pulsos cortos de 1 a 2 segundos cada vez. Para una textura más gruesa, procese tandas más pequeñas y pulse 1 o 2 veces de 1 o 2 segundos cada vez. Pulse más seguido para obtener una textura más fina. Para las mantequillas de frutos secos, procese continuamente hasta que estén lisas. Guarde en el refrigerador. NOTA: Procesar frutos secos y otros alimentos duros puede rayar el acabado de la superficie interior del tazón.
CONSEJOS PARA OBTENER RESULTADOS ÓPTIMOS CÓMO USAR EL DISCO REVERSIBLE PARA RALLAR Y REBANAR Para rebanar o rallar frutas o verduras largos y con un diámetro relativamente pequeño, como apio, zanahorias y bananas: Corte los alimentos de modo que encajen de manera vertical u horizontal, y agréguela de forma que quepan los alimentos. No debería haber tanto alimento que no se pueda mover libremente.
CONSEJOS PARA OBTENER RESULTADOS ÓPTIMOS • Para evitar daños a la cuchilla o al motor, no procese alimentos que se hayan congelado hasta estar tan duros o firmes que no se puedan pinchar con la punta de un cuchillo afilado. Si un trozo de un alimento duro, tal como una zanahoria, se aplasta o se atasca en la cuchilla, detenga el procesador y quite la cuchilla. Retire los alimentos de la cuchilla con cuidado. • No llene en exceso el tazón de trabajo.
CUIDADO Y LIMPIEZA LIMPIEZA DEL PROCESADOR DE ALIMENTOS IMPORTANTE: Este tazón sin BPA necesita un cuidado especial. Si prefiere lavarlos en lavavajillas en vez de lavarlos a mano, siga estas instrucciones. 2 Limpie el cuerpo del motor y el cable de alimentación con un paño tibio y húmedo. Seque completamente con un paño suave. No use limpiadores ni estropajos abrasivos. No sumerja la base en agua u otros líquidos.
Si el procesador de alimentos falla o no funciona, revise lo siguiente: El procesador de alimentos no ralla o rebana adecuadamente: 1. ¿Está enchufado el procesador de alimentos? 2. Cerciórese de que el tazón y la tapa estén debidamente alineados y trabados en su lugar. 3. ¿Presionó más de un botón al mismo tiempo? 4. Desenchufe el procesador de alimentos y después vuelva a enchufarlo en el tomacorriente. 5.
GARANTÍA Y SERVICIO GARANTÍA DEL PROCESADOR DE ALIMENTOS KITCHENAID ® PARA LOS 50 ESTADOS DE ESTADOS UNIDOS, EL DISTRITO DE COLUMBIA, PUERTO RICO Y CANADÁ Esta garantía se extiende al comprador y a cualquier propietario subsiguiente para el procesador de alimentos usadas en los cincuenta estados de Estados Unidos, el Distrito de Columbia, Puerto Rico y Canadá. Duración de la garantía: Un año de garantía completa a partir de la fecha de compra.
GARANTÍA Y SERVICIO GARANTÍA DE REEMPLAZO SIN DIFICULTADES – EN LOS CINCUENTA ESTADOS DE ESTADOS UNIDOS, EL DISTRITO DE COLUMBIA Y PUERTO RICO Si el procesador de alimentos fallara durante el primer año de compra, simplemente llame a nuestro Centro para la eXperiencia del cliente al 1-800-541-6390, de lunes a viernes. Tenga a mano el recibo de compra original cuando llame. Se requerirá el comprobante de compra para iniciar un proceso de reclamo.
DISCOVER MORE. DÉCOUVREZ PLUS. DESCUBRA MÁS. KITCHENAID.COM/QUICKSTART PRODUCT QUESTIONS OR RETURNS QUESTIONS SUR LE PRODUIT OU LES RETOURS PREGUNTAS SOBRE EL PRODUCTO O DEVOLUCIÓNES USA: 1.800.541.6390 | KitchenAid.com CANADA: 1.800.807.6777 | KitchenAid.ca MEXICO: KitchenAid.com.mx LATIN AMERICA: KitchenAid-Latam.com ®/™ ©2017 KitchenAid. All rights reserved. KITCHENAID and the design of the stand mixer are trademarks in the U.S. and elsewhere. Used under license in Canada. ®/™ ©2017 KitchenAid.