KFP1466 INSTRUCTIONS INSTRUCTIONS INSTRUCCIONES W10694199A_FINAL2.
CMD + SHIFT CLICK TO CHANGE COPY FC WELCOME TO THE WORLD OF KITCHENAID. We’re committed to helping you create a lifetime of delicious meals for family and friends. To help ensure the longevity and performance of your appliance, keep this guide handy. It will empower you with the best way to use and care for your product. Your satisfaction is our #1 goal. Remember to register your product online at www.kitchenaid.com or by mail using the attached Product Registration Card.
FOOD CMD +PROCESSOR SHIFT CLICKINSTRUCTIONS TO CHANGE COPY FOOD PROCESSOR SAFETY Important safeguards........................................................................................... 4 Electrical requirements....................................................................................... 5 English TABLE OF CONTENTS PARTS AND FEATURES Parts and accessories........................................................................................... 6 Accessories selection guide.............
CMD +PROCESSOR FOOD SHIFT CLICKSAFETY TO CHANGE COPY C F IMPORTANT SAFEGUARDS When using electrical appliances, basic safety precautions should always be followed, including the following: 1. Read all instructions. 2. To protect against risk of electrical shock, do not put Food Processor in water or other liquid. 3. Close supervision is necessary when any appliance is used by or near children. 4. Unplug from the outlet when not in use, before putting on or taking off parts, and before cleaning. 5.
10. Keep hands and utensils away from moving blades or discs while processing food to reduce the risk of severe injury to persons or damage to the Food Processor. A scraper may be used but must be used only when the Food Processor is not running. 11. Blades are sharp. Handle carefully. 12. To reduce the risk of injury, never place cutting blade or discs on base without first putting bowl properly in place. 13. Be certain cover is securely locked in place before operating appliance. 14.
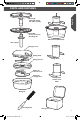
CMD +AND PARTS SHIFT FEATURES CLICK TO CHANGE COPY P Parts and accessories 2-in-1 food pusher Work bowl cover with 2-in-1 feed tube 14-cup (3.0 L) work bowl Externally adjustable slicing control Clean touch control pad Heavy-duty base 6 W10694199A_FINAL2.
PARTS AND FEATURES English Externally adjustable slicing disc (thin to thick) Reversible (2 mm and 4 mm) shredding disc Mini-bowl and Mini-blade Disc adapter Dicing kit cover Dicing blade Dicing kit base Dough blade Dicing kit clean out tool Dicing kit storage bowl Multipurpose stainless steel blade Dicing kit Cleaning brush Storage case 7 W10694199A_FINAL2.
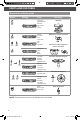
CMD +AND PARTS SHIFT FEATURES CLICK TO CHANGE COPY C A Accessories selection guide Action Setting Cheese Chocolate Fruit Fresh herbs Nuts Tofu Vegetables Chop Puree Dicing Kit Multipurpose stainless steel blade OR Mini-bowl and Mini multipurpose stainless steel blade Pasta Sauce Pesto Salsa Sauces Mix Fruit (soft) Potatoes Tomatoes Vegetables (soft) Slice thin Accessory Fruits (soft) Vegetables (soft) Tomatoes Eggs (boiled) Cheese Dice Mince Food Slice thick Knead Externally adjustable s
CMD + SHIFT THE ASSEMBLING CLICK FOOD TO CHANGE PROCESSOR COPY Before using your Food Processor for the first time, wash all parts and accessories either by hand or in the dishwasher (see “Cleaning the Food Processor” section). NOTE: Your Food Processor is shipped with the work bowl cover installed on the work bowl, with the mini-bowl inside the work bowl. English Before first use IMPORTANT: Place the Food Processor on a dry, level countertop with the controls facing forward.
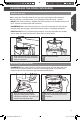
CMD + SHIFT THE ASSEMBLING CLICK FOOD TO CHANGE PROCESSOR COPY A Attaching the work bowl cover NOTE: Be sure to install the desired accessory before attaching the work bowl cover. 1 Place the work bowl cover on the work bowl with the feed tube just to the left of the work bowl handle. Grasp the feed tube and turn the cover to the right until it locks into place. 2 Fit the food pusher into the 2-in-1 feed tube. See “Using the 2-in-1 feed tube” for details on working with different sized foods.
ASSEMBLING THE FOOD PROCESSOR English Installing the adjustable slicing disc 1 Hold the slicing disc by the finger grips and lower it onto the drive adapter. 2 Install the work bowl cover, being sure it locks into place. TIP: You may need to turn the disc/adapter until it drops down into place. Adjusting the slicing thickness Thinner Thicker NOTE: The lever only works with the externally adjustable slicing disc.
CMD ASSEMBLING + SHIFT THE CLICK FOOD TO CHANGE PROCESSOR COPY 3 C A Install the work bowl cover, being sure it locks into place. Installing the multipurpose blade or dough blade IMPORTANT: The multipurpose blade and dough blade can only be used with the work bowl. 1 Place the blade on the power shaft. Rotate the blade so it falls into place on the power shaft. 2 Push to lock: Press down firmly on the blade until it is down as far as it will go.
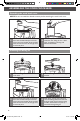
CMD ASSEMBLING + SHIFT THE CLICK FOOD TO CHANGE PROCESSOR COPY English Installing the mini-bowl and mini-blade 1 Place the mini-bowl inside the work bowl over the power shaft. Rotate the mini-bowl until the tabs on the top edge of the bowl drop into the indents on the top of the work bowl. 2 Insert the drive adapter into the miniblade, and place on the power shaft. It may be necessary to rotate the blade until it falls into place. Press down firmly to lock it into place.
CMD OPERATING + SHIFTTHE CLICK FOOD TO CHANGE PROCESSOR COPY OC Using the Food Processor Before operating the Food Processor, be sure the work bowl, blades, and work bowl cover are properly assembled on the Food Processor base (see “Assembling the Food Processor” section). Rotating Blade Hazard Always use food pusher. Keep fingers out of openings. Keep away from children. Failure to do so can result in amputation or cuts.
English OPERATING CMD + SHIFT THE CLICK FOOD TOPROCESSOR CHANGE COPY 3 Wait until the blade or disc comes to a complete stop before removing the work bowl cover. Be sure to turn off the Food Processor before removing the work bowl cover, or before unplugging the Food Processor. 4 The pulse control allows precise control of the duration and frequency of processing. It’s great for jobs which require a light touch.
CMD USING + SHIFT THE FOOD CLICKPROCESSOR TO CHANGE COPY TC Removing processed foods 1 Press the OFF Button and unplug the Food Processor before disassembling. 2 Turn the work bowl cover to the left and remove. 3 If using a disc, remove it before removing the bowl. Holding the disc by the 2 finger grips, lift it straight up, then remove the adapter. 4 If using the mini-bowl, grasp and remove the bowl using the finger grips located along the top edge of the bowl.
TIPS CMDFOR + SHIFT GREAT CLICK RESULTS TO CHANGE COPY To chop fresh fruits or vegetables: Peel, core, and/or remove seeds. Cut food in 1 to 11/2-inch (2.53.75 cm) pieces. Process food to desired size, using Low speed. Scrape sides of bowl, if necessary. To puree cooked fruits and vegetables (except potatoes): Add 1/4 cup (60 ml) liquid from recipe per cup (235 ml) of food. Process food, using short pulses, until finely chopped. Then process continuously until reaching desired texture.
CMD TIPS + FOR SHIFT GREAT CLICK RESULTS TO CHANGE COPY TC Using a slicing or shredding disc Rotating Blade Hazard Always use food pusher. Keep fingers out of openings. Keep away from children. Failure to do so can result in amputation or cuts. To slice or shred fruits or vegetables that are long and relatively small in diameter, such as celery, carrots, and bananas: Cut food to fit wide mouth feed tube vertically or horizontally, and pack feed tube securely to keep food positioned properly.
TIPS CMDFOR + SHIFT GREAT CLICK RESULTS TO CHANGE COPY • To avoid damage to the blade or motor, do not process food that is so hard or firmly frozen that it cannot be pierced with the tip of a sharp knife. If a piece of hard food, such as a carrot, becomes wedged or stuck on the blade, stop the processor and remove the blade. Gently remove food from the blade. • Do not overfill work bowl. For thin mixtures, fill work bowl up to 1/2 to 2/3 full. For thicker mixtures, fill work bowl up to 3/4 full.
CMD CARE+AND SHIFT CLEANING CLICK TO CHANGE COPY TC Cleaning the Food Processor IMPORTANT: These BPA-free bowls require special handling. If you choose to use a dishwasher instead of hand washing, please follow these guidelines. 2 Wipe the base and cord with a warm, sudsy cloth, and wipe clean with a damp cloth. Thoroughly dry with a soft cloth. Do not use abrasive cleaners or scouring pads. 1 Press the OFF Button, then unplug the Food Processor before cleaning.
TROUBLESHOOTING CMD + SHIFT CLICK TO CHANGE COPY Food Processor doesn’t run: • Make sure that the bowl and lid are properly aligned and locked in place and the large food pusher is inserted in the feed tube. • When using the large feed tube opening, make sure that food is not above the Max. Fill line on the feed tube. • Press only one button at a time. The Food Processor will not operate if more than one button is pressed at the same time.
CMD WARRANTY + SHIFTAND CLICK SERVICE TO CHANGE COPY W KitchenAid® Food Processor Warranty for the 50 United States, the District of Columbia, Puerto Rico, and Canada This warranty extends to the purchaser and any succeeding owner for Food Processor operated in the 50 United States, the District of Columbia, Puerto Rico, and Canada. Length of Warranty: One Year Full Warranty from date of purchase. KitchenAid Will Pay for Your Choice of: Hassle-Free Replacement of your Food Processor.
WARRANTY AND SERVICE We’re so confident the quality of our products meets the exacting standards of KitchenAid that, if your Food Processor should fail within the first year of ownership, KitchenAid will arrange to deliver an identical or comparable replacement to your door free of charge and arrange to have your original Food Processor returned to us. Your replacement unit will also be covered by our one year limited warranty. Please follow these instructions to receive this quality service.
CMD + SHIFT CLICK TO CHANGE COPY IN BIENVENUE DANS LE MONDE DE KITCHENAID. Nous nous engageons à vous aider à créer de délicieux repas pour votre famille et vos amis, et ce durant tout le cycle de vie de l’appareil. Pour contribuer à la durabilité et à une bonne performance de votre appareil, conserver ce guide à portée de main. Il vous permettra d’utiliser et d’entretenir votre produit de la meilleure manière qui soit. Votre satisfaction est notre objectif numéro 1.
INSTRUCTIONS D’UTILISATION DU ROBOT CULINAIRE TABLE DES MATIÈRES PIÈCES ET CARACTÉRISTIQUES Pièces et accessoires......................................................................................... 28 Guide de sélection des accessoires................................................................... 30 ASSEMBLAGE DU ROBOT CULINAIRE Avant la première utilisation.............................................................................. 31 Montage du bol de travail.................................
CMD SÉCURITÉ + SHIFT DUCLICK ROBOT TOCULINAIRE CHANGE COPY SÉ CONSIGNES DE SÉCURITÉ IMPORTANTES Lors de l’utilisation d’appareils électriques, il faut toujours observer certaines précautions élémentaires de sécurité, y compris les suivantes: 1. Lire toutes les instructions. 2. Pour éviter tout risque de choc électrique, ne pas immerger le robot culinaire dans de l’eau ou tout autre liquide. 3. Une surveillance attentive s’impose lorsqu’un appareil ménager est utilisé par ou à proximité d’enfants. 4.
8. Ne pas utiliser à l’extérieur. 9. Ne pas laisser le cordon pendre par dessus le bord d’une table ou d’un plan de travail. 10. Garder les mains et les ustensiles à l’écart des lames ou disques lors de la préparation des aliments pour éviter toute blessure corporelle grave ou tout dommage au robot culinaire.On peut utiliser un grattoir, mais il doit être employé uniquement lorsque le robot culinaire ne fonctionne pas. 11. Les lames sont aiguisées. Les manipuler avec précaution. 12.
CMD PIÈCES + SHIFT ET CARACTÉRISTIQUES CLICK TO CHANGE COPY Pièces et accessoires Poussoir à 2 pièces Couvercle du de travail avec goulotte d’alimentation 2-en-1 Bol de préparation de 3,0 L (14 tasses) Réglage à trancher externement réglable Socle robuste 28 W10694199A_FINAL2.
Externally adjustable slicing disc (thin to thick) Mini-bol et mini-lame Adaptateur pour râpe réversible Français Râpe réversible (2 mm et 4 mm) Couvercle de l’ensemble de tranchage en dés Lame de tranchage en dés Socle de l’ensemble de tranchage en dés Lame de pétrissage Outil de nettoyage de l’ensemble de tranchage en dés Bol de rangement de l’ensemble de tranchage en dés Lame polyvalente acier inoxydable Tranchage en dés Brosse de nettoyage W10694199A_FINAL2.
A CMD PIÈCES + SHIFT ET CARACTÉRISTIQUES CLICK TO CHANGE COPY Guide de sélection des accessoires Action Réglage Dice Hacher Émincer Rèduire en purèe Aliment Tranchage en des Fromage Chocolat Fruit Fines herbes Noix Tofu Legumes Lame polyvalente Fruit (mous) Pommes de terre Tomates Legumes (mous) Trancher épais Mini-bol et mini-lame polyvalente Râper fin Pétrir + Disque à trancher réglable Fromage Chocolat Fruit (hard) Legumes (hard) Pommes de terre Legumes (mous) Râper moyen OU Sauce bolo
ASSEMBLAGE DU ROBOT CULINAIRE Avant la première utilisation Avant d’utiliser le robot culinaire pour la première fois, laver les pièces et accessoires à la main ou au lave-vaisselle (consulter la section « Entretien et nettoyage »). REMARQUE : Le robot culinaire est livré avec le couvercle du bol de travail monté sur le bol de travail, et le mini-bol dans le bol de travail.
ASSEMBLAGE DU ROBOT CULINAIRE CMD + SHIFT CLICK TO CHANGE COPY A Montage du couvercle du bol de travail REMARQUE: Veiller à installer l’accessoire souhaité avant de monter le couvercle du bol de travail. 1 Placer le couvercle du bol de travail sur le bol de travail en positionnant la goulotte d’alimentation juste à gauche de la poignée du bol de travail. Saisir la goulotte d’alimentation et tourner le couvercle vers la droite jusqu’à ce qu’il se verrouille.
ASSEMBLAGE DU ROBOT CULINAIRE 1 Le bol de travail installé, tenir le disque à trancher par le bout des doigts et le placer sur la tige d’entraînement. 2 Installer le couvercle du bol de travail en s’assurant qu’il se verrouille. CONSEIL : Il faudra peut-être tourner le disque/la tige d’entraînement jusqu’à ce qu’il/elle s’emboîte.
A CMD ASSEMBLING ASSEMBLAGE + SHIFT CLICK THE DU ROBOT FOOD TO CHANGE PROCESSOR CULINAIRE COPY Assemblage de la râpe réversible Tige d’enraînement Prise pour le doigt 1 Tout en maintenant le disque à trancher par les prises pour les doigts, faire pivoter le bord côtelé de l’axe dans le sens horaire pour des tranches plus fines ou dans le sens antihoraire pour des tranches plus épaisses.
ASSEMBLAGE DU ROBOT CULINAIRE Installer le couvercle du bol de préparation en s’assurant qu’il se verrouille. Français 3 Montage du mini-bol et de la mini-lame 1 Placer le mini-bol dans le bol de préparation sur l’axe du socle. Faire tourner le mini-bol jusqu’à ce que les picots qui se trouvent sur le pourtour du bol s’enclenchent dans les fentes qui se trouvent sur le pourtour du bol de travail.. 2 Placer la mini-lame sur l’axe du socle.
CMD UTILISATION + SHIFT CLICK DU ROBOT TO CHANGE CULINAIRE COPY U Utilisation du robot culinaire Avant d’utiliser le robot culinaire, s’assurer que le bol de travail, les lames et le couvercle du bol de travail sont correctement assemblés sur le socle (voir « Assemblage du robot culinaire »). Danger avec la lame rotative Toujours utiliser un poussoir pour introduire les aliments. Ne pas approcher les doigts des ouvertures. Conserver hors de portée des enfants.
3 Attendre que le disque ou la lame soit complètement arrêté(e) avant d’ôter le couvercle du bol de préparation. Veiller à éteindre le robot culinaire avant de retirer le couvercle du bol de préparation ou de le débrancher. 4 Le bouton “Pulse” permet de contrôler avec précision la durée et la fréquence de la préparation. Il est idéal pour les tâches délicates.
CMD UTILISATION + SHIFT CLICK DU ROBOT TO CHANGE CULINAIRE COPY C Retrait des aliments transformés 1 Appuyer sur le bouton OFF (arrêt) et débrancher le robot culinaire avant de le démonter. 2 Faire tourner le couvercle du bol de travail vers la gauche et le retirer. 3 Si un disque est utilisé, l’ôter avantde retirer le bol. En le tenant par les deux prises pour les doigts, le soulever verticalement. Retirer l’adaptateur.
CONSEILS À SUIVRE POUR OBTENIR DE BONS RÉSULTATS Pour hacher les fruits et les légumes frais : Peler, évider et/ ou épépiner les aliments. Les couper en morceaux de 1 à 1½ po (2,5 à 3,75 cm). Réduire les aliments à la grosseur désirée un utilisant la vitesse LOW (lent). Racler les parois du bol, au besoin. Pour réduire en purée les fruits et les légumes cuits (à l’exception des pommes de terre) : Pour chaque tasse (235 ml) d’aliments, ajouter ¼ de tasse (60 ml) de liquide compris dans la recette.
CONSEILS À SUIVRE POUR OBTENIR DE BONS RÉSULTATS TIPS CMDFOR + SHIFT GREAT CLICK RESULTS TO CHANGE COPY Utilisation de le disque à trancher ou à râper Danger avec la lame rotative Toujours utiliser un poussoir pour introduire les aliments. Ne pas approcher les doigts des ouvertures. Conserver hors de portée des enfants. Le non-respect de ces instructions peut causer une amputation ou des coupures.
CONSEILS À SUIVRE POUR OBTENIR DE BONS RÉSULTATS Conseils pratiques • Des fines lamelles de carottes ou de céleri risquent parfois de retomber dans la goulotte d’alimentation et de ce fait entraîner un tranchage irrégulier. Pour minimiser ce risque, couper les aliments en plusieurs morceaux et les tasser dans la goulotte d’alimentation. La petite goulotte d’alimentation dans le poussoir à trois pièces convient idéalement à la préparation de petits ingrédients.
CONSEILS À SUIVRE POUR OBTENIR DE BONS RÉSULTATS • Pour minimiser le nettoyage du bol, organiser les étapes de préparation en commençant par mixer les ingrédients secs ou fermes avant les liquides. •P our supprimer facilement les ingrédients se trouvant sur la lame polyvalente, il suffit de vider le bol de travail, de remettre en place le couvercle, et de faire tourner le robot par impulsions pendant 1 à 2 secondes pour la nettoyer.
ENTRETIEN ET NETTOYAGE 4 Afin d’éviter d’endommager le système de verrouillage, entreposer toujours le bol de travail et son couvercle sans les verrouiller lorsqu’ils ne sont pas utilisés.. 5 Ranger les lames et les disques/râpes dans le coffret de rangement, dans un endroit hors de portée des jeunes enfants.
CMD GARANTIE + SHIFT TO CHANGE COPY GARANTIE ETCLICK DÉPANNAGE G Garantie et dépannage du food processor KitchenAid® pour les 50 États des États-Unis, le district fédéral de Columbia, Porto Rico et le Canada La présente garantie couvre l’acheteur et les propriétaires suivants du robot culinaire lorsqu’il est utilisé dans les 50 États des États-Unis, le district fédéral de Columbia, à Porto Rico et au Canada. Durée de la garantie : Garantie complète d’un an à compter de la date d’achat.
GARANTIE ET DÉPANNAGE Nous sommes tellement certains que la qualité de nos produits satisfait aux normes exigeantes de KitchenAid que si le robot culinaire cesse de fonctionner au cours de la première année suivant son acquisition, KitchenAid livrera gratuitement à votre porte un appareil de remplacement identique ou comparable et prendra les dispositions nécessaires pour que le robot culinaire d’origine nous soit retourné.
CMD + SHIFT CLICK TO CHANGE COPY IN BIENVENIDO AL MUNDO DE KITCHENAID. Estamos comprometidos a ayudarle a crear deliciosas comidas para su familia y amistades por toda la vida. Para ayudar a asegurar la larga duración y el desempeño de su aparato, mantenga esta guía a la mano. Ésta le proveerá información sobre la mejor manera de usar y cuidar su producto. Su satisfacción es nuestra meta número 1. Recuerde registrar su producto en línea en www.kitchenaid.
INSTRUCCIONES PARA EL PROCESADOR DE ALIMENTOS ÍNDICE SEGURIDAD DEL PROCESADOR DE ALIMENTOS Salvaguardias importantes................................................................................. 48 Requisitos eléctricos.......................................................................................... 49 PIEZAS Y CARACTERÍSTICAS Piezas y accesorios............................................................................................ 48 Guía de selección de accesorios........................
CMD SEGURIDAD + SHIFTDEL CLICK PROCESADOR TO CHANGEDE COPY ALIMENTOS SE SALVAGUARDIAS IMPORTANTES Al utilizar aparatos eléctricos, debe seguir las precauciones básicas de seguridad, entre las que se incluyen las siguientes: 1. Lea todas las instrucciones. 2. Para protegerse contra el riesgo de choque eléctrico, no ponga el procesado de alimentos en agua ni en ningún otro líquido. 3. Es necesario supervisar cuidadosamente a los niños cuando usen cualquier aparato o cuando éste se use cerca de ellos. 4.
SEGURIDAD DEL PROCESADOR DE ALIMENTOS GUARDE ESTAS INSTRUCCIONES Requisitos eléctricos Español 7. El uso de aditamentos no recomendados o no vendidos por KitchenAid puede provocar un incendio, choque eléctrico o lesiones. 8. No lo use al aire libre. 9. No deje que el cable cuelgue del borde de la mesa o del mostrador. 10.
CMD PIEZAS + SHIFT Y CARACTERÍSTICAS CLICK TO CHANGE COPY P Piezas y accesorios Empujador de alimentos de 2 partes Cubierta para tazón de trabajo con tubo de alimentación 2 en 1 Tazón de trabajo de 2,0 L (9 tazas) Control requlable exerno para rebanar Base de construcción robusta 50 W10694199A_FINAL2.
PIEZAS Y CARACTERÍSTICAS Disco regulable rebanador de fino a grueso Disco reversible para rallar (de 2 mm y 4 mm) Minitazón y minicuchilla Adaptador del disco rallador reversible Cuchilla para cortar en cubos Base del juego para cortar en cubos Paleta para masa Español Cubierta del juego para cortar en cubos Herramienta de limpieza del juego para cortar en cubos Tazón de guardado del juego para cortar en cubos Cuchilla de acero inoxidable multiuso Juego para cortar en cubos Cepillo de limpieza W1
CMD PIEZAS + SHIFT Y CARACTERÍSTICAS CLICK TO CHANGE COPY C Guía de selección de accesorios Acción Ajuste Fruta (suave) Vegetales (suaves) Tomates Huevos (hervidos) Queso Dice Picar Moler Alimento Hacer puré Queso Chocolate Fruta Hierbas frescas Frutos secos Tofu Vegetales Fruta (suave) Papas Tomates Vegetales (suaves) Rebanadas gruesas O Minitazón y minicuchilla multiuso de acero inoxidable Rallar o cortar en tiras finas Amasar + Disco regulable rebanador Queso Chocolate Fruta (dura) Veget
CÓMO ENSAMBLAR EL PROCESADOR DE ALIMENTOS Antes del primer uso Antes de usar el procesador de alimentos por primera vez, lave todas las piezas y los accesorios a mano o en la lavavajillas (vea la sección “Cuidado y limpieza”). NOTA: Su procesador de alimentos se envía con la tapa del tazón de trabajo ya instalada en éste, con el minitazón dentro del tazón de trabajo. IMPORTANTE: Coloque el procesador de alimentos en un mostrador seco y nivelado, con los controles mirando hacia delante.
CMD CÓMO + SHIFT ENSAMBLAR CLICK TO EL PROCESADOR CHANGE COPYDE ALIMENTOS Cómo sujetar la tapa del tazón de trabajo NOTA: Asegúrese de instalar el accesorio deseado antes de sujetar la tapa del tazón de trabajo. 1 Coloque la tapa del tazón de trabajo sobre el tazón de trabajo con el tubo de alimentación directamente a la izquierda de la manija del tazón de trabajo. Sujete el tubo de alimentación y gire la tapa hacia la derecha, hasta que quede asegurada en su lugar.
CÓMO ENSAMBLAR EL PROCESADOR DE ALIMENTOS Cómo instalar el disco regulable rebanador 1 Con el tazón de trabajo instalado, sujete el disco rebanador del área rebordeada y bájelo sobre el adaptador de la transmisión. 2 Instale la cubierta del tazón de trabajo y asegúrese que esté asegurada en su lugar. CONSEJO UTIL: El disco regulable rebanador se ajusta fácilmente y simplifica las tareas de rebanado.
CMD CÓMO + SHIFT ENSAMBLAR CLICK TO EL PROCESADOR CHANGE COPYDE ALIMENTOS 3 Instale la tapa del tazón de trabajo y asegúrese que esté asegurada en su lugar. Cómo instalar la cuchilla multiusos o la paleta para masa IMPORTANTE: La cuchilla multiuso y la paleta para masa se pueden usar únicamente con el tazón de trabajo. 1 Coloque la cuchilla/paleta en el eje eléctrico. Gire la cuchilla de modo que caiga en su lugar en el eje eléctrico.
CÓMO USAR EL PROCESADOR DE ALIMENTOS Cómo instalar el minitazón y la minicuchilla 1 Coloque el minitazón dentro del tazón de trabajo sobre el eje eléctrico. Gire el minitazón hasta que las lengüetas en el borde superior del tazón caigan en las hendiduras en la parte superior del tazón de trabajo. 2 Inserte el adaptador de la transmisión en la minicuchilla y colóquelos en el eje eléctrico. Puede que sea necesario girar la cuchilla hasta que caiga en su lugar.
CMD CÓMO + SHIFT USAR CLICK EL PROCESADOR TO CHANGE DECOPY ALIMENTOS C Cómo usar el procesador de alimentos Antes de usar el procesador de alimentos, asegúrese que el tazón de trabajo, las cuchillas y la tapa del tazón de trabajo estén ensamblados apropiadamente sobre la base del procesador de alimentos (consulte “Cómo ensamblar el procesador de alimentos”). Peligro con las Cuchillas Giratorias Siempre utilice el empujador de alimentos. Mantenga los dedos fuera de las aberturas.
CÓMO USAR EL PROCESADOR DE ALIMENTOS 3 Espere hasta que la cuchilla o el disco se detenga por completo antes de destapar la tapa del tazón de trabajo. Asegúrese de apagar el procesador de alimentos antes de destapar la tapa del tazón de trabajo o de desenchufar el procesador de alimentos. 4 El control de pulso permite un control preciso de la duración y la frecuencia del procesamiento. Es estupendo para los trabajos delicados.
CMD CÓMO + SHIFT USAR CLICK EL PROCESADOR TO CHANGE DE COPY ALIMENTOS C Cómo retirar los alimentos procesados 1 Presione el botón OFF (Apagado) y desenchufe el Procesador de alimentos antes de desensamblar. 2 Gire la tapa del tazón de trabajo hacia la izquierda y quítela. 3 Si usó un disco, retírelo antes de quitar el tazón. Quite el disco sujetándolo de las 2 áreas rebordeadas y levantándolo de modo recto hacia arriba. Quite el adaptador cuando use el disco para rallar.
CONSEJOS PARA ESTUPENDOS RESULTADOS Cómo usar la cuchilla multiuso Para picar frutos secos o hacer mantequilla de frutos secos: Procese hasta 710 ml (3 tazas) de frutos secos a la consistencia deseada, usando pulsos cortos de 1 a 2 segundos cada vez. Para una consistencia más gruesa, procese tantas más pequeñas, pulsando 1 o 2 veces de 1 a 2 segundos cada vez. Haga más pulsos para obtener una consistencia más fina. Para las mantequillas de frutos secos, procese continuamente hasta que esté suave.
CONSEJOS CMD + SHIFT PARA CLICK ESTUPENDOS TO CHANGE RESULTADOS COPY C Cómo usar el disco rebanador o rallador Peligro con las Cuchillas Giratorias Siempre utilice el empujador de alimentos. Mantenga los dedos fuera de las aberturas. Mantenga fuera del alcance de los niños. No seguir estas instrucciones puede ocasionar amputación o cortaduras.
CONSEJOS PARA ESTUPENDOS RESULTADOS Consejos útiles • Algunas veces los alimentos finos, tales como las zanahorias o el apio, se caen en el tubo de alimentación, lo que resulta en rebanadas desiguales. Para minimizar esto, corte los alimentos en varios trozos y llene el tubo de alimentación con alimento por completo. Para procesar artículos pequeños o finos, el tubo de alimentación pequeño que se encuentra en el empujador de tres partes resultará especialmente útil.
CONSEJOS PARA ESTUPENDOS RESULTADOS • Organice las tareas de procesamiento para minimizar la limpieza dele tazón. Procese los ingredientes secos o duros antes que los líquidos. • Para limpiar los ingredientes de la cuchilla multiuso con facilidad, simplemente vacíe el tazón de trabajo, vuelva a colocar la tapa y haga pulsos de 1 a 2 segundos para que al girar se limpie la cuchilla. • Después de quitar la tapa del tazón de trabajo, colóquela al revés sobre el mostrador.
CUIDADO Y LIMPIEZA 4 Para evitar daños en el sistema de bloqueo, siempre almacenar el recipiente de trabajo y la tapa del cuenco de trabajo en la posición de desbloqueo cuando no esté en uso. Envuelva el cable alrededor del cuenco de trabajo y asegure el enchufe sujetándolo a la cuerda. 5 Guarde las cuchillas y los discos en el estuche de guardado fuera del alcance de los niños.
CMD GARANTÍA + SHIFT Y CLICK SERVICIO TO CHANGE COPY G Garantía del procesador de alimentos KitchenAid® para los 50 estados de Estados Unidos, el distrito de Columbia, Puerto Rico y Canadá Esta garantía se extiende al comprador y a cualquier propietario subsiguiente para el procesador de alimentos usadas en los cincuenta estados de Estados Unidos, el Distrito de Columbia, Puerto Rico y Canadá. Duración de la garantía: Un año de garantía completa a partir de la fecha de compra.
GARANTÍA Y SERVICIO Garantía de reemplazo sin dificultades – En los cincuenta estados de Estados Unidos, el Distrito de Columbia y Puerto Rico Confiamos tanto en que la calidad de nuestros productos cumple con las exigentes normas de KitchenAid que, si el procesador de alimentos presentara alguna falla durante el primer año de compra, KitchenAid hará arreglos para entregar un reemplazo idéntico o comparable a su domicilio sin cargo y arreglará la devolución de su procesador de alimentos original a nosotros.
®/™ © 2014 KitchenAid. All rights reserved. Used under license in Canada. ®/™ © 2014 KitchenAid. Tous droits réservés. Utilisé sous licence au Canada. ®/™ © 2014 KitchenAid. Todos los derechos reservados. Usada en Canadá bajo licencia. W10694199A 05/14 W10694199A_FINAL2.