
Installation guide


Electronicignitionsystemsoperatewithin
widevoltagelimits,butpropergroundand
polarityarenecessary.Inadditionto
checkingthattheoutletprovides120=volt
powerandiscorrectlygrounded,the
outletmustbecheckedbyaqualified
electriciantoseeifit iswired with correct
polarity. A wiring diagram is provided in
the literature package.
Important: This range is equipped with
an electronic ignition system that will not
operate if plugged into an outlet that is
not properly polarized.
This appliance, when installed, must be
electrically grounded in accordance with
local codes or, in the absence of local
codes, with the current CSA standard
C22.1. Canadian Electrical Code Part 1.
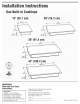
Now start,,,
With cooktop in kitchen.
Numbers
correspond to steps. 6.
Recommended ground method
For your personal safety, this cooktop
must be grounded. This cooktop is
equipped with a 3-prong ground plug. To
minimize possible shock hazard, the cord
must be plugged into a mating 3-prong
ground-type outlet, grounded in
accordance with the National Electrical
Code ANSI/NFPA 70 latest edition* or
Canadian Electrical Code (CSA)** -- and
local codes and ordinances. If a mating
outlet is not available, it is the personal
responsibility and obligation of the _
customer to have a properly polarized _- ->-_
and grounded, 3=prong outlet installed by
a qualified electrician.
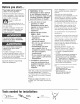
3=pr0ngpolarized __
gr0und=type outlet
m Remove pressure regulator,
3=pr0ng hardware package, burner grates and
groundplug caps from shipping package.
puv_er
supply cerd
E Remove foam shipping blocks and
tape from cooktop. Untape power supply
cord.
Copies of the standards listed above may be
obtained from:
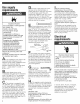
Lift entire cooktop up from cutout when
repositioning cooktop in countertop
opening to prevent scratching countertop.
*National Fire Protection Association
One Batterymarch Park
Quincy, Massachusetts 02269
** CSA International
8501 East Pmeasant Valley Rd.
C_eveJand, OH 44131-8575
3E Insert cooktop into countertop
opening. Center the cooktop in the cutout.
Check that front edge of cooktop is
parallel to front edge of countertop. Check
that all required clearances are met. Use
a pencil to outline the rear of the cooktop
on the countertop. Remove the cooktop
from the cutout and place upside down
on a protected surface.
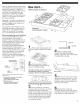
strip
4E Glass Cooktops Only:
Remove foam strip from literature
package. Apply foam strip around bottom
of cooktop flush with edge.
front of ¢ooktop
5m Remove two screws from left and
right bottom edges of burner box. Place
brackets on top of burner box. Position
brackets as shown and hand=tighten one
screw into each bracket.
m Reinsert the cooktop into
countertop opening. Check that cooktop
is parallel to front edge of countertop. Lift
entire cooktop to make adjustments.