
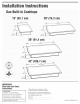
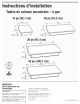
Installation guide


If installing after the cooktop
is phced into cutout:
Hace the cooktop upside down on a
protective surface (bianket, pad),
burner box
foam
strip
Giass cooktops oniy:
Remove foam strip from iiterature
package. Appiy foam strip around bottom
of cooktop flush with edge.Turn cooktop
right side up.
o Carefully phce cooktop into cutout.
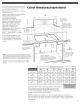
IMPORTANT: Check that the front edge of
the cooktop is paraHei to the front edge
of the countertop.
Lift entire cooktop up from cutout when
repositioning cooktop to prevent
scratching the countertop.
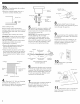
o Remove the attachment screw, s from
seiected bracket bcations on the
bottom of the burner box.
Attach brackets as shown so that they
are beyond edge of burner box and the
champ screws (see Step 4) will contact
the countertop bottom.Tighten screws
secureiy.
aoces_
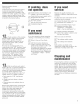
m Instal[ the pressure regulator with
the arrow on the reguiator pointing up
toward unit and in a position where you
can reach the access cap.
IMPORTANT: All connections must be
vvrench4ightened. Do not make
connections to the gas regulator too
tight. Making the connection too tight
may crack the regulator and cause a gas
leak. Do not allow the regulator to turn
on the pipe when tightening fittings.
adapter flexible metal 3/8"
shutoff valve
"open" position
to cooktop
\
gas supply
line
m Open shutoff valve in the gas
supply line, Wait a few minutes for gas to
move through the gas line,
9m Leak testing of the appliance shall
be conducted according to the following
instructions:
Test ail connections by brushing on an
approved non-corrosive leak-detection
solution, Bubbles wiii show a leak,
Correct any leak found,
burner
2-1/2" (6.4 cm)
box clamping
screw
bracket
attachment screw
4E Place the 2q/2" (6.4 cm) clamping
screws into the brackets. Use a
screwdriver to tighten the screws against
the countertop. Do not overtighten.
valve compound regulator
All connections must be
wrench4ightened.
6m Assemble flexible metal connector
from the gas supply pipe to the pressure
regulator, You will need to determine the
fittings required, depending on the size
of your gas supply line, flexible metal
connector and shutoff valve,
7m Use pipeojoint compound made for
use with NATURAL and L,R gas, if
flexible metal connector is used, be
certain tubing is not kinked,
E Hug into a grounded
3@rong outlet.
burner cap
ignitor __ burner
electrode "base
m Put burner caps on each burner
base. Place burner grates over burner
bases and caps.