Kitchen_kid _ GAS RANGE For questions about features, operation/performance, In Canada, call for assistance 1-800-461-5681, parts accessories or service, call: 1-800-422-1230 for installation and service, call: 1-800-807-6777 www.kitchenaid.com or visit our website at... or www.KitchenAid.ca Table of Contents ............................................................................................................
TABLE OF CONTENTS RANG E SAFETY ............................................................................. PARTS AND FEATURES ................................................................ COOKTOP USE .............................................................................. Cooktop Controls ......................................................................... Sealed Surface Burners ............................................................... Flame Height ....................................
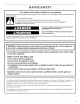
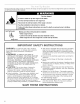
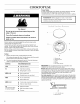
RANGE SAFETY Your safety and the safety of others are very important. We have provided many important safety messages in this manual and on your appliance. Always read and obey all safety messages. This symbol alerts you to potential hazards that can kill or hurt you and others. All follow the safety alert symbol and either the word "DANGER" or Thissafety is themessages safety alertwillsymbol. "WARNING.
Therangewillnottipduringnormal use.However, therangecantipifyouapplytoomuchforceorweighttotheopendoorwithout the anti-tip bracket fastened downproperly. Tip Over Hazard A child or adult can tip the range and be killed. Connect anti-tip bracket to rear range foot. Reconnect the anti-tip bracket, if the range is moved. See the installation instructions for details. Failure to follow these instructions can result in death or serious burns to children and adults.
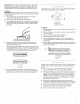
PARTS AND FEATURES This manual appearances covers several different of the features shown models. The range you have purchased may have some here may not match those of your model. or all of the items listed. The locations and Control Panel if_J_ FIONr [] [] OFF OFF @ FlOaf OFF OFF %'r< _-..;,,. o i i 1 2 1. Left Rear Control Knob 2. Left Front Control Knob 3 3. Electronic 4 Oven Control 5 4. Right Front Control Knob 5. Right Rear Control Knob Range 8 9 10 I1 12 1.
COOKTOP USE Power failure In case of prolonged power failure, the surface burners can be lit manually. Hold a lit match near a burner and turn knob counterclockwise to LITE. After burner lights, turn knob to setting. REMEMBER: When range is in use or (on some models) during the Self=Cleaning cycle, the entire cooktop area may become hot, Fire Hazard Do not let the burner flame extend beyond the edge of the pan. Turn off all controls when not cooking.
Burner ports: Check burner flames occasionally for proper size and shape as shown above. A good flame is blue in color, not yellow. Keep this area free of soil and do not allow spills, food, cleaning agents or any other material to enter the burner ports. To Clean: Depending on your model, the LO or LOW setting flame height of each of the surface burners can be adjusted. IMPORTANT: Before cleaning, make sure all controls are off and the oven and cooktop are cool.
Usecookware aboutthesamesizeasthesurface cooking area.Cookware should notextend morethan1in.(2.5cm) outside thearea. f / *_ ........... Use the following chart as a guide for cookware material characteristics. 2 COOKWARE CHARACTERISTICS Aluminum • Heats quickly and evenly. • Suitable for all types of cooking. • Medium or heavy thickness is best for most cooking tasks. • Heats slowly and evenly. • Good for browning and frying. • Maintains heat for slow cooking.
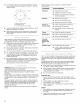
ELECTRONIC 1 1. 2. 3. 4. 5. 6. 2 Oven Display Symbol Heat Settings Oven Display Start/Stop Time Number Pads Control Lock 1 OVEN CONTROLS 2 7. Time of Day/Timer Display (on some models) 8. Start 9. Oven Settings 10. EASYCONVECT TM Conversion (on some models) 11. Timed Cooking 3 4 5 12. Convect Full Meal (Surface Light on some models) 13. Surface Light (on some models) 14. Oven Light 15. Clock 16. Minute Timer ! 7. Cancel Off 6 7 [D C]C] 8 1. 2. 3. 4. 5.
When pressing any control pad function on the Electronic Oven Control, use the pad of your finger to press the desired function. Hold down the pad a few seconds, or until the desired function appears on the display. When entering multiple functions within one setting, pause briefly between each control pad command. If a command pad is pressed several times repeatedly, the pad may briefly stop working. Wait a few seconds, and the pad should function again as normal.
OVEN USE The Control Lock shuts down the control panel pads to prevent unintended use of the oven. The Control Lock is preset off; however, it can be enabled. When the control is locked, only the TIMER SET/START and TIMER CANCEL pads will function. The Control Lock is preset unlocked, but can be locked. Before locking, make sure the oven, the Timer and Timed Cooking are off. Odors and smoke are normal when the oven is used the first few times, or when it is heavily soiled.
BAKEWARE To cook food evenly, hot air must be able to circulate. Allow 2 in. (5 cm) of space around bakeware and oven walls. Use the following chart as a guide. NUMBER OF PAN(S) POSITION ON RACK 1 Center of rack. 2 Side by side or slightly staggered. 3 or 4 Opposite corners on each rack. Make sure that no bakeware piece is directly over another. The bakeware material affects cooking results. Follow manufacturer's recommendations and use the bakeware size recommended in the recipe.
To Bake or Roast: Before baking and roasting, position racks according to the "Positioning Racks and Bakeware" section. When roasting, it is not necessary to wait for the oven to preheat before putting food in, unless recommended in the recipe. 1. Press BAKE. Press the number pads to enter a temperature other than 350°F (177°C). The bake range can be set between 170°F and 500°F (77°C and 260°C).
To Broil: 1. Close oven door. 2. Press BROIL. On some models, press once for Broil MAXI and twice for Broil ECONO. 3. 4. On some models, press once for Broil MAXl and twice for Broil ECONO. 4. Press the number pads to set a temperature between 170°F and 325°F (77°C and 163°C). On some models, press the TEMPERATURE "up" or "down" arrow pads (buttons) to set a temperature between 300°F and 525°F (150°C and 275°C). Press START. The temperature can be changed after this step.
To Convection (iiiii i::iJJ ¸ iii:ii o iii: (iiiioo ii iii :!!ii!i i;il In a convection oven, the fan-circulated hot air continually distributes heat more evenly than the natural movement of air in a standard thermal oven. This movement of hot air maintains a consistent temperature throughout the oven, cooking foods more evenly, crisping surfaces while sealing in moisture and yielding crustier breads. Press the number pads to enter a temperature other than 325°F (163°C).
To Convection Roast: Before convection roasting, position racks according to the "Positioning Racks and Bakeware" section. It is not necessary to wait for the oven to preheat before putting food in, unless recommended in the recipe. Use the roasting rack on top of the broiler pan and grid. This holds the food above the grid and allows air to circulate completely around all surfaces. Food/Rack Position Oven Temp. Internal Food Temp.
Convect Full Meal lets you choose from 11 preset cooking cycles. A single pad includes an oven setting, an oven temperature, and a cook time or probe temperature. One pad is changeable to allow you to set your own cycle and save it for future use. Use the following chart as a guide. • All food should be at refrigerator or room temperature before placing in the oven. These settings and times are not for frozen foods. 1 2 • !. Broil heat 2.
To Use: To Use: Before using Convect Full Meal, place food in oven. If temperature probe is required, insert probe into food and plug probe into jack. See "Temperature Probe" section for diagram. 1. Press CONVECT FULL MEAL. Before using convection temperature conversion for BAKED GOODS and OTHER FOODS, allow the oven to preheat before placing food in the oven. 1. Press BAKED GOODS, MEATS or OTHER FOODS. 2. Press number pads to enter standard cook temperature. 3.
To Set Range for Sabbath Mode: To set range to meet "no work" requirements for the Sabbath, first activate the Sabbath mode using the steps above, then follow the steps below, 1. Turn oven light and/or surface light (if available) on or off. These lights will stay on or off (whichever is set) while in the Sabbath mode. Opening the door will not turn on the oven light if it is programmed to be off. 2. 3. Open the oven door. Press BAKE, 4. Press 350°F 500°F Press 5. 6. 7. 8.
1. 2. Proofing bread prepares the dough for baking by activating the yeast. Follow the recipe directions as a guide. 3. To Proof: Before first proofing, place the dough in a lightly greased bowl and cover loosely with wax paper, coated with shortening. Place on rack guide two, then place broiler pan on guide one. See "Positioning Racks and Bakeware" for diagram. Put 2 cups (500 mL) of boiling water in the broiler pan. Close the door. 1. Press and hold BAKED GOODS for 5 seconds.
6. Press START. The start time is automatically calculated and displayed. "DELAY" and the stop time will also appear on the oven display. When the start time is reached, the oven will automatically turn on. On some models, the vertical bar countdown and minute time countdown will appear on the oven display. Food Poisoning Hazard Do not let food sit in oven more than one hour On some models, the set temperature and minute time countdown will appear on the oven display. before or after cooking.
Prepare Oven: • Remove the broiler pan, grid, cookware and bakeware and, on some models, the temperature probe from the oven. • Remove any foil from the oven because it may burn or melt, damaging the oven. • Remove oven racks to keep them shiny and easy to slide. See "General Cleaning" section for more information. • Hand clean inside door edge and the 11/2in. (3.8 cm) area around the inside oven cavity frame, being careful not to move or bend the gasket.
SURFACE BURNERS IMPORTANT: Before cleaning, make sure all controls are off and the oven and cooktop are cool. Always follow label instructions on cleaning products. Soap, water and a soft cloth or sponge are suggested first unless otherwise noted. EXTERIOR PORCELAIN ENAMEL SURFACES (on some models) Food spills containing acids, such as vinegar and tomato, should be cleaned as soon as the entire appliance is cool. These spills may affect the finish.
CONTROL PANEL Do not use steel wool or abrasive cleansers. Do not spray cleaner directly on panel. • Sponge and warm, soapy water. The oven light(s) is a 40-watt appliance bulb. The light(s) will come on when the oven door is opened. The light(s) will not work during the Self-Cleaning cycle. When the oven door is closed, press OVEN LIGHT to turn the light(s) on or off. Paper towel and mild liquid soap.
To Replace: 1. Hold oven door by the handle and place the top of the door under the cooktop overhang. 2. Use front of leg to apply pressure to slide hinges into the slots as far as possible, 3. Use side of leg to apply pressure to the bottom of the door front. 4. TROUBLESHOOTING Try the solutions suggested here first in order to avoid the cost of an unnecessary service call. Nothing will operate • 5. Lift door slightly. Apply pressure and push until the hinges have gone in fully. Fully open the door.
Cooktop cooking results not what expected Self-Cleaning cycle will not operate • Is the proper cookware being used? See "Cookware" section. • Is the oven door open? Close the oven door all the way. • Is the control knob set to the proper heat level? See "Cooktop Controls" section. • Has the function been entered? See "Self-Cleaning Cycle" section. • Is the appliance level? Level the appliance. See the Installation Instructions.
ASSISTANCE Before calling for assistance or service, please check "Troubleshooting." It may save you the cost of a service call. If you still need help, follow the instructions below. When calling, please know the purchase date and the complete model and serial number of your appliance. This information will help us to better respond to your request. If you need replacement parts If you need to order replacement parts, we recommend that you only use factory specified parts.
KITCHENAID ®COOKTOP, BUILT-IN OVEN AND RANGE WARRANTY ONE-YEAR FULL WARRANTY For one year from the date of purchase, when this appliance is operated and maintained according to instructions attached to or furnished with the product, KitchenAid will pay for factory specified parts and repair labor costs to correct defects in materials or workmanship. Service must be provided by a KitchenAid designated service company.