
Instruction for Use


The electrical connections must comply with current
legislation and be carried out by a qualified, competent
person.
• Information on the voltage and power absorbed are shown
on the serial no. plate.
• The appliance must be earthed.
• When installing the appliance, we recommend that this hob
is protected by a 3mm bi-polar switch.
• If damaged, the power cable must be replaced with an
identical type of powercable ( H05V2V2-FT90ºC, or
H05RR-F type). We recommend that this operation be
conducted by our After Sales Service. Please contact our
Customer Care Centre on 00800-3810-4026.
• Do not use extension cables.
• The manufacturer declines all responsibility for damage to
persons, pets or goods as a result of failure to comply with
the regulations above.
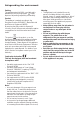
Electrical connection
L
Earth
(yellow/green)
N
Important: The following procedure shall be carried out by
competent technical personnel only. The hob can be installed
on different types of materials, such as masonry, metal, bare
wood and heat resistant laminate coated wood (90°C).
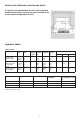
Cut an opening in the worktop to the dimensions shown in the
diagram.
Carefully place the seal on the external outline of the worktop, as
shown in the figure below. Apply a light hand pressure to ensure a
good adhesion to the surface.
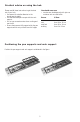
Fix the hob using the fixing brackets provided.
The appliance is supplied with two types of brackets:
- no. 8 standard length brackets (Service code 4812 404 49874) for
installation on kitchen tops with thickness over 40 mm
- no. 8 long brackets (Service code 4812 404 49875) for installation
on kitchen tops with thickness below 40 mm.
The brackets must be fixed using the appropriate screws both at the
front (no. 4) and at the back (no. 4) using the seats at the bottom of
the hob.
Note: the electrical power cable must be long enough to allow the
hob to be lifted out from above.
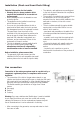
Fixing the Hob to the supporting structure.
Traditionally fitted model (Semi Flush fitting)
10
Fig. 1
Fig. 2
Fig. 3