NO NO Bruksanvisning
Beskrivelse av apparatet og symbolene 4 Bruk av brennerne 4 Praktiske råd for bruk av platetoppen 5 Plassering av kasserollerist og wokstativ 5 Avstand mellom platetopp og ventilator/overskap (mm) 6 Tabell over dyser 6 Advarsler og råd 7 Miljøinformasjon 8 Samsvarserklæring (CE) 8 Installasjon (flush-montering og semiflush-montering) 9 Gasstilkobling 9 Elektrisk tilkobling 10 Festing av platetoppen til rammen (tradisjonell montering og semiflush-montering) 10 Festing av platetoppen
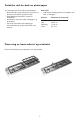
Beskrivelse av apparatet og symbolene 1. 2. 3. 4. 5. 6. 7. 8. 9. Avtakbare kasserollestativ Ekstrabrenner Halvhurtig brenner Halvhurtig brenner Profesjonell wokbrenner Reguleringsbryter for ekstrabrenner Reguleringsbryter for halvhurtig brenner Reguleringsbryter for halvhurtig brenner Reguleringsbryter for profesjonell wokbrenner Kontrollsymboler Av Maks. Flamme Min. flamme Bruk av brennerne Slå på en brenner: 1. Drei tilsvarende reguleringsbryter mot klokken til indikatoren er ved symbolet for maks.
Praktiske råd for bruk av platetoppen Les instruksjonene for best bruk av platetoppen. • Bruk kasseroller med en diameter som passer til brenneren (se tabellen på denne siden). • Bruk flatbunnete kasseroller, unntatt til wokstativet. • Ikke bruk for mye vann under matlagingen, og bruk lokket. • Pass på at kasserollene står skikkelig på kasserollestativene og ikke stikker frem over kantene. Bruk aldri: • to brennere samtidig med kun én beholder som f.eks. en fiskegryte.
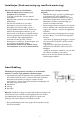
Avstand mellom platetopp og ventilator/overskap (mm) Hvis en ventilator skal installeres over platetoppen, se ventilatorens installasjonsanvisning for å garantere riktig høyde over platetoppen. Tabell over dyser Klasse II2H3B/P Gass som brukes Brenner Dyseskilt Primærluft Nominell (X)(mm) varmestrøm kW Nominelt forbruk Redusert varmestrøm min.
Advarsler og råd For best bruk av platetoppen, les instruksjonene nøye og oppbevar dem for fremtidige behov. • Disse instruksjonene er kun gyldige i de landene som har sitt symbol på platetoppens typeskilt. • Emballasjen (plastposter, polystyrendeler osv.) må holdes utenfor barns rekkevidde. • Kontroller at apparatet ikke har blitt skadet under transporten, og fjern all beskyttende emballasje og film før installasjonen. • Denne platetoppen (kl. 3) er kun utviklet for matlaging i husholdninger.
Miljøinformasjon Emballasje Emballasjen består av 100 % resirkulerbart materiale og er merket med resirkuleringssymbolet . Kildesorter i henhold til de lokale forskrifter. Advarsel • Dette apparatet må ikke brukes av barn eller personer med reduserte psykiske evner og ferdigheter, eller av uerfarne personer uten kjennskap til apparatet, eller hvis de ikke er under oppsyn eller opplæring av personer ansvarlig for deres sikkerhet.
Installasjon (flush-montering og semiflush-montering) Teknisk informasjon for installatøren • Advarsel: Apparatet er tungt og må installeres av to personer. • Ta på deg vernehansker når du installerer platetoppen. • Apparatet kan installeres i en minst 20 mm tykk kjøkkenbenk. • Hvis det ikke installeres en ovn under platetoppen, må et panel festes under platetoppen for å hindre skader, og for å beskytte kjøkkenskapets innhold.
Elektrisk tilkobling Den elektriske tilkoblingen må utføres av en kvalifisert tekniker i samsvar med gjeldende sikkerhetsregler. • Informasjon om spenning og effekt finnes på typeskiltet. • Apparatet må jordes. • Platetoppen bør beskyttes med en 3 mm topolet bryter. • Hvis nettledningen ødelegges, må den skiftes ut med en som er helt lik (H05V2V2-FT90°C, eller H05RR-F). Dette arbeidet bør utføres av Service. • Ikke bruk forlengelsesledninger.
Festing av platetoppen til kjøkkenbenken (flush-montering) Viktig: Arbeidet nedenfor må kun utføres av en kvalifisert tekniker. Platetoppen kan installeres oppå eller inn i forskjellige materialer, som f.eks. mur, metall, tre og varmebestandig laminatdekket tre (90 °C). Før platetoppen plasseres må pakningen/tetningslisten som følger med festes under kanten på platetoppen, hvor platetoppen kommer i kontakt med kjøkkenbenken (Fig. 2). Når pakningen er festet settes platetoppen ned i fordypningen.
Tilpasning til en annen gasstype Skift ut dysene, hvis det brukes en annen gass enn den som er oppgitt på typeskiltet og det oransje skiltet bak på platetoppen. Hvis det finnes en wokbrenner, må primærluften reguleres (se Tabell over dyser på side 6). Det oransje skiltet må fjernes og oppbevares sammen med bruksanvisningen. • For utskifting av dysene, kontakt Service eller en kvalifisert elektriker. • Dysene som ikke følger med kan kjøpes på servicesenteret. • Reguler gassventilenes min. strømningsnivå.
Festing av wokbrenneren For å feste wokbrennerens dobbeltkronete brenner: Sett inn i følgende rekkefølge: 1. brennerholder (A); 2. dekorring for brennerholder (B); 3. stort brennerdeksel (C); 4. lite brennerdeksel (D). Merk: Kontroller følgende: 1. Styrepinnen i brennerholderen (A) må være riktig innsatt i åpningen på brenneren. 2. Styrepinnen på det store brennerdekslet (C) må være satt inn i åpningen på brennerholderen (A). Regulering av gassventilenes min. strømningsnivå Reguler min.
Rengjøring og vedlikehold Koble alltid platetoppen fra strømmen, og vent til den er kjølt ned før rengjørings- og/eller vedlikeholdsarbeid. For å holde platetoppen i god stand må den holdes ren. Fjern matrester hver gang du har brukt den. Rengjøre platetoppen: • Den rustfrie stålflaten kan bli flekkete, hvis den over lang tid er i kontakt med hardt vann, eller med veldig sterke rengjøringsmidler. Tørk alltid opp søl med en gang (sauser, kaffe, vann, osv.).
Feilsøkingsliste Hvis platetoppen ikke fungerer riktig, kikk gjennom denne listen før du tar kontakt med Service. Slukker flammen? Kontroller følgende: 1. Reguleringsbryteren ble trykket skikkelig ned når brenneren ble slått på, og holdt nede helt til termoelementet ble koblet inn. 2. Brennerens åpninger er ikke tilstoppet nær eller rundt termoelementet. 3. Toppen av termoelementet er ren. Tennes ikke brennerne, eller er flammen ujevn? Kontroller følgende: 1.
Whirlpool Europe S.r.l. Viale G. Borghi, 27 - 21025 Comerio (VA) Phone 0332.759111 - Fax 0332.759268 www.whirlpool.