
Installation guide
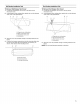


INSTALLATION
INSTRUCTIONS
packaging,
or
it
may
be
attached
to
the
back
of
the
microwave
oven.
NOTE:
To
avoid
possible
damage
to
the
work
surface,
cover
the
work
surface.
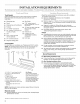
1.
Remove
any
remaining
contents
from
the
microwave
oven
cavity.
2.
Ifthe
mounting
plate
is
attached
to
the
back
of
the
microwave
oven,
remove
it
and
set
it
aside.
3.
Tape
the
microwave
oven
door
closed
so
that
door
does
not
swing
open
while
the
microwave
oven
is
being
handled.
NOTE:
To
avoid
damage
to
the
microwave
oven,
do
not
grip
or
use
the
door
or
door
handle
while
the
microwave
oven
is
being
handled.
(fc
iV)
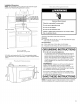
The
microwave
oven
is
set
for
recirculation
installation.
For
wall
or
roof
venting,
changes
must
be
made
to
the
venting
system.
See
“Venting
Design
Specifications”
section.
NOTE:
Skip
this
section
if
you
are
using
recirculation
installation.
Keep
the
damper
assembly
in
case
the
venting
method
is
changed,
or
the
microwave
oven
is
reinstalled
in
another
location
where
wall
or
roof
venting
may
be
used.
To
prepare
the
microwave
oven
for
wall
or
roof
venting,
the
vent
deflector
(L-shaped
metal
bar)
must
be
installed,
and
the
appropriate
damper
vent
opening
must
be
uncovered.
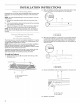
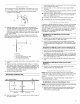
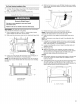
To
Install
Vent
Deflector:
1.
Gently
pull
the
rings
and
lift
vent
screen
from
the
top
of
the
microwave
oven.
A
|
=
:
a
|
B
Cc
A.
Top
of
microwave
oven
B.
Vent
screen
C.
Rings
2.
With
vent
deflector
oriented
as
shown
(wide
side
down),
slide
it
back
and
under
the
back
edge
of
the
vent
opening.
A.
Vent
opening
B.
Vent
deflector
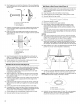
3.
When
the
vent
deflector
is
as
far
back
as
it
can
easily
slide,
flip
it
so
that
the
wide
side
is
to
the
back
of
the
microwave
oven,
and
the
narrow
side
(with
holes)
is
down.
The
vent
deflector
holes
should
align
with
mounting
holes
in
the
vent
opening,
as
shown
in
inset.
A.
Vent
opening
B.
Vent
deflector
4.
Secure
vent
deflector
with
2
mounting
screws
(1
on
each
end).
A
B
A.
Mounting
screw
B.
Vent
deflector
5.
Replace
vent
screen.