Instructions for use
Installation diagrams 4 Important safety instructions 6 Safeguarding the environment 9 Eco Design Declaration 9 Before use 9 Using existing pots and pans 10 Recommended pan base diameters 10 Installation 10 Electrical wiring 11 Instructions for use 12 Cleaning 16 Troubleshooting 16 After-sales service 17 Power setting table 18 Functions table 19 Cooking table 20
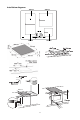
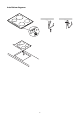
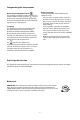
Installation diagrams 180 mm 240 mm 180 mm 145 mm Min. 5 cm Min. 10 cm 5 mm Min. 3 cm Max.
Installation diagrams 5
These instructions are also available at: docs.kitchenaid.eu IMPORTANT SAFETY INSTRUCTIONS YOUR SAFETY AND THAT OF OTHERS IS VERY IMPORTANT This manual and the appliance itself provide important safety warnings which you should read and observe at all times. This is the hazard symbol, which warns of potential safety risks to users and others.
- The user must not be able to access the electrical components after installation. - The appliance is designed solely for cooking food in a domestic environment. No other use is permitted (e.g. heating rooms). The manufacturer cannot be held responsible for inappropriate use or incorrect setting of the controls. - The appliance and its accessible parts become hot during use. Care should be taken to avoid touching the heating elements.
- Metallic objects such as knives, forks, spoons and lids should not be placed on the surface of the hob as they can become hot. - After using the hob, switch off the element using its control and do not rely on the pan detector (only applies to hobs with a glass surface). Disposing of household appliances - This product is made from recyclable or reusable materials. It must be disposed of in accordance with local regulations for waste disposal.
Safeguarding the environment Energy saving tips Follow the following recommendations for optimum results: • Use pots and pans that have the same base diameter as the cooking zone you are using. • Only use pots and pans that have a flat base. • If possible, keep the lids on pots and pans while cooking. • Cook vegetables, potatoes, etc. with little water in order to reduce the cooking time. • Use a pressure cooker to save even more energy and time (cannot be used in "SENSOR" mode).
Using existing pots and pans Use a magnet to check whether your pots and pans are suitable for using on the induction hob: If the magnetic does not stick to the item’s base, it will not work on the hob. - Make sure that pots and pans have a smooth base, otherwise they may scratch the glass ceramic surface of the hob. Check dishes as well. - Never place hot pots or pans on the hob’s control panel as they may damage it. OK NO Recommended pan base diameters XL dia. 30 cm dia. 14 cm - 30 cm XL dia.
Electrical wiring WARNING - Disconnect the appliance from the power supply. - Installation must be carried out by a qualified electrician who is fully aware of current safety and installation regulations. - The manufacturer cannot be held responsible for injury to persons or animals and for damage to property resulting from failure to observe the regulations provided in this section. - The power supply cable must be long enough to allow the hob to be removed from the worktop.
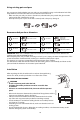
Instructions for use Description of the control panel The control panel is equipped with touch controls that can be operated simply by pressing the corresponding symbol (a light touch is sufficient).
Instructions for use Activating and adjusting cooking zones Cooking zone timer Cooking zone selection and selected cooking zone/power setting display 55 0 Slide touchscreen (power adjustment) Place a pot or pan on the cooking zone you want to use and then switch on the hob. Activate the cooking zone by pressing the relevant round button: The round button displays number 0, which corresponds to the intermediate power setting.
Instructions for use Press and hold the button for 3 seconds: A signal will sound and an indicator light will switch on above the lock symbol to confirm that the function has been activated. The control panel is locked with the exception of the OFF function. To unlock the controls, repeat the activation procedure. The dot will go out and the hob will be reactivated.
Instructions for use Changing the power setting or activating the pause function will deactivate the SENSOR function. - The hob manages the SENSOR function and booster settings autonomously; this means that, in some cases, it may not be possible to activate the booster if the SENSOR function is already in use. - The quality of the cookware you use may affect the performance of the SENSOR function.
Cleaning WARNING - Never use steam cleaners. - Before cleaning, make sure that the cooking zones are switched off and the residual heat indicator ("H") is not displayed. IMPORTANT: Do not use abrasive sponges or pan scourers as these could damage the surface of the glass. • Clean the hob after every use (wait until it has cooled down first) to remove any food residues. • Sugar and foods with a high sugar content may damage the glass ceramic surface and must be removed immediately.
After-sales service Before contacting our after-sales service 1. See if you can solve the problem yourself by referring to the "Troubleshooting" section. 2. Switch the hob off and on again to see if the problem persists. If the fault persists after you have carried out the checks listed above, contact your nearest aftersales service.
Power setting table Type of cooking Setting use (cooking type and habits) Boost Heating quickly Ideal for rapidly increasing the temperature of food or cooking liquids and boiling water quickly. 8-9 Frying, boiling Ideal for browning, starting to cook, frying frozen products, rapid boiling. 7-8 Browning, sautéing, boiling, grilling Ideal for sautéing, maintaining a vigorous boil, cooking and grilling (for a short period of time, e.g. 5-10 minutes).
Functions table Function Description of the automatic functions Simmering Identifies a power setting that is suitable for simmering in recipes with a long cooking time. Suitable for cooking tomato sauce, ragù, soups, minestrone, maintaining a constant cooking level. Ideal for cooking in a bain-marie (creamy sauces) and reheating food that has already been cooked. Prevents food from boiling over or sticking to the bottom of the pan and burning, as often happens with these recipes.
Cooking table Type(s) of food Dish(es) or type of cooking Power setting and cooking status First stage Power Second stage Power Fresh pasta Heating the water Booster - 9 Cooking the pasta and maintaining the boil 7-8 Dry pasta Heating the water Booster - 9 Cooking the pasta and maintaining the boil 7-8 Boiled rice Heating the water Booster - 9 Cooking the rice and maintaining the boil 5-6 Risotto Sautéing and roasting 7-8 Maintaining the right cooking temperature 4-5 Boiled Heati
Cooking table Type(s) of food Fish Dish(es) or type of cooking Power setting and cooking status First stage Power Second stage Power Grilled Preheating the grill 7-8 Cooking on both sides 7-8 Stewed Browning with oil (or power setting 6 if using butter) 7-8 Cooking and maintaining 3-4 the temperature Fried Heating the oil or fat 8-9 Frying or browning 7-8 Frittata Heating the pan with butter or fat 6 Cooking on both sides 6-7 Omelettes Heating the pan with butter or fat 6 Cookin
Whirlpool Europe S.r.l. - Socio Unico Viale G. Borghi, 27 - 21025 Comerio (VA), Italy Tel. +39 0332 759111 - Fax +39 0332 759268 www.whirlpool.