
Instruction for Use


Activating and adjusting cooking zones
Place a pot or pan on the cooking zone you want to use and then switch on the hob.
Activate the cooking zone by pressing the relevant round button: The round button displays number
0,
which corresponds to the intermediate power setting.
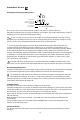
If you are using a pot or pan that is not suitable, not correctly positioned or not of the correct
dimensions for your induction hob, the "no pot" message will appear in the display (see figure on the
left). If a pot or pan is not detected within 60 seconds, the hob will switch off.
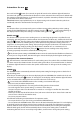
0. To change the power setting, move your finger horizontally along the slide touchscreen: The
number inside the circle will change from a minimum of 1 to a maximum of 9 depending on the
position of your finger on the touchscreen. The booster function can be activated by pressing "BOOST"
on the slide touchscreen ("P" on the display). The "BOOST" power setting can be used for up to 10
minutes, after which the appliance will switch to setting 9 automatically. If more than one cooking zone
is switched on, the slide touchscreen allows you to change the power of the selected zone, which is
indicated by the dot lighting up at the bottom right of the power indicator. To select a zone, simply
press the relevant round button.
In models with three cooking zones, it is possible activate three "BOOST" functions at the same
time: In this case, the appliance will adjust the distribution of power between the zones automatically.
Deactivating cooking zones
Select the cooking zone you want to switch off by pressing the relevant round button (the dot will light
up at the bottom right of the power setting indicator). Press OFF on the slide touchscreen.
The cooking zone will switch off and, if the zone is still hot, the letter "H" will appear in the circle.
"H" is the residual heat indicator. The hob has a residual heat indicator for each cooking zone. These
indicators alert the user to the fact that cooking zones are still hot. Once the relevant cooking zone has
cooled down, the indicator will switch off.
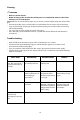
Setting the timer
The timer can be used to set a maximum cooking time of 90 minutes.
Select the cooking zone you want to use with the timer (the dot will light up at the bottom right of the
power setting indicator on the display), then set the time you require using the + and - buttons for the
timer function: The time in minutes is shown next to the cooking zone display.
A few seconds after the last press, the timer will begin the countdown (the cooking zone selection dot
will start flashing).
Once the time you have set has elapsed, a signal will sound and the cooking zone will switch off
automatically.
For information on the timer associated with the SENSOR function, refer to the description of the
function on the following pages.
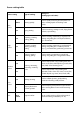
Control panel lock
This function locks the hob controls to prevent them from being activated accidentally (e.g. during
cleaning).
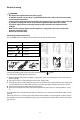
i
C
ooking zone timer
Cooking zone selection and
selected cooking zone/power
setting display
Slide touchscreen
(power adjustment)
55
0
13
Instructions for use