Instructions for use
Installation diagrams 4 Important safety instructions 6 Safeguarding the environment 8 Declaration of conformity 8 Before use 8 Existing pots and pans 8 Recommended pot bottom widths 8 Installation 9 Electrical connection 9 Instructions for use 11 Cleaning 14 Troubleshooting guide 14 Noises made by the hob 14 After-Sales Service 15 Power level table 15 3
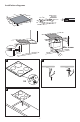
Installation diagrams 180 mm x 230 mm 145 mm 180 mm x 230 mm 4 210 mm
Installation diagrams 770 mm 52 mm 510 mm 0 +1 0 30 mm 750 +2 mm 742 mm 483 mm R = Min. 6,5 mm Max. 8 mm Min. 50 mm 0 490 +2 mm Min. 10 cm Min. 5 mm Min. 3 cm Max.
IMPORTANT SAFETY INSTRUCTIONS YOUR SAFETY AND THAT OF OTHERS IS VERY IMPORTANT This manual and the appliance itself provide important safety messages, to be read and always observed. This is the danger symbol, regarding safety, warning of potential risks to users and others. All safety messages will be preceded by the danger symbol and the following words: DANGER Indicates a hazardous situation which, if not avoided, will result in serious injury.
- The appliance and its accessible parts become hot during use. Care should be taken to avoid touching heating elements. Very young (0-3 years) and young children (3-8 years) shall be kept away unless continuously supervised. - Children from 8 years and above and persons with reduced physical, sensory or mental capabilities or lack of experience and knowledge can use this appliance only if they are supervised or have been given instructions on safe appliance use and if they understand the hazards involved.
Safeguarding the environment Disposal of packing The packing material is 100% recyclable and marked with the recycling symbol . The various parts of the packing must not be dispersed in the environment, but disposed of in compliance with local regulations. The symbol on the appliance or the accompanying documentation indicates that this product should not be treated as domestic waste but must be taken to an appropriate collection point for recycling WEEE.
Installation After unpacking the product, check for any damage during transport. In case of problems, contact the dealer or the After-Sales Service. For built-in dimensions and installation instruction, see the pictures in page 5. min 5 mm PREPARING THE CABINET FOR FITTING WARNING - Install a separator panel under the hob. - The lower part of the product must not be accessible after installation. - Do not fit the separator panel if an undertop oven is installed.
Electrical connection Connection to the terminal block For the electrical connection, use an H05RR-F or H05V2V2-F cable as specified in the table below.
Instructions for use Control Panel Description On/Off Bridge Zone function Power management/Timer/ Lock function button Quick access Slider Cooking zone controls and corresponding display Switching the hob ON/OFF To switch the hob on, press the button for approx. 2 seconds until the cooking zone displays light up. To switch off, press the same button until the displays switch off.
Instructions for use Control panel lock This function locks the controls to prevent accidental activation of the hob. To activate the control panel lock, switch the hob on and press the Timer button for three seconds; an acoustic signal and a luminous indicator near the padlock symbol signal activation. The control panel is locked except for the switching off function. To deactivate the control lock, repeat the activation procedure. The luminous dot goes off and the hob is active again.
Instructions for use Step Control panel Display 1 + 2 Press the Power Management button to confirm the previous step The display shows 3 -/+ Press to set the chosen level amongst the different options available The light comes on together with the in-use lights for the individual cooking zones 4 Press the Power Management button to confirm the previous step The display shows the set level which flashes for approximately 2 seconds; after which the hob emits an acoustic signal and then turns its
Cleaning WARNING - Do not use steam cleaners. - Before cleaning, make sure the cooking zones are switched off and that the residual heat indicator (“H”) is not displayed. IMPORTANT: Do not use abrasive sponges or scouring pads. Their use could eventually ruin the glass. • • • • After each use, clean the hob (when it is cool) to remove any deposits and stains due to food residuals. Sugar or foods with a high sugar content damage the hob and must be immediately removed.
After-Sales Service Before contacting the After-Sales Service 1. See if you can solve the problem yourself with the help of the “Troubleshooting guide”. 2. Switch the appliance off and then on again it to see if the problem has been eliminated. If the problem persists after the above checks, contact the nearest After-Sales Service.
Printed in Italy 06/14 5019 500 00083 n GB