GB Instructions for use
Product description and symbols 4 Using the burners 4 Practical advice on using the hob 5 Positioning the pan supports and wok support 5 Hood and cabinetry clearances (mm) 6 Injectors table 6 Warnings and suggestions 7 Safeguarding the environment 8 Installation (Flush and Traditional fitting) 9 Gas connection 9 Electrical connection 10 Fixing the hob to the work top. Traditionally fitted model 10 Fixing the hob to the work top.
Product description and symbols 1. Removable pan supports 2. 1 kWh auxiliary burner 3. 1.65 kWh semi-rapid burner 4. 1.65 kWh semi-rapid burner 5. 1 kWh auxiliary burner 6. Professional wok burner 7. Auxiliary burner control knob 8. Semi-rapid burner control knob 9. Semi-rapid burner control knob 10. Auxiliary burner control knob 11. Professional wok burner control knob ! $ § & Control Symbols % Off /(Q)= " Maximum flame Minimum flame Using the burners To turn on one of the burners: 1.
Practical advice on using the hob Read the instructions to get the best out of your hob. • Use pans with a similar diameter to the burner (see the table on this page). • Use flat bottomed pans except with the wok support. • Do not use excessive water when cooking foods and use the lid. • Ensure that pans are fully supported by the pan supports and do not protrude over the edges. Important: Do not rest or drag the pan supports upside down on the hob as this could scratch it.
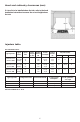
Hood and cabinetry clearances (mm) If a hood is to be installed above the hob, refer to the hood installation instructions to ensure the correct height above the hob. Injectors table GAS CATEGORY: II2H3+ Type of gas used Type of burner Injector label Control primary air (X) (mm) Nominal heat flow kW Nominal consumption Reduced heat flow kW min. nom. max.
Warnings and suggestions To get the most out of your hob, please read the instructions carefully and keep them for future consultation. • The installation and connection of this appliance to a gas or electrical supply must be carried out by a competent, qualified person in compliance with current legislation. • This appliance should be installed in compliance with standards in force and only used in well ventilated rooms. Read the instructions before installing and using this appliance.
Safeguarding the environment Packaging The packaging material is 100% recyclable and is labelled with the recycling symbol . Please dispose of all packaging responsibly and carefully. Note: • Incorrect placement of the pan supports can scratch the hob. To avoid this, always ensure that the rubber feet on the bottom of the pan supports are the only part of the pan supports that touch the hob. Do not drag the pan supports across the hob surface. • Do not use two burners to cook using one pan. (i.
Installation (Flush and Traditional fitting) Technical information for the installer • Warning: this is a heavy product which requires the installation to be carried out by two people. • This appliance can be installed into a 20mm 50mm thick worktop. • If no oven is to be installed below the hob, a panel must be fitted under the hob to prevent hob damage and protect the cupboard contents.
Electrical connection The electrical connections must comply with current legislation and be carried out by a qualified, competent person. • Information on the voltage and power absorbed are shown on the serial no. plate. • The appliance must be earthed. • When installing the appliance, we recommend that this hob is protected by a 3mm bi-polar switch. • If damaged, the power cable must be replaced with an identical type of powercable ( H05V2V2-FT90ºC, or H05RR-F type).
Fixing the hob to the work top. Flush fitted model Important: The following procedure must be carried out by competent technical personnel only. The hob can be installed on, or into different types of materials, such as masonry, metal, wood and heat resistant laminate coated wood (90°C). 80 51 0 718 49 8 51 1 719 706 Cut an opening in the worktop to the dimensions shown in the figure (Fig. 1). R.
Adaption to a different type of gas supply If you are using a different kind of gas from the one indicated on the serial no. plate and the orange label on the back of the hob, you must replace the injectors; in the case of the Wok burner, adjust the primary air (see Injector table on page 6). The orange label should be removed and kept together with the manual. • Injectors not supplied as standard should be requested from the Customer Care Centre on 00800-3810-4026.
Fitting the wok burner To fit the double crown wok burner Insert in the following order: 1. burner ring (A); 2. decorative covering ring (B); 3. external burner cap (C); 4. internal burner cap (D). Note: make sure that: 1. the locating pin for the burner ring (A) is inserted correctly in the slot on the burner unit. 2. that the locating pin on the external burner cap (C) is inserted in the slot on the burner ring (A).
General cleaning & maintenance Always disconnect the hob from the electrical power supply and wait until it cools before cleaning and/or doing maintenance work. In order to keep your hob in good condition, you must keep it clean, removing any food residue each time you use it. Cleaning the hob surface: • the stainless steel surface may become stained if it comes into contact with hard water over along period of time or with extremely strong, aggressive cleaning products.
Troubleshooting guide If the hob is not working properly, work through this guide before contacting our Customer Care Centre. The flame doesn’t stay on? Check that: 1. the button was pushed in properly when turning on the burner for the time required to activate the safety thermocouple. 2. the burner’s openings are not blocked near, or around the thermocouple. 3. the end part of the thermocouple is clean. The burner does not ignite, or the flame is unsteady? Check that: 1.
Whirlpool Europe S.r.l. Viale G. Borghi, 27 - 21025 Comerio (VA) Phone 0332.759111 - Fax 0332.759268 www.whirlpool.