KHPF 9010 KHPS 9010 Gebruiksaanwijzing
Productbeschrijving en symbolen 4 De gaspitten gebruiken 4 Praktische informatie voor het gebruik van uw kookelement 5 De panondersteuners en de wokondersteuner positioneren 5 Openingen Afzuigkap en Keukenkasten (mm) 6 Injectietabel 6 Waarschuwingen en suggesties 7 Milieutips 8 Installatie (Vlakke en Opbouw installatie) 9 Gasaansluiting 9 Elektrische aansluiting 10 Het kookelement op het werkblad installeren. Opbouwl geïnstalleerd model 10 Het kookelement op het werkblad installeren.
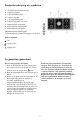
Productbeschrijving en symbolen 1. Verwijderbare panondersteuners 2. 1 kWh steungaspit 3. 1.65 kWh halfsnel gaspit 4. 3 kWh snel gaspit 5. 1.65 kWh halfsnel gaspit 6. Professionele gaspit voor wok 7. Bedieningsknop steungaspit 8. Bedieningsknop halfsnel gaspit 9. Bedieningsknop snel gaspit 10. Bedieningsknop halfsnel gaspit 11.
Praktische informatie voor het gebruik van uw kookelement Lees de instructies door om het beste resultaat van uw kookelement te verkrijgen. • Maak gebruik van pannen met een doorsnede die met de diameter van de gaspit overeenkomt (zie de tabel op deze pagina). • Maak gebruik van pannen met een platte bodem met uitzondering van het gebruik van de wokondersteuner. • Maak geen gebruik van overtollige hoeveelheden water tijdens het bereiden van voedsel en maak gebruik van de deksel.
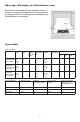
Openingen Afzuigkap en Keukenkasten (mm) Indien u boven het kookelement een afzuigkap wenst te installeren, raadpleeg de handleiding voor de installatie van de afzuigkap om de correcte hoogte van de afzuigkap boven het kookelement te garanderen. Injectietabel Categorie II2E+3+ Soort gebruikt gas Soort gaspit Injector etiket Bediening primaire lucht (X) (mm) Nominale Nominaal warmtestroom verbruik kW Gereduceerde warntestroom kW Gasdruk (mbar) min. nom. max.
Waarschuwingen en suggesties Om het beste resultaat van uw kookelement te kunnen verkrijgen, lees deze aanwijzingen zorgvuldig door en bewaar ze voor toekomstige raadpleging. • Deze instructies gelden alleen voor de landen waarvan het symbool op het serienummerplaatje van het kookelement staat aangegeven. • Het verpakkingsmateriaal (plastic zakken, geëxpandeerd polyurethaan, enz) zouden een mogelijk gevaar voor kinderen kunnen opleveren en dienen zorgvuldig verwijderd te worden.
Milieutips Verpakking • Het verpakkingsmateriaal is 100% recyclebaar zoals wordt aangegeven door het symbool . Volg de plaatselijke milieuvoorschriften op wanneer u het apparaat afdankt. Opmerking: • Een onjuiste plaatsing van de panondersteuner zou krassen op het kookelement kunnen veroorzaken. Om dit te voorkomen controleer altijd of alleen de rubberen pootjes op de bodem van de panondersteuners op het kookelement steunen en verschuif de panondersteuners nooit over het oppervlak van het kookelement.
Installatie (Vlakke en Opbouw installatie) (zie het serienummerplaatje op het kookelement en de injectietabel). • De keukenkasten en de apparaten rondom/in de buurt van het kookelement warmtebestendig zijn en met de lokale regelingen overeenstemmen. • De verbrandingsproducten uit de lucht van de kamer worden verwijderd door middel van een afzuigkap of een in een muur of in een raam geïnstalleerde elektrische ventilator die in overeenstemming met de lokale regelingen is.
Elektrische aansluiting De elektrische aansluiting dient in overeenstemming met de wetgeving en door een gekwalificeerd en competent persoon uit te worden gevoerd. • Informatie over de voltage en de geabsorbeerde stroom zijn op het serienummerplaatje aangegeven. • Het apparaat dient te worden geaard. • We raden u aan dat, tijdens de installatie van het apparaat, dit kookelement met behulp van een 3mm bipolaire schakelaar wordt beveiligd.
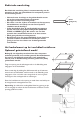
Het kookelement op het werkblad installeren. Vlak geïnstalleerd model ≥ 2,2 1,2 51 0 860 80 861 848 49 8 51 1 Belangrijk: de volgende procedure dient door competent technisch personeel uit te worden gevoerd. Het kookelement kan op of in verschillende materialen, zoals metselwerk, metaal, hout en hittebestendig laminaat gelakt hout (90°C) geïnstalleerd worden. R.11 Zaag een opening met de afmetingen zoals in de afbeelding staat aangegeven in het keukenblad.
Voor een afwijkende gasvoorziening geschikt maken Indien u gebruik maakt van een soort gas die afwijkt van het soort dat op het serienummerplaatje en op het oranje etiket aan de achterkant van het kookelement staat aangegeven, dient u de spuitstukken te vervangen. In het geval van het gaspit voor de Wok, stel de primaire lucht bij (zie Injectietabel op pagina 6). Het oranje etiket dient verwijderd te worden en samen met de gebruiksaanwijzing te worden bewaard.
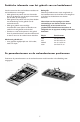
Het gaspit voor de wok installeren Voor het installeren van het dubbelkapsgaspit voor de wok: Plaats in de volgende volgorde: 1. gaspit-ring (A); 2. decoratieve afdekkingsring (B); 3. buitenste gaspitdeksel (C); 4. binnenste gaspitdeksel (D). Opmerking: verzeker u ervan dat: 1. de plaatsingspin voor de gaspit-ring (A) op correcte wijze in de opening op het gaspit is gestoken. 2. dat de plaatsingspin op de buitenste gaspitdeksel (C) op correcte wijze in de opening op de gaspit-ring (A) is gestoken.
Algemene reinigings- & onderhoudsoperaties Sluit het kookelement altijd van de elektrische stroomvoorziening af en wacht tot deze helemaal afgekoeld is alvorens u met reinigings- en/of onderhoudswerkzaamheden aanvangt. Om uw kookelement in een perfecte staat te behouden, dient u deze schoon te houden, door elke keer dat u hier gebruik van heeft gemaakt de achtergebleven voedselresten te verwijderen.
Opsporen van storingen Indien het kookelement niet correct functioneert, bestudeer deze handleiding alvorens u met de Klantenservice contact opneemt. of rondom de thermokoppel geblokkeerd zijn. 3. het uiteinde van de thermokoppel schoon is. De pannen zijn onstabiel? Controleer dat: 1. de bodem van de pan geheel plat is. 2. de pan goed boven het gaspit gecentreerd is. 3. de panondersteuners op correcte wijze geïnstalleerd zijn en dat alle rubberen pootjes op hun plaats zitten.
Whirlpool Europe S.r.l. Viale G. Borghi, 27 - 21025 Comerio (VA) Phone 0332.759111 - Fax 0332.759268 www.whirlpool.