
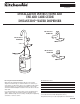
INSTANT-HOT WATER DISPENSER USE AND CARE GUIDE


4
Electrical Requirements
A 120-volt, 60 Hz, AC-only 15 or 20 amp fused, grounded
electrical supply is required. It is recommended that a separate
circuit serving only your hot water dispenser be provided. Use an
outlet that cannot be turned on/off by a switch.
Recommended ground method
This appliance is equipped with a power supply cord having a
3 prong ground plug. To minimize possible shock hazard, the
cord must be plugged into mating, 3 prong, ground-type outlet,
grounded in accordance with all national and local codes and
ordinances. If a mating outlet is not available, it is the personal
responsibility and obligation of the customer to have a properly
grounded, 3 prong outlet installed by a qualified electrician.
Electrical Shock Hazard
Plug into a grounded 3 prong outlet.
Do not remove ground prong.
Do not use an adapter.
Do not use an extension cord.
Failure to follow these instructions can result in death,
fire, or electrical shock.
WARNING
Water Supply Requirements
If local codes permit, the hot water dispenser feed line should be
connected to the cold water supply line using a saddle valve or
another means for providing a 1/4
"
tube to connect to the
dispenser. If a saddle valve is used, do not use a piercing type or
3/16" saddle valve, which reduces water flow and clogs more
easily.
IMPORTANT: If local codes do not permit the use of saddle
valves, special feed valves can be obtained from your local
plumbing supply distributor.
Connection to hot water line is not recommended. Energy will be
wasted in heating the water twice and may produce an
undesirable taste.
A water filter is recommended if your water supply contains sand,
grit or other particles, or has a known taste or odor issue. If a
water filter system is used, the water pressure to the hot water
dispenser system from the filter needs to be a minimum of 20 psi
(138 kPa) for proper operation. If the water pressure to the hot
water dispenser system is less than 20 psi (138 kPa), a booster
pump can be added.
IMPORTANT: If the water pressure to the hot water dispenser
system is less than 20 psi (138 kPa), performance may be
affected.
INSTALLATION INSTRUCTIONS
Please complete the “Record your model’s information” section
on the front cover before beginning installation.
This hot water dispenser is not a water purifier. Some installations
may require a water filtering system to improve the quality of
water.
Installing the Faucet
1. Determine where you will install your hot water dispenser.
Check below sink to assure that reinforcing ribs, support
brackets or cabinet construction will not interfere with faucet.
2. Knock out plug from hole in sink or cut a hole in sink or
countertop.
NOTE: It is recommended that only a licensed plumber or
professional installer cut an opening in the sink or countertop.
3. Carefully straighten tubing so that it will go through hole in
sink or countertop.
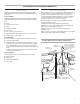
4. Remove nut, metal washer and rubber washer from faucet.
Do not remove rubber o-ring in bottom of faucet base.
5. Feed tubing through hole in sink or countertop. Hold faucet in
place while installing rubber washer, metal washer and nut on
faucet from under the countertop. Securely tighten nut.
rubber washer
rubber o-ring
metal washer
nut
faucet base