Instructions for use
Installation diagrams 4 Important safety instructions 6 Safeguarding the environment 9 Declaration of conformity 9 Before use 9 Existing pots and pans 9 Recommended pot bottom widths 9 Installation 10 Electrical connection 10 Instructions for use 11 After-Sales Service 16 3
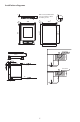
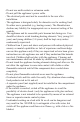
Installation diagrams 4
R1 380 R1 2 490 510 1.5 +1 381 0 +1 511 0 1 N.B. For the Semifilo version, it is not necessary to lower the hob by 1.5 mm.
These instructions shall also be available on website: www.kitchenaid.eu IMPORTANT SAFETY INSTRUCTIONS YOUR SAFETY AND THAT OF OTHERS IS VERY IMPORTANT This manual and the appliance itself provide important safety messages, to be read and always observed. This is the danger symbol, regarding safety, warning of potential risks to users and others.
- Do not use multi-sockets or extension cords. - Do not pull the appliance’s power cable. - The electrical parts must not be accessible to the user after installation. - The appliance is designed solely for domestic use for cooking food. No other use is permitted (e.g. heating rooms). The Manufacturer declines any liability for inappropriate use or incorrect setting of the controls. - The appliance and its accessible parts become hot during use. Care should be taken to avoid touching heating elements.
Danger of fire: do not store items on the cooking surfaces. - Do not use steam cleaners. - Metallic objects such as knives, forks, spoons and lids should not be placed on the hob surface since they can get hot. - After use, switch off the hob element by its control and do not rely on the pan detector. (only for appliances with glass surface). Disposal of household appliances - This product is built from recyclable or reusable materials.
Safeguarding the environment Disposal of packing The packing material is 100% recyclable and marked with the recycling symbol . The various parts of the packing must not be dispersed in the environment, but disposed of in compliance with local regulations. The symbol on the appliance or the accompanying documentation indicates that this product should not be treated as domestic waste but must be taken to an appropriate collection point for recycling WEEE.
Installation After unpacking the product, check for any damage during transport. In case of problems, contact the dealer or the After-Sales Service. For built-in dimensions and installation instruction, see the pictures in page 5. PREPARING THE CABINET FOR FITTING WARNING - The lower part of the product must not be accessible after installation. - Do not fit the separator panel if an undertop oven is installed.
Electrical connection For direct connection to the network it is necessary to fit an omnipolar switch of a suitable size to ensure disconnection of he network with a contact opening distance that allows complete disconnection in the conditions of the overtension category III, compliant with the installation regulations (the yellow/green earth wire must not be interrupted). The omnipolar socket or switch must be easy to reach when the appliance is installed. N.B.
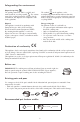
Instructions for use On/off of the Touch Control yi y i 8. 8. 8. t q ruw e 1. On/off 2. Selection decimal points or association with the timer 3. Cooking area selection 4. Power increase 5. Power decrease 6. Timer display 7. Cooking point display 8. Selection decimal points or association with the timer The electronic Touch Control is activated by means of the ON/OFF button and switches from the OFF mode to the Standby mode. To do so it is necessary to press the ON/OFF button for 1 second.
Instructions for use Automatic power down (limiting the working time) The limitation of the working time is a function of the touch control, for turning off the generator. In relation to the cooking level set, each cooking point is turned off after a certain maximum operating time unless the set cooking time has been changed.
Instructions for use Setting the timer value: when a timer has been selected, you can change the timer value using the plus or minus keys. If a timer value has not been set, pressing the minus key will set a value of 30 minutes, which can then be changed. By holding down the plus or minus key longer, the set value will change faster. At a setting value of 99 or 01, the automatic repeat will automatically stop. Turning off the timer early: You can turn off the timer by setting the timer value to 00.
Instructions for use The power required to activate the booster function could be too high and, as a result, the integrated powermanagement feature will reduce the power of the other cooking point of the same induction module; this is indicated to the user by the flashing of the assigned display, allowing a correction time of 3 seconds before the power is reduced to the necessary cooking level. For each cooking point, the Booster function lasts 5 minutes.
After-Sales Service Before contacting the After-Sales Service 1. Switch the appliance off and then on again it to see if the problem has been eliminated. If the problem persists after the above checks, contact the nearest After-Sales Service. Always specify: • a brief description of the fault; • the product type and exact model; • the Service number (the number after the word Service on the rating plate), located under the appliance (on the metal plate). • your full address; • your telephone number.
Printed in Italy 05/15 400010780633 n GB