TOUCH-ACTIVATED ELECTRONIC INDUCTION COOKTOP Use & Care Guide For questions about features, operation/performance, parts, accessories or service, call: 1-800-422-1230 or visit our website at www.kitchenaid.com In Canada, call 1-800-807-6777 or visit our website at www.kitchenaid.ca TABLE DE CUISSON À INDUCTION AVEC COMMANDES ÉLECTRONIQUES TACTILES Guide d’utilisation et d’entretien Au Canada, pour assistance, installation ou service, composer le 1-800-807-6777 ou visiter notre site Web au www.kitchenaid.
TABLE OF CONTENTS TABLE DES MATIÈRES COOKTOP SAFETY........................................................................2 COOKTOP USE ..............................................................................4 Induction Cooking........................................................................5 Cooktop Controls.........................................................................5 Dual Size Surface Cooking Area..................................................6 Simmer ......................
IMPORTANT SAFETY INSTRUCTIONS WARNING: To reduce the risk of fire, electrical shock, injury to persons, or damage when using the cooktop, follow basic precautions, including the following: ■ CAUTION: Do not store items of interest to children in cabinets above a cooktop – Children climbing on the cooktop to reach items could be seriously injured. ■ Proper Installation – Be sure your cooktop is properly installed and grounded by a qualified technician.
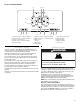
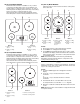
COOKTOP USE This manual covers different models. The cooktop you have purchased may have some or all of the features listed. 30" (76.2 cm) Model KICU500 D C H G B E A F I J A. Left front surface cooking area display B. Left rear surface cooking area display C. Surface cooking area off D. Heat level display M L K E. Right rear surface cooking area display F. Right front surface cooking area display G. Power on/off H. Simmer I. Melt + Hold J. Timer display K. Timer (increase/decrease) L.
36" (91.4 cm) Model KICU569 D C H I E B F A G J A. Left front surface cooking area display B. Left rear surface cooking area display C. Surface cooking area off D. Center surface cooking area display E. Heat level display K L M N O F. Right rear surface cooking area display G. Right front surface cooking area display H. Power on/off I. Simmer J. Melt + Hold K. Timer display Induction Cooking Induction cooking is quite different from traditional forms of cooking.
To Use To Turn On the Cooktop: 1. Press POWER. The indicator light above the Power keypad and a dash (“-”) in each surface cooking area will light to indicate that each surface cooking area is ready to be activated. Inactivity for 1 minute after the main power has been turned on will automatically turn off the power to the cooktop. To Turn Off: 1. Touch OFF to turn off desired surface cooking area. One tone will sound when Off is pressed. 2. Touch POWER to turn off the cooktop when finished.
To Turn On a Bridge: Simmer The Simmer function can be used on with all surface cooking areas. Simmer can be used on more than 1 surface cooking area at a time. To Use: To Turn On: 1. Check that a surface cooking area has been selected. 2. Touch SIMMER. “A” will appear in the display, and the indicator light next to Simmer will light. The timer remains visible and can be set if desired. To Turn Off: Simmer can be turned off in 3 different ways: 1. Use the power slider to set to a heat level. OR 2.
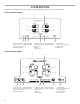
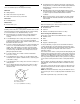
30" (76.2 cm) Model KICU500 36" (91.4 cm) Model KICU569 Performance Boost function is available on only 1 surface cooking area at a time within a zone. If you attempt to use another surface cooking area in the same zone, “P” and “9” will briefly flash in the display before returning to heat setting level 9. The surface cooking area that was set to the Performance Boost function will automatically reset to heat setting level 9. See the following illustrations for zones.
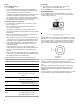
■ Use flat-bottomed cookware for best heat conduction and energy efficiency. Cookware with rounded, warped, ribbed or dented bottoms could cause uneven heating and poor cooking results. ■ Determine flatness by placing the straight edge of a ruler across the bottom of the cookware. While you rotate the ruler, no space or light should be visible between it and the cookware. ■ Make sure the bottoms of pots and pans are clean and dry before using them. Residue and water can leave deposits when heated.
COOKTOP CARE TROUBLESHOOTING Try the solutions suggested here first in order to avoid the cost of an unnecessary service call. General Cleaning IMPORTANT: Before cleaning, make sure all controls are off and the cooktop is cool. Always follow label instructions on cleaning products. Soap, water and a soft cloth or sponge are suggested first unless otherwise noted. Nothing will operate ■ Is the cooktop wired properly? See the Installation Instructions for more information.
■ ■ Is the display flashing “Er” and numbers? If an “Er” and a series of numbers appear in the display panel, turn power off at the circuit breaker. Turn on again. If problem continues, call customer service. See “Assistance or Service” section. Is the display flashing “F” or “C” and numbers? If “F” or “C” and a number are alternately flashing on the display, refer to the following table for possible solutions. Error Code Error Solution Cooktop has turned off and is beeping every 10 sec.
Accessories Cooktop Bracket Adhesive Kit (for marble countertop installations only) Order Part Number W10310006 In Canada Call the KitchenAid Canada Customer eXperience Centre toll free: 1-800-807-6777. Our consultants provide assistance with: ■ Features and specifications on our full line of appliances. Cooktop Cleaner ■ Use and maintenance procedures. (ceramic glass models) Order Part Number 31464 ■ Accessory and repair parts sales.
KITCHENAID® COOKTOP WARRANTY LIMITED WARRANTY For one year from the date of purchase, when this major appliance is operated and maintained according to instructions attached to or furnished with the product, KitchenAid brand of Whirlpool Corporation or Whirlpool Canada LP (hereafter “KitchenAid”) will pay for Factory Specified Parts and repair labor to correct defects in materials or workmanship. Service must be provided by a KitchenAid designated service company.
Notes 14
SÉCURITÉ DE LA TABLE DE CUISSON Votre sécurité et celle des autres est très importante. Nous donnons de nombreux messages de sécurité importants dans ce manuel et sur votre appareil ménager. Assurez-vous de toujours lire tous les messages de sécurité et de vous y conformer. Voici le symbole d’alerte de sécurité. Ce symbole d’alerte de sécurité vous signale les dangers potentiels de décès et de blessures graves à vous et à d’autres.
IMPORTANTES INSTRUCTIONS DE SÉCURITÉ AVERTISSEMENT : Pour réduire le risque d'incendie, de choc électrique, de blessures ou de dommages lors de l'utilisation de la table de cuisson, observer les précautions élémentaires suivantes, y compris ce qui suit : ■ MISE EN GARDE : Ne pas remiser dans les armoires au-dessus d'une table de cuisson, des articles que des enfants pourraient vouloir atteindre. Les enfants pourraient se brûler ou se blesser en grimpant sur la table de cuisson.
Cette table de cuisson à induction génère et utilise une énergie de fréquence ISM qui chauffe l’ustensile de cuisson à l’aide d’un champ électromagnétique. Elle a été testée et déclarée conforme à la section 18 du règlement FCC pour l’équipement ISM. Cette table de cuisson à induction satisfait aux exigences du règlement FCC pour la minimisation des interférences avec d’autres dispositifs résidentiels.
30" (76,2 cm) Modèle KICU509 D C G H B E A F A. Affichage de la surface de cuisson avant gauche B. Affichage de la surface de cuisson arrière gauche C. Arrêt surface de cuisson D. Affichage du niveau de chaleur L K J I M E. Affichage de la surface de cuisson arrière droite F. Affichage de la surface de cuisson avant droite G. Mise sous tension-Marche/Arrêt H. Mijotage I. Faire fondre + maintenir au chaud N J. Affichage de la minuterie K. Minuterie (augmentation/ diminution) L.
Première utilisation ou après une panne de courant : Cuisson par induction La cuisson par induction est très différente des formes de cuisson traditionnelles. La chaleur est générée directement dans l’ustensile de cuisson; la surface de cuisson demeure plus froide qu’un élément traditionnel. Avec la cuisson par induction, il y a une moindre déperdition de chaleur par rapport aux formes de cuisson traditionnelles du fait que la chaleur est générée dans l’ustensile lui-même.
Utiliser le tableau suivant comme guide lors du réglage des niveaux de chaleur. RÉGLAGE Surface de cuisson à dimension double (sur certains modèles) UTILISATION RECOMMANDÉE 9 - Boost (optimisation) ■ Porter un liquide à ébullition. 9 ■ Démarrer la cuisson des aliments. 7-8 ■ Brunir ou saisir rapidement les aliments. 6-7 ■ Maintenir une ébullition rapide. 5-6 ■ Faire frire ou sauter les aliments. ■ Faire cuire les soupes et les sauces. ■ Maintenir une ébullition lente.
Désactivation d'une liaison : Faire fondre et maintenir au chaud La fonction Melt + Hold (faire fondre et maintenir au chaud) peut être utilisée pour toutes les surfaces de cuisson. On peut utiliser Melt + Hold pour plus d'une surface de cuisson à la fois. Utilisation Activation : 1. Vérifier qu'une surface de cuisson a été sélectionnée. 2. Appuyer sur MELT + HOLD. “A” apparaît sur l'affichage et le témoin lumineux situé à côté de Melt + Hold s'allume.
Fonction d'optimisation du rendement Cette fonction vous permet d’augmenter le niveau de chaleur audelà du réglage de chaleur maximal 9 pendant 10 minutes ou moins. REMARQUE : La fonction d'optimisation du rendement n'est pas disponible lorsque la fonction de liaison est activée. A D 30" (76,2 cm) Modèle KICU500 La fonction d'optimisation du rendement n'est disponible que sur une surface de cuisson à la fois pour une zone donnée.
Utilisation : 1. Vérifier qu'une surface de cuisson a été sélectionnée. 2. Appuyer sur BOOST. “P” apparaît sur l'afficheur. 3. Appuyer sur la touche BOOST une fois terminé. Le “P” n’est plus visible sur l’affichage et la fonction d'optimisation du rendement n'est plus active. La surface de cuisson revient au réglage de chaleur 9. REMARQUE : La fonction d'optimisation du rendement peut se désactiver automatiquement pour empêchant les composants électroniques internes de la table de cuisson de surchauffer.
Ustensiles de cuisson Seuls les ustensiles de cuisson ferromagnétiques peuvent être utilisés pour la cuisson par induction. Les matériaux ferromagnétiques incluent : ■ Acier émaillé ■ Fonte ■ Acier inoxydable conçu pour la cuisson par induction Les matériaux non ferromagnétiques incluent : Ces types d'ustensiles ne sont pas adaptés à la cuisson par induction.
DÉPANNAGE ■ ■ ■ ■ ■ Essayer d'abord les solutions suggérées ici afin d'éviter le coût d'une intervention de dépannage inutile. ■ L’afficheur de la fonction d'optimisation de rendement Rien ne fonctionne clignote-t-il et s’éteint-il? La fonction d'optimisation du rendement fait fonctionner la surface de cuisson à la puissance maximale.
Sons liés au fonctionnement de la table de cuisson ■ Y a-t-il un faible bourdonnement? Ceci se produit en cas de cuisson à puissance élevée. Cela est dû à la quantité d’énergie transmise de l’appareil à l’ustensile de cuisson. Le bourdonnement faiblit ou cesse lorsque l’alimentation est interrompue. ■ Y a-t-il un bruit de crépitation? Ce son survient lorsque l'ustensile de cuisson utilisé est composé de différents matériaux.
GARANTIE DE LA TABLE DE CUISSON KITCHENAID® GARANTIE LIMITÉE Pendant un an à compter de la date d'achat, lorsque ce gros appareil ménager est utilisé et entretenu conformément aux instructions jointes à ou fournies avec le produit, la marque KitchenAid de Whirlpool Corporation ou Whirlpool Canada LP (ci-après désignées “KitchenAid”) paiera pour les pièces spécifiées par l'usine et la main-d'œuvre pour corriger les vices de matériaux ou de fabrication.
Conservez ce manuel et votre reçu de vente ensemble pour référence ultérieure. Pour le service sous garantie, vous devez présenter un document prouvant la date d'achat ou d'installation. Inscrivez les renseignements suivants au sujet de votre gros appareil ménager pour mieux vous aider à obtenir assistance ou service en cas de besoin. Vous devrez connaître le numéro de modèle et le numéro de série au complet. Vous trouverez ces renseignements sur la plaque signalétique située sur le produit.