
Owner's Manual
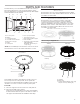

Table Of Contents
- Microwave Oven Safety
- Installation Instructions
- Parts and Features
- MICROWAVE OVEN CONTROL
- Microwave Oven Use
- Microwave Oven Care
- Troubleshooting
- Assistance or Service
- Sécurité du four à micro-ondes
- Instructions d’installation
- Pièces et caractéristiques
- COMMANDES DU FOUR À MICRO-ONDES
- Affichage
- Standby mode (Mode veille)
- Start (mise en marche)
- Quick start/Add 30 seconds (démarrage rapide/ajouter 30 secondes)
- Cancel (annulation)
- Utilisation du menu sans détection
- Clock (Horloge)
- Tones ON/OFF (Signaux sonores de marche/arrêt)
- Utilisation du menu avec détection
- Timer (minuterie)
- Fin de cuisson
- Control Lock (verrouillage des commandes)
- Instructions du clavier
- Utilisation du four à micro-ondes
- Caractéristiques des aliments
- Guide de cuisson
- Ustensiles de cuisson et vaisselle
- Papier d’aluminium et métal
- Cook (cuisson)
- Popcorn (maïs éclaté)
- Reheat (réchauffage)
- Soften/Melt (ramollir/faire fondre)
- Auto Defrost (décongélation automatique)
- Steam Clean (nettoyage à la vapeur)
- Keep Warm (Maintien au chaud)
- Grill (gril)
- Convection Bake/Roast (Cuisson au four/rôtissage par convection)
- Air fryer (Friture à air)
- Entretien du four à micro-ondes
- Dépannage
- Assistance ou dépannage
- Seguridad del horno microondas
- Instrucciones de instalación
- Piezas y funciones
- CONTROL DEL HORNO MICROONDAS
- Pantalla
- Modo Standby (En espera)
- Start (Inicio)
- Quick start/Add 30 seconds (Inicio rápido/Agregar 30 segundos)
- Cancel (Cancelar)
- Para utilizar el menú sin sensor
- Clock (Reloj)
- Tones ON/OFF (Encendido/Apagado de los tonos)
- Para utilizar el menú del sensor
- Timer (Temporizador)
- Fin de la cocción
- Control Lock (Bloqueo de controles)
- Instrucciones del teclado
- Uso del horno microondas
- Características de los alimentos
- Pautas para cocinar
- Utensilios de cocina y vajilla
- Papel de aluminio y metal
- Cook (Cocinar)
- Popcorn (Palomitas de maíz)
- Reheat (Recalentar)
- Soften/Melt (Ablandar/Derretir)
- Auto Defrost (Descongelado automático)
- Steam Clean (Limpieza con vapor)
- Keep Warm (Mantener caliente)
- Grill (Asar)
- Convection Bake/Roast (Hornear/Rostizar por convección)
- Freidora de aire
- Cuidado del horno microondas
- Solución de problemas
- Asistencia o servicio técnico

7
PARTS AND FEATURES
This manual may cover several different models. The model you
have purchased may have some or all of the features shown
here. The appearance of your particular model may differ slightly
from the illustrations in this manual.
*NOTE: To avoid damage to the microwave oven,do not remove
microwave inlet cover. See the “Parts and Features” section.
Turntable
The turntable can rotate in either direction to help cook food
more evenly. For best cooking results, do not operate the
microwave oven without having the turntable in place. See the
“Assistance or Service” section to reorder any of the parts.
To Install:
1. Place the support on the microwave oven cavity bottom.
2. Place the turntable on the support.
Fit the raised, curved wedges in the center of the turntable
bottom between the three spokes of the hub. The rollers on
the support should t inside the turntable bottom ridge.
Grill Element
The microwave oven uses a cal rod thermal element for grilling.
The microwave oven cavity and door will become hot. The use of
oven mitts is recommended.
Convection Element and Fan
The microwave oven’s convection system is composed of
a convection element which heats in conjunction with the
convection fan for true convection cooking. The convection
system is embedded in the wall of the microwave oven cavity,
behind the screen. See the “Parts and Features” section. The
microwave oven cavity and door will become hot. The use of
oven mitts is recommended.
Accessory Congurations
A. Door lock system
B. Window
C. Cooking guide label
D. Convection element and fan
E. Microwave oven light
F. Display
G. Control panel
H. Door open push button
I. Microwave inlet cover*
J. Removable turntable support
K. Glass turntable
L. Model and serial number plate
Parts and Features
Not Shown: Grill element (on
cavity ceiling)
A
B
C
D
A. Turntable
B. Hub
C. Support
D. Shaft
DA EC F B
IKL HJ
G
Grilling Airfrying
Baking Roasting
Grill and Convection Accessories
A. Turntable
B. Baking Tray
C. Air Fryer (without ipping out the legs)
and put on the top of baking tray