
Owner's Manual
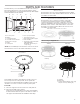
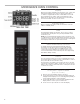

Table Of Contents
- Microwave Oven Safety
- Installation Instructions
- Parts and Features
- MICROWAVE OVEN CONTROL
- Microwave Oven Use
- Microwave Oven Care
- Troubleshooting
- Assistance or Service
- Sécurité du four à micro-ondes
- Instructions d’installation
- Pièces et caractéristiques
- COMMANDES DU FOUR À MICRO-ONDES
- Affichage
- Standby mode (Mode veille)
- Start (mise en marche)
- Quick start/Add 30 seconds (démarrage rapide/ajouter 30 secondes)
- Cancel (annulation)
- Utilisation du menu sans détection
- Clock (Horloge)
- Tones ON/OFF (Signaux sonores de marche/arrêt)
- Utilisation du menu avec détection
- Timer (minuterie)
- Fin de cuisson
- Control Lock (verrouillage des commandes)
- Instructions du clavier
- Utilisation du four à micro-ondes
- Caractéristiques des aliments
- Guide de cuisson
- Ustensiles de cuisson et vaisselle
- Papier d’aluminium et métal
- Cook (cuisson)
- Popcorn (maïs éclaté)
- Reheat (réchauffage)
- Soften/Melt (ramollir/faire fondre)
- Auto Defrost (décongélation automatique)
- Steam Clean (nettoyage à la vapeur)
- Keep Warm (Maintien au chaud)
- Grill (gril)
- Convection Bake/Roast (Cuisson au four/rôtissage par convection)
- Air fryer (Friture à air)
- Entretien du four à micro-ondes
- Dépannage
- Assistance ou dépannage
- Seguridad del horno microondas
- Instrucciones de instalación
- Piezas y funciones
- CONTROL DEL HORNO MICROONDAS
- Pantalla
- Modo Standby (En espera)
- Start (Inicio)
- Quick start/Add 30 seconds (Inicio rápido/Agregar 30 segundos)
- Cancel (Cancelar)
- Para utilizar el menú sin sensor
- Clock (Reloj)
- Tones ON/OFF (Encendido/Apagado de los tonos)
- Para utilizar el menú del sensor
- Timer (Temporizador)
- Fin de la cocción
- Control Lock (Bloqueo de controles)
- Instrucciones del teclado
- Uso del horno microondas
- Características de los alimentos
- Pautas para cocinar
- Utensilios de cocina y vajilla
- Papel de aluminio y metal
- Cook (Cocinar)
- Popcorn (Palomitas de maíz)
- Reheat (Recalentar)
- Soften/Melt (Ablandar/Derretir)
- Auto Defrost (Descongelado automático)
- Steam Clean (Limpieza con vapor)
- Keep Warm (Mantener caliente)
- Grill (Asar)
- Convection Bake/Roast (Hornear/Rostizar por convección)
- Freidora de aire
- Cuidado del horno microondas
- Solución de problemas
- Asistencia o servicio técnico

8
MICROWAVE OVEN CONTROL
Display
When power is rst supplied to the microwave oven, “12Hr” will
appear in the display. User can press Timer/Clock button or
+/- button to toggle between 12Hr or 24Hr within 10 seconds.
Press Start button to conrm. If the “12:00” appears in the
display at any other time, a power failure has occurred. Reset
the clock if needed. See the “Clock” section.
Standby mode
When no functions are being used, the microwave oven will
switch to Standby mode.
Start
The Start button begins any function. If non-sensor cooking
isinterrupted by opening the door, pressing Start button will
resume the cycle.
NOTE: To avoid unintentional operation of the microwave oven,
a cooking function cannot be started if the microwave oven door
has been closed for about 1 minute. The word “door” willappear
in the display until the door is opened and closed.
Quick start/Add 30 seconds
In standby mode, pressing Start automatically starts the
microwave oven at 100% power for 30 seconds and adds
30 seconds of cook time, with each additional touch of the
control. Time may be added to any manual cooking cycle in
30 second increments, at the moment power level, by pressing
Start button during cooking.
Cancel
The Cancel button clears any incorrect command and Cancels
any program during cooking. Press the Cancel button to Cancel
the cycle. It will not erase the time of day.
The microwave oven will also turn off when the door is opened.
Close the door and press Start to resume the cycle. The Cancel
button is also used to lock and unlock the control panel. See the
“Control Lock” section.
To use Non - Sensor Menu
(Popcorn, Potato)
1. Place food on the turntable and close the door.
2. Touch desired menu control. The rst programmed amount
will appear in the display. Touch control keypad repeatedly or
touch number keypads to change quantity.
3. Touch Start. When the cycle ends, “End” will appear in the
display and the end-of-cycle tone will sound.
4. Touch Cancel or open the door to clear the display.