
Owner's Manual


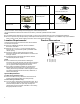

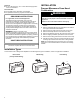
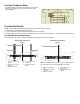

Table Of Contents
- MICROWAVE OVEN SAFETY
- Microwave Oven Safety
- MICROWAVE OVEN MAINTENANCE AND CARE
- General Cleaning
- INSTALLATION INSTRUCTIONS
- REQUIREMENTS
- Tools and Parts
- Location Requirements
- Product Dimensions
- Installation Dimensions
- Electrical Requirements
- INSTALLATION
- Prepare Microwave Oven Hood Combination
- Installation Types
- Find the Cardboard Plate
- Find the Wall Stud(s)
- Find the Flush Point
- Mark Upper Cabinet
- Mark Rear Wall
- Drill holes in Upper Cabinet
- Drill holes in Rear Wall
- Attach Mounting Plate to Wall
- Rotate Blower Motor
- Install Damper Assembly
- Install the Microwave Oven
- Complete Installation
- VENTING DESIGN SPECIFICATIONS
- Venting Design Specifications
- SEGURIDAD DEL HORNO MICROONDAS
- Seguridad del horno de microondas
- MANTENIMIENTO Y CUIDADO DEL HORNO MICROONDAS
- Limpieza general
- INSTRUCCIONES DE INSTALACIÓN
- REQUISITOS
- Herramientas y piezas
- Requisitos de Ubicación
- Dimensiones del producto
- Dimensiones de instalación
- Requisitos eléctricos
- INSTALACIÓN
- Preparar la combinación de horno de microondas y campana
- Tipos de instalación
- Encontrar plantilla de cartón
- Encontrar las vigas de pared
- Encontrar el Punto al Ras
- Marcar gabinete superior
- Marque la pared posterior
- Taladrar los orificios en el gabinete superior
- Taladre orificios en la pared posterior
- Fije la placa de montaje a la pared
- Gire el Motor del Soplador
- Instale el Conjunto de la Compuerta
- Instalación del horno de microondas
- Complete la instalación
- ESPECIFICACIONES PARA EL DISEÑO DE LA VENTILACIÓN
- Especificaciones para el Diseño de la Ventilación

7
Installation Dimensions
NOTE: The grounded 3 prong outlet must be inside the upper
cabinet. See the “Electrical Requirements” section.
B
C
F
G
D
E
A
A. 2" x 4" (5.1 cm x 10.2 cm)
wall stud
B. Grounded 3 prong outlet
C. Upper cabinet depth (with
door)***
D. 36" (91.4 cm) recommended*
30" (76.2 cm) typical**
E. 30" (76.2 cm) minimum
F. 72" (182.8 cm) recommended
66" (167.6 cm) minimum
G. Flat back surface 18
1
/
4
"
(46.3 cm) minimum
D D
B
A
C
B
A. (Flush) 12
3
/
4
" to 13" (32.3 cm to 33 cm) deep
B. Cabinet
C. Less than 12
3
/
4
" (32.3 cm) deep
D. Mounting plate
Exact dimensions may vary depending on type of range/cooktop
below.
*36" (91.4 cm) is recommended for 72" (182.8 cm) installation
height.
**30" (76.2 cm) is typical for 66" (167.6 cm) installation height.
***Measure from the back wall to where the front bottom
surface of the microwave oven needs to be (Dimension A).
Using the mounting plate provided with the product:
For cabinet depths less than 12.75" (32 cm), the microwave
oven may protrude from the cabinet (and the front edge of the
Template should protrude the same amount when marking the
mounting holes to be drilled in the upper cabinet).
For 12.75" (32 cm) to 13" (33 cm) cabinets, the microwave oven
is flush to the cabinet.
NOTE: It may be necessary to
use a number of the washers
provided as spacers, between
the mounting plate and the
wall, to achieve a more ‘Flush’
appearance.
If cabinets are deeper than
13" (33 cm), and up to 16"
(40.6 cm), use the bump out
mounting kit, replacing the
mounting plate supplied with
the product. The bump out
mounting kit
(part#- W11630300) is not
provided.
To order, see the “Online
Ordering Information” section
of the Quick Start Guide.
For cabinets with other
dimension’s, we suggest
selecting other Whirlpool
Products.
C
A
B
A. (Bump out) 13" to 16"
(33 cm to 40.6 cm) deep
B. Cabinet
C. Bump put mounting bracket
Electrical Requirements
WARNING
Electrical Shock Hazard
Plug into a grounded 3 prong outlet.
Do not remove ground prong.
Do not use an adapter.
Do not use an extension cord.
Failure to follow these instructions can result in death,
fire, or electrical shock.
Observe all governing codes and ordinances.