
Control Guide
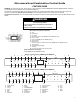


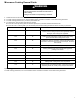
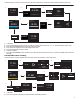


Table Of Contents
- Feature Guide_W11689505A
- Electronic Oven Controls_W11689505A
- Settings_W11689505A
- Microwave Cooking General guide_W11689505A
- IR Cooking (For (Y)KMMF730 only)_W11689505A
- Oven Cooking Functions_W11689505A
- Other Modes_W11689505A
- Guide des caractéristiques_W11689505A
- Commandes électroniques du four_W11689505A
- Réglages_W11689505A
- Guide général du four à micro-ondes_W11689505A
- Cuisson IR (pour (Y)KMMF730 seulement)_W11689505A
- Fonctions de cuisson au four_W11689505A
- Autres modes_W11689505A
- Feature Guide_W11689505A
- Electronic Oven Controls_W11689505A
- Settings_W11689505A
- Microwave Cooking General guide_W11689505A
- IR Cooking (For (Y)KMMF730 only)_W11689505A
- Oven Cooking Functions_W11689505A
- Other Modes_W11689505A
5
Time Format
There are 12 hours or 24 hours format for your option. The time format setting is in the Settings-Preferences-Language and regional
submenu.
1. Press Settings button, press Arrow buttons to Preferences, press CONFIRM/MENU button to confirm your setting.
2. Press Arrow buttons to Language and regional submenu, press CONFIRM/MENU button to confirm your setting.
3. Press Arrow buttons to Time Format submenu, press CONFIRM/MENU button to confirm your setting.
4. Press Arrow buttons to select 12 hours or 24 hours.
5. Press the CONFIRM/MENU button to confirm your setting.
Restore Factory Defaults
Users may set the microwave oven back to default state.
1. Press Settings button, press Arrow buttons to Preferences, press CONFIRM/MENU button to confirm your setting.
2. Press Arrow buttons to Restore factory defaults submenu, press CONFIRM/MENU button to confirm your setting.
3. Press the CONFIRM/MENU button to restore settings.
NOTE: System restarts and returns to idle. All features including all Settings and any stored value in memory will be reset.
Sounds Volume
Programming all sounds on/off and changing timers and alerts, buttons and effects volume.
All sounds: On or Off
Timers and alerts: Maximum, High, Medium, Low Off
Buttons and effects: Maximum, High, Medium, Low Off
Instruction:
1. Press Settings button, press Arrow buttons to Preferences, press CONFIRM/MENU button to confirm your setting.
2. Press Arrow buttons to Sounds volume submenu, press CONFIRM/MENU button to confirm your setting.
3. Press Arrow buttons to toggle to the item you want to set.
4. Press the CONFIRM/MENU button to confirm your setting.
Time and Date
Microwave oven will set the time and date automatically using Wi-Fi, or you can set time and date manually by the following instruction.
Set Time (12 hours format is default setting):
Set the time with the below instructions, for example, setting the time to 3:30 AM:
1. Press Settings button, press Arrow buttons to Preferences, press the CONFIRM/MENU button to confirm your setting.
2. Press the Arrow buttons to Time and Date submenu, press the CONFIRM/MENU button to confirm your setting.
3. Press the CONFIRM/MENU button when you see the Set time setting.
4. Press number 330, to set the time to 3:30.
5. Press the Arrow buttons toggle to AM. The display showed 3:30 AM.
6. Press the CONFIRM/MENU button to confirm your setting.
7. Press the BACK button back to the home page.
NOTE: If you like the 24 hours format, change the time format in the Time Format submenu.
For a 24 hours format, if the clock is blanking on the screen, set the date with the following instructions, the problem will be solved.
Set Date: MM/DD/YY format, for example, setting the date to 01/01/24.
1. Press the Settings button, press Arrow buttons to Preferences, press the CONFIRM/MENU button to confirm your setting.
2. Press the Arrow buttons to Time and date submenu, press the CONFIRM/MENU button to confirm your setting.
3. Press the Arrow buttons until Set date, press the CONFIRM/MENU button to confirm your setting.
4. Press number 01 to set the month.
5. Press number 01 to set the date.
6. Press number 24 to set the year.
7. Press the CONFIRM/MENU button to confirm your setting.
8. Press the BACK button back to the home page.
Time Format: 12 hours with AM/PM, or 24 hours format.