
Owner's Manual


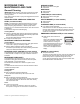

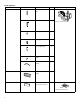

Table Of Contents
- MICROWAVE OVEN SAFETY
- Microwave Oven Safety
- Internet Connectivity Guide for Connected Appliances Only
- FCC Caution
- MICROWAVE OVEN MAINTENANCE AND CARE
- General Cleaning
- INSTALLATION INSTRUCTIONS
- REQUIREMENTS
- Tools and Parts
- Location Requirements
- Product Dimensions
- Installation Dimensions
- Electrical Requirements
- INSTALLATION
- Prepare Microwave Oven Hood Combination
- Installation Types
- Find the Cardboard Plate
- Find the Wall Stud(s)
- Find the Flush Point
- Mark Upper Cabinet
- Mark Rear Wall
- Drill holes in Upper Cabinet
- Drill holes in Rear Wall
- Attach Mounting Plate to Wall
- Rotate Blower Motor
- Install Damper Assembly
- Install the Microwave Oven
- Complete Installation
- VENTING DESIGN SPECIFICATIONS
- SEGURIDAD DEL HORNO MICROONDAS
- Seguridad del Horno Microondas
- Guía de Conectividad a Internet solo para Electrodomésticos Conectados
- Precaución de FCC
- MANTENIMIENTO Y CUIDADO DEL HORNO MICROONDAS
- Limpieza general
- INSTRUCCIONES DE INSTALACION
- REQUISITOS
- Herramientas y piezas
- Requisitos de Ubicación
- Dimensiones del producto
- Dimensiones de Instalación
- Requisitos eléctricos
- INSTALACION
- Prepare la combinación de horno microondas y campana
- Tipos de Instalación
- Encontrar plantilla de cartón
- Encuentre las vigas de pared
- Encontrar el punto al ras
- Marque el gabinete superior
- Marque la pared posterior
- Taladre los orificios en el gabinete superior
- Taladre orificios en la pared posterior
- Fije la placa de montaje a la pared
- Gire el motor del soplador
- Instale el conjunto de la compuerta
- Instalación del horno microondas
- Complete la instalación
- ESPECIFICACIONES PARA EL DISENO DE LA VENTILACION

7
Replacing Charcoal Filter:
The charcoal filter is behind the grease filter. It cannot be cleaned and should be replaced every 6 months, while the display shows the
filter alert “Change the Charcoal Filter and reset reminder in Settings”.
To replace the charcoal filter:
Disconnect power.
Remove the grease filter by pushing finger grips back and then pull down from the bottom plate and
set aside, see illustration 1.
Remove the charcoal filter out of the bottom plate by pulling the four hooks out, see illustration 3.
Replace the old charcoal filter with a new charcoal filter.
Put the charcoal filter back to the bottom plate, insert the four hooks into the bottom plate holes.
Put the grease filter back into the bottom plate and the springs toward the back. Push the finger
grips back, until the two tongues are in position, see illustration 2.
Illustration 2
A
C
B
D
A. Tongues
B. Finger
Grip
C. Grease
Filter
D. Spring
To remove the filter alert and reset filters duration:
After replacing the charcoal filter, to remove the filter alert on the display, retrieve another 6 months
duration.
Press Setting key, use Arrow key to select Cleaning and Maintenance submenu, press
CONFIRM/MENU key to enter.
Use Arrow key to select Reset filter submenu, press CONFIRM/MENU key to reset.
The charcoal filter retrieves another 6 months duration now.
NOTE: For roof venting and wall venting, the charcoal filter is not necessary, but the filter alert will
still appear every 6 months. You can follow the above steps to remove the alert.
Illustration 3
B
A
C
D
A. Holes
B. Hooks
C. Charcoal
Filter
D. Bottom
Plate
INSTALLATION INSTRUCTIONS
REQUIREMENTS
Tools and Parts
Tools Needed
� Measuring tape
� Pencil
� Scissors
� Masking tape or thumbtacks
� Drill
� No. 2 Phillips screwdriver
� Stud finder
� No. 3 Phillips screwdriver for 1/4-20 x 3" (76 mm) bolts
� 3/16" (5 mm), 3/8" (10 mm), 5/8" (16 mm) drill bits
� 3/4" (19 mm) hole saw
� Keyhole saw
� Diagonal wire cutting pliers
� 7/16" (11 mm) socket wrench (or box wrench) for 1/4" x 2"
(6.4 mm x 51 mm) lag screws
� 1
1
/
2
" (38 mm) diameter hole drill bit for wood or metal cabinet
� Caulking gun and weatherproof caulking compound
� Duct tape.
Materials Needed
� Standard fittings for wall or roof venting. See the “Venting
Design Specifications” section.