BUILT-IN ELECTRIC OVENS USER INSTRUCTIONS THANK YOU for purchasing this high-quality product. Register your built-in oven at www.kitchenaid.com. In Canada, register your built-in oven at www.kitchenaid.ca. For future reference, please make a note of your product model and serial numbers. They can be found on the label located on the bottom edge of the control panel, right hand side.
BUILT-IN OVEN SAFETY Your safety and the safety of others are very important. We have provided many important safety messages in this manual and on your appliance. Always read and obey all safety messages. This is the safety alert symbol. This symbol alerts you to potential hazards that can kill or hurt you and others. All safety messages will follow the safety alert symbol and either the word “DANGER” or “WARNING.
PARTS AND FEATURES This manual covers different models. The oven you have purchased may have some or all of the items listed. The locations and appearances of the features shown here may not match those of your model. A B,C D M E L F K G H J I A. B. C. D. Electronic oven control Automatic oven light switch Oven door lock latch Model and serial number plate (on bottom edge of control panel, right hand side) E. Temperature probe jack (oven with convection element and fan only) F. Oven lights G.
Control Panel This manual covers several models. Your model may have some or all of the items listed. Refer to this manual or the Frequently Asked Questions (FAQs) section of our website at www.kitchenaid.com for more detailed instructions. In Canada, refer to the Service and Support section at www.kitchenaid.ca. Single Oven Double Oven Combo Oven Keypad Feature Instructions LIGHT UPPER LIGHT LOWER LIGHT OVEN LIGHT Oven cavity light The Light keypads control their respective oven light.
Keypad Feature Instructions KITCHEN TIMER Kitchen timer The Kitchen Timer keypad will set a timer that is independent of oven functions. The kitchen timer can be set in hours, minutes, and seconds, up to 99 hours. NOTE: The kitchen timer does not start or stop the oven. RECENTLY USED Recall function The Recently Used keypad allows you to quickly select a recent cycle. 1. Touch RECENTLY USED. 2. Select the desired oven cavity. 3. Select the desired recent cooking mode from the available list.
Status Icons Indicates +Powered Attachments are connected to the oven. Indicates a problem with the wireless connection. Indicates Remote Enable is active. Function Set Screen Rapid Preheat WARNING Touch to select Rapid Preheat. This feature should be used only with one oven rack. Food Poisoning Hazard Do not let food sit in oven more than one hour before or after cooking. Doing so can result in food poisoning or sickness.
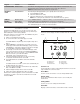
Status Screen Cooking Modes While the oven is in use, the display will show a timeline with information about the current oven function(s). If one of the cavities is not in use, a button to use that cavity will appear. H G 1 1 :0 0 A M F 350 E D 340 /350 O C B E O Do not let food sit in oven more than one hour before or after cooking. Doing so can result in food poisoning or sickness. Ready at 12:15 PM 00:30:00 The oven has a variety of cooking modes to achieve the best results every time.
Kitchen Timer The Kitchen Timer keypad will set a timer that is independent of oven functions. The Kitchen Timer can be set in hours, minutes, and seconds, up to 99 hours. NOTE: The Kitchen Timer does not start or stop the oven. 1. Touch KITCHEN TIMER. 2. Touch HR:MIN or MIN:SEC. 3. Touch the number keypads to set the length of time. NOTE: Touching HR:MIN or MIN:SEC after the time has been entered will clear the timer. 4. Touch the Start button on the display to start the kitchen timer. 5.
Settings The Settings icon allows you access to functions and customization options for your oven. These options allow you to set the clock, change the oven temperature between Fahrenheit and Celsius, turn the audible signals and prompts on and off, adjust the oven calibration, change the language, and more. Many of these options are set during the Welcome Guide. The Sabbath mode is also set using the Settings menu.
OVEN USE Odors and smoke are normal when the oven is used the first few times, or when it is heavily soiled. During oven use, the heating elements will not remain on, but will cycle on and off throughout oven operation. IMPORTANT: The health of some birds is extremely sensitive to the fumes given off. Exposure to the fumes may result in death to certain birds. Always move birds to another closed and well‑ventilated room.
Traditional Cooking Aluminum Foil IMPORTANT: To avoid permanent damage to the oven bottom finish, do not line the oven bottom with any type of foil or liner. ■■ For best cooking results, do not cover entire rack with foil because air must be able to move freely. ■■ To catch spills, place foil on rack below dish. Make sure foil is at least 1/2" (1.3 cm) larger than the dish and that it is turned up at the edges.
SatinGlide™ Roll-Out Extension Racks The SatinGlide™ roll-out extension rack allows easy access to position and remove food in the oven. It can be used in rack positions 1 through 6. The SatinGlide™ Roll-Out Extension Rack for Smart Oven+ Attachments has a curve to support the +Powered Attachments and allowing easy access to position and remove food in the oven and on the +Powered Attachments. It can be used in rack position 1. Open Position B A To Replace SatinGlide™ Roll-Out Extension Racks: 1.
Oven Vent(s) Baking and Roasting IMPORTANT: The convection fan and convection element may operate during the Bake function to enhance performance and heat distribution. During baking or roasting, the bake and broil elements will cycle on and off in intervals to maintain the oven temperature. If the oven door is opened during baking or roasting, the heating elements (bake and broil) will turn off approximately 30 seconds after the door is opened.
Cook’s Assistant Option The Cook’s Assistant Option is an automated cooking option that invites you to explore the many capabilities of the oven, including the attachments, convection baking, and sensor cooking with the temperature probe. When used with attachments, this option automatically controls the oven system for foods commonly prepared on each one, including a wide selection of steaks and chops, chicken and fish, pizza and vegetable items.
To Use Temperature Probe Cook: Before using, insert the temperature probe into the food item. (For meats, the temperature probe tip should be located in the center of the thickest part of the meat and not into the fat or touching a bone). Place food in oven and connect the temperature probe to the jack. Keep temperature probe as far away from heat source as possible. Close oven door. NOTE: The temperature probe must be inserted into the food item before the mode is selected. 1.
To Set a Delayed Cook Time Before setting, make sure the clock is set to the correct time of day. See the “Settings” section. 1. Select a cooking function. Delayed Cook Time cannot be used with the Powered Attachments or Keep Warm function. Touch the number keypads to enter a temperature other than the one displayed. Timed Cooking may also be used with the Bread Proof function, but the temperature is not adjustable. 2. Touch “--:--”. 3. Touch the number keypads to enter the length of time to cook.
OVEN CARE Self-Cleaning Cycle WARNING Burn Hazard How the Cycle Works IMPORTANT: The heating and cooling of porcelain on steel in the oven may result in discoloring, loss of gloss, hairline cracks, and popping sounds. The Self-Cleaning Cycle uses very high temperatures, burning soil to a powdery ash. Use the following chart as a guide to determine the desired cleaning level. Cleaning Level Total Cleaning Time (includes a 30-minute cool-down time) Keep children away from oven during Self-Cleaning cycle.
General Cleaning IMPORTANT: Before cleaning, make sure all controls are off and the oven is cool. Always follow label instructions on cleaning products. Soap, water, and a soft cloth or sponge are suggested first unless otherwise noted. +POWERED ATTACHMENTS To avoid damage to the nonstick surfaces, do not use abrasive cleaners, steel-wool pads, gritty washcloths, or abrasive paper towels. Food spills should be cleaned when the +Powered Attachment cools.
Oven Door IMPORTANT: To avoid oven door glass breakage: 4. Gently start to close the door. The door will stop at a partially closed position. ■■ Do not close the oven door if the racks are not fully inserted into the oven cavity or when bakeware extends past the front edge of an oven rack. ■■ Do not set objects on the glass surface of the oven door. ■■ Do not hit glass surfaces with bakeware or other objects. Do not wipe down glass surfaces until the oven has completely cooled.
To Replace: 1. Using 2 hands, grasp side edges of door at the midpoint. Face the oven cavity. 2. Locate the slots on each side of the oven front frame for the door hinge locks. A A. Slot in the oven cavity for door hinge lock 3. Using 2 hands, grasp the edges of the oven door. At a 45° angle, insert the hinges at the same time, and push the oven door into the oven cavity slot to replace. You may need to gently shift the door from side to side as you push. 4.
TROUBLESHOOTING First try the solutions suggested here. If you need further assistance or more recommendations that may help you avoid a service call, refer to the warranty page in this manual, or visit http://www.kitchenaid.com/customer-service. In Canada, visit http://www.kitchenaid.ca. Contact us by mail with any questions or concerns at the address below: In the U.S.A.
Problem Possible Causes and/or Solutions Oven cooking results not what expected The set temperature was incorrect: Double-check the recipe in a reliable cookbook. Oven temperature needs adjustment: See “Calibrate Oven” in the Settings menu. Oven was not preheated: See the “Baking and Roasting” section. Improper bakeware being used: See the “Bakeware” section. Racks were positioned improperly: See the “Racks and Bakeware Positions” section.
KITCHENAID® BUILT‑IN OVEN & MICROWAVE LIMITED WARRANTY ATTACH YOUR RECEIPT HERE. PROOF OF PURCHASE IS REQUIRED TO OBTAIN WARRANTY SERVICE. Please have the following information available when you call the Customer eXperience Center: ■■ Name, address and telephone number ■■ Model number and serial number ■■ A clear, detailed description of the problem ■■ Proof of purchase including dealer or retailer name and address IF YOU NEED SERVICE: 1.
INSTRUCTIONS D’UTILISATION DU FOUR ENCASTRÉ Nous vous REMERCIONS d’avoir acheté ce produit de grande qualité. Enregistrer le four encastré au www.kitchenaid.com. Enregistrer le four encastré au www.kitchenaid.ca. Pour référence ultérieure, consigner par écrit les numéros de modèle et de série de votre produit. Ces numéros se trouvent sur l’étiquette située sur le bord inférieur du tableau de commande, côté droit.
SÉCURITÉ DU FOUR ENCASTRÉ Votre sécurité et celle des autres est très importante. Nous donnons de nombreux messages de sécurité importants dans ce manuel et sur votre appareil ménager. Assurez-vous de toujours lire tous les messages de sécurité et de vous y conformer. Voici le symbole d’alerte de sécurité. Ce symbole d’alerte de sécurité vous signale les dangers potentiels de décès et de blessures graves à vous et à d’autres.
IMPORTANTES INSTRUCTIONS DE SÉCURITÉ AVERTISSEMENT : Pour réduire le risque d’incendie, de choc électrique, de blessures corporelles ou de dommages lors de l’utilisation du four, il convient d’observer certaines précautions élémentaires dont les suivantes : ■ Installation appropriée – S’assurer que le four est convenablement installé et relié à la terre par un technicien qualifié. ■ Ne jamais utiliser le four pour chauffer ou réchauffer une pièce.
PIÈCES ET CARACTÉRISTIQUES Ce manuel couvre différents modèles. Le four que vous avez acheté peut comporter tous les éléments énumérés ou seulement certains d’entre eux. L’emplacement et l’apparence des caractéristiques illustrées peuvent ne pas correspondre à ceux de votre modèle. A B,C D M E L F K G H J I A. B. C. D.
Tableau de commande Ce manuel couvre plusieurs modèles. Votre modèle peut comporter toutes les caractéristiques énumérées ou seulement certaines d’entre elles. Se reporter à ce manuel ou à la section Foire Aux Questions (FAQ) de notre site Web au www.kitchenaid.com pour des instructions plus détaillées. Au Canada, consulter la section Service et soutien technique au www.kitchenaid.ca.
Clavier Fonction Instructions KITCHEN TIMER (minuterie de cuisine) Minuterie de cuisine Les touches de la minuterie de cuisine permettent de régler une minuterie indépendante des fonctions du four. La minuterie de cuisine peut être réglée en heures, en minutes ou en secondes jusqu’à concurrence de 99 heures. REMARQUE : La minuterie de cuisine ne met pas en marche le four et ne l’éteint pas.
Barre d’état Affiche l’état actuel du four, ex. : mode démo ou commandes verrouillées. Témoins d’état Indique que l’activation à distance est active. Indique un problème avec la connexion sans fil. Indique que les accessoires électriques sont branchés au four. Écran de réglage des fonctions AVERTISSEMENT Risque d'empoisonnement alimentaire Ne pas laisser des aliments dans un four plus d'une heure avant ou après la cuisson.
Écran de statut Modes de cuisson Lorsque le four est en marche, l’écran affiche un fil d’actualité des informations concernant les fonctions actuellement utilisées sur le four. Si l’un des fours n’est pas utilisé, un bouton permettant d’utiliser ce four apparaîtra.
Minuterie de cuisine Les touches de la minuterie de cuisine permettent de régler une minuterie indépendante des fonctions du four. La minuterie de cuisine peut être réglée en heures, en minutes ou en secondes jusqu’à concurrence de 99 heures. REMARQUE : La minuterie de cuisine ne met pas en marche le four et ne l’éteint pas. 1. Appuyer sur KITCHEN TIMER (minuterie de cuisine). 2. Appuyer sur HR :MIN ou MIN :SEC. 3. Appuyer sur les touches numériques pour programmer une durée.
Réglages L’icône de réglages permet d’accéder aux fonctions et de personnaliser les options du four. Ces options permettent de régler l’horloge, d’alterner entre unités Fahrenheit et Celsius pour la température du four, d’activer ou de désactiver les signaux sonores et les messages, de régler le calibrage du four, de choisir la langue et plus. Plusieurs de ces options sont configurées lors du guide de bienvenue. Le mode Sabbat peut également être programmé en utilisant le menu de réglages.
UTILISATION AU FOUR Des odeurs et de la fumée sont normales lorsque le four est utilisé les premières fois et lorsqu’il est très sale. Lors de l’utilisation du four, les éléments de chauffage ne sont pas actifs, mais fonctionnent par intermittence lors du fonctionnement du four. IMPORTANT : La santé de certains oiseaux est très sensible aux émanations de fumée. L’exposition aux émanations peut entraîner la mort de certains oiseaux. Toujours déplacer les oiseaux dans une autre pièce fermée et bien aérée.
Papier d’aluminium IMPORTANT : Pour éviter des dommages permanents au fini du fond du four, ne pas recouvrir le fond avec du papier d’aluminium ou un revêtement quelconque. ■■ Pour obtenir les meilleurs résultats de cuisson, ne pas couvrir entièrement la grille d’aluminium, car l’air doit pouvoir circuler librement. ■■ Pour récupérer les renversements, placer du papier d’aluminium sur la grille sous le plat.
Position rétractée et emboîtée Cuisson au four de gâteaux sur 2 grilles Pour des résultats optimaux lors de la cuisson au four de gâteaux sur 2 grilles, utiliser la fonction cuisson au four et les grilles plates en positions 2 et 5. Placer les gâteaux sur les grilles comme indiqué. Prévoir un espace d’au moins 2 po entre le bord avant des grilles et le bord avant des gâteaux. A B A. Grille déployante coulissante SatinGlide™ pour accessoires de four intelligent B.
Ustensiles de cuisson Le matériau des ustensiles de cuisson affecte les résultats de cuisson. Suivre les recommandations du fabricant et utiliser le format d’ustensiles recommandé dans la recette. Utiliser le tableau suivant comme guide.
Cuisson et rôtissage au four Options d’aide-cuisinier IMPORTANT : Le ventilateur de convection et l’élément de convection peuvent se mettre en marche durant la fonction de cuisson au four pour améliorer la performance et la distribution de chaleur. Durant la cuisson au four ou le rôtissage, les éléments de cuisson au four et de cuisson au gril s’allument et s’éteignent par intermittence afin de maintenir la température du four.
Levée du pain La levée du pain prépare la pâte pour la cuisson en activant la levure. Sauf indication contraire de la recette, il est recommandé de procéder à une double levée. Faire lever Avant la première levée de pain, placer la pâte dans un saladier légèrement graissé et couvrir sans serrer avec du papier ciré ou de la pellicule plastique recouverte de graisse végétale. Placer sur la grille 2. Voir la section “Positionnement des grilles et ustensiles de cuisson” pour le diagramme. Fermer la porte. 1.
Mode guide de recettes Le mode guide de recettes est conçu pour guider et stimuler votre inspiration culinaire. Il propose une variété de recettes qui marchent bien avec les accessoires alimentés et permet d’optimiser les réglages du four pour obtenir des résultats parfaits. Chaque recette propose une marche à suivre pour la préparation et la cuisson des aliments. D’autres recettes peuvent être ajoutées grâce aux mises à jour du logiciel ou à l’achat des accessoires alimentés optionnels.
ENTRETIEN DU FOUR Programme d’autonettoyage AVERTISSEMENT Risque de brûlures Ne pas toucher le four au cours du programme d'autonettoyage. Garder les enfants loin du four au cours du programme d'autonettoyage. Le non-respect de ces instructions peut causer des brûlures. IMPORTANT : La santé de certains oiseaux est très sensible aux émanations qui surviennent durant le programme d’autonettoyage. L’exposition aux émanations peut entraîner la mort de certains oiseaux.
Nettoyage général IMPORTANT : Avant le nettoyage, s’assurer que toutes les commandes sont désactivées et que le four est froid. Toujours suivre les instructions figurant sur les étiquettes des produits de nettoyage. L’usage de savon, d’eau et d’un chiffon doux ou d’une éponge est suggéré en priorité, sauf indication contraire.
Lampes du four 2. Ouvrir complètement la porte du four. Les lampes du four sont des ampoules à halogène de 120 V, 40 W maximum. Elles s’allument à l’ouverture de la porte du four. Sur les modèles à double four, les lampes supérieure et inférieure s’allument lorsque l’une des deux portes est ouverte. Les lampes du four ne fonctionnent pas durant le programme d’autonettoyage. Lorsque la porte est fermée, appuyer sur la touche de lampe appropriée pour allumer et éteindre la lampe du four.
6. Tirer la porte du four vers soi et enlever la porte. Vous devrez peut-être basculer doucement la porte d’un côté et de l’autre en la tirant. 7. Garder la porte du four à part sur la surface de travail couverte en la faisant reposer sur sa poignée. Replacer : 1. Saisir les bords latéraux de la porte par le milieu avec les 2 mains. Se placer face à la cavité du four. 2. Repérer les encoches situées de chaque côté du cadre avant du four pour les loquets de charnière de la porte. A A.
DÉPANNAGE Essayez d’abord les solutions suggérées ici. Pour obtenir de l’aide ou des recommandations supplémentaires pour éviter un appel de service, reportez-vous à la page de garantie de ce guide ou visitez le http ://www.kitchenaid.com/customer-service. Au Canada, visiter le http ://www.kitchenaid.ca.
Problème Causes et solutions possibles La cuisson au four ne produit pas les résultats prévus La température programmée est inexacte : Vérifier la recette dans un livre de recettes fiable. Il faut régler la température du four : Consulter la section “Calibrer le four” dans le menu des réglages. Le four n’a pas été préchauffé : Voir la section “Cuisson au four et rôtissage”. Ustensiles de cuisson inappropriés : Voir la section “Ustensiles de cuisson”.
GARANTIE DU FOUR ET DU FOUR À MICRO-ONDES ENCASTRÉ KITCHENAID® ATTACHEZ ICI VOTRE REÇU DE VENTE. UNE PREUVE D’ACHAT EST OBLIGATOIRE POUR OBTENIR L’APPLICATION DE LA GARANTIE.
CLAUSE D’EXONÉRATION DE RESPONSABILITÉ AU TITRE DES GARANTIES IMPLICITES LES GARANTIES IMPLICITES, Y COMPRIS LES GARANTIES APPLICABLES DE QUALITÉ MARCHANDE OU D’APTITUDE À UN USAGE PARTICULIER, SONT LIMITÉES À UN AN OU À LA PLUS COURTE PÉRIODE AUTORISÉE PAR LA LOI.