
Control Guide
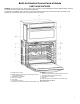
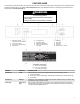
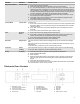
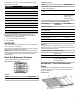


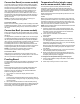
Table Of Contents
- Parts and Features_W10643472
- Feature Guide_W11648991A
- Electronic Oven Controls_W10643472
- OVEN USE
- Racks and Bakeware_W10643472
- SatinGlide Roll-Out Rack_W10643472
- Bakeware_W10643472
- Meat Thermometer_WOBIMW_CG_OLD
- Preheating and Oven Temp_W10643472
- Baking and Roasting_W10643472
- Broiling_W10643472
- Convection_W10643472
- Convection Bake_W10643472
- Convection Roast_W10643472
- Convection Broil_W10643472
- Proofing Bread_W10643472
- Temperature Probe_W10643472
- Timed Cooking_W10643472
- Air Fry
- Pièces et caractéristiques_W10643472
- Guide des caractéristiques_W11648991A
- Commandes électroniques du four_W10643472
- UTILISATION DU FOUR
- Grilles et ustensiles de cuisson_W10643472
- Grille coulissante SatinGlide_W10643472
- Cuisson au four_W10643472
- Thermomètre à viande_WOBIMW_CG_OLD
- Préchauffage et température du four_W10643472
- Cuisson et rôtissage au four_W10643472
- Cuisson au gril_W10643472
- Convection_W10643472
- Cuisson au four par convection_W10643472
- Rôtissage par convection_W10643472
- Cuisson au gril par convection_W10643472
- Levée du pain_W10643472
- Sonde de cuisson_W10643472
- Cuisson minutée_W10643472
- Air Fry (friture à l’air)
- Piezas y características_W10643472
- Guía de funciones_W11648991A
- Controles electrónicos del horno_W10643472
- USO DEL HORNO
- Parrillas y utensilios para hornear_W10643472
- Parrilla deslizable extensible_W10643472
- Utensilios para hornear_W10643472
- Termómetro para carne_WOBIMW_CG_OLD
- Precalentado y puerta del horno_W10643472
- Hornear y asar_W10643472
- Asar a la parrilla_W10643472
- Convección_W10643472
- Hornear por convección_W10643472
- Asar por convección_W10643472
- Asar a la parrilla por convección_W10643472
- Proofing Bread_W10643472
- Sonda de temperatura_W10643472
- Cocción programada_W10643472
- Air Fry (Freír sin aceite)

8
Closed and Engaged Position
A. SatinGlide™ roll-out extension rack
B. Sliding shelf
To Remove SatinGlide™ Roll-Out Extension Rack:
1. Slide the rack in completely so that it is closed and engaged
with the sliding shelf.
2. Using 2 hands, lift up on the front edge of the rack and push
the sliding shelf to the back wall of the oven so that the front
edge of the sliding shelf sits on the rack guides. The front
edge of the rack and the sliding shelf should be higher than
the back edge.
A. Sliding shelf
B. Rack guide
C. SatinGlide
™ roll-out extension rack
3. Pull the rack and the sliding shelf out.
To Replace SatinGlide
™ Roll-Out Extension Rack:
1. Using 2 hands, grasp the front of the closed rack and the
sliding shelf. Place the closed rack and the sliding shelf on the
rack guide.
2. Using 2 hands, lift up on the front edge of the rack and the
sliding shelf together.
3. Slowly push the rack and the sliding shelf to the back of the
oven until the back edge of the rack pulls over the end of the
rack guide.
To avoid damage to the sliding shelves, do not place more than
25 lbs (11.4 kg) on the rack or 35 lbs (15.9 kg) on the roll-out rack
for powered attachments (on some models).
Do not clean the SatinGlide
™
roll-out extension rack in a
dishwasher. It may remove the rack’s lubricant and affect its ability
to slide.
See the “General Cleaning” section in the Owner’s Manual for
more information.
Bakeware
The bakeware material affects cooking results. Follow
manufacturer’s recommendations and use the bakeware size
recommended in the recipe. Use the following chart as a guide.
BAKEWARE/
RESULTS
RECOMMENDATIONS
Light colored
aluminum
� Light golden crusts
� Even browning
� Use temperature and time
recommended in recipe.
Dark aluminum and
other bakeware with
dark, dull and/or
nonstick finish
� Brown, crisp crusts
� May need to reduce baking
temperatures slightly.
� Use suggested baking time.
� For pies, breads and casseroles,
use temperature recommended in
recipe.
� Place rack in center of oven.
Insulated cookie
sheets or baking
pans
� Little or no bottom
browning
� Follow rack recommendations in
the “Position Racks and
Bakeware” section.
� May need to increase baking time.
Stainless steel
� Light, golden crusts
� Uneven browning
� May need to increase baking time.
Stoneware/Baking
stone
� Crisp crusts
� Follow manufacturer’s
instructions.
Ovenproof
glassware, ceramic
glass or ceramic
� Brown, crisp crusts
� May need to reduce baking
temperatures slightly.
Meat Thermometer
Not all models have a temperature probe. On models without a
temperature probe, use a meat thermometer to determine
whether meat, poultry and fish are cooked to the desired degree
of doneness. The internal temperature, not appearance, should
be used to determine doneness.
Preheating and Oven Temperature
Preheating
When beginning a Bake or Convect Bake cycle or Convect Roast
cycle the oven begins preheating after Start is touched. The oven
will take approximately 12 to 17 minutes to reach 350°F (177°C)
with all of the oven racks provided with your oven inside the oven
cavity. Higher temperatures will take longer to preheat. The
preheat cycle rapidly increases the oven temperature. The actual
oven temperature will go above your set temperature to offset the
heat lost when your oven door is opened to insert food. This
ensures that when you place your food in the oven, the oven will
begin at the proper temperature. Insert your food when the
preheat tone sounds. Do not open the door during preheat until
the tone sounds.
Oven Temperature
While in use, the oven elements will cycle on and off as needed to
maintain a consistent temperature. They may run slightly hot or
cool at any point in time due to this cycling. Opening the oven door
while in use will release the hot air and cool the oven which could
impact the cooking time and performance. It is recommended to
use the oven light to monitor cooking progress.