
Setup and user guide


4
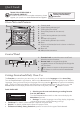
1. Control panel
2. Upper heating element/grill
3. Cooling fan (not visible)
4. Data plate (please do not remove)
5. Lamp
6. Circular heating element (not visible)
7. Fan
8. Rotisserie (if supplied)
9. Lower heating element (not visible)
10. Door
11. Position of shelves (the level is shown on the front
of the oven)
12. Rear wall
13. Meat probe connection
12
PER IL COLLEGAMENTO ELETTRICO CONSULTARE LA PARTE RELATIVA
ALL'INSTALLAZIONE
1. Pannello comandi
2. Resistenza superiore/grill
3. Ventola raffreddamento (non visibile)
4. Targhetta matricola (da non rimuovere)
5. Lampade
6. Resistenza circolare (non visibile)
7. Ventola
8. Girarrosto (se in dotazione)
9. Resistenza inferiore (non visibile)
10. Porta
11. Posizione dei ripiani (il numero di livello è indicato sul frontale del forno)
12. Paratia
13. Connessione sonda carne
NOTA:
- Durante la cottura, è possibile che la ventola di raffreddamento si attivi ad intermittenza per ridurre il
consumo energetico.
- A fine cottura, dopo lo spegnimento del forno, la ventola di raffreddamento può continuare a
funzionare per un certo intervallo di tempo.
- Aprendo la porta durante la cottura, gli elementi riscaldanti si disattivano.
Istruzioni per l'uso del forno
1
12
5
2
4
8
9
11
10
7
6
3
13
1. Function knob: to switch the oven on/off and
select the various functions
2. Browse knob: to navigate through the
suggested menus on the display and change the
pre-set values
3. Back button: to return to the previous screen
4. OK button: to conrm and activate selected
functions
14
Istruzioni per l'uso del forno
DESCRIZIONE PANNELLO COMANDI
DISPLAY
1. MANOPOLA FUNZIONI: accensione/spegnimento e selezione delle funzioni
2. MANOPOLA NAVIGAZIONE: navigazione nel menù, regolazione valori preimpostati
3. TASTO : per tornare alla schermata precedente
4. TASTO : per selezionare e confermare le impostazioni
1 3 4 2
INSERIMENTO DI GRIGLIE E ALTRI ACCESSORI ALL’INTERNO DEL FORNO
1. Inserire la griglia orizzontalmente, con la parte rialzata “A” orientata verso l’alto (Fig. 1).
2. Gli altri accessori, come la leccarda e la piastra dolci, vanno inseriti con la parte sollevata sulla sezione
piatta “B” rivolta verso l'alto (Fig. 2).
(Fig. 1)
(Fig. 2)
Quick Guide
Oven Parts and Features
THANK YOU FOR BUYING A
KITCHENAID PRODUCT
In order to receive a more complete assistance, please
register your product on www . kitchenaid . eu/ register
Before using the appliance
carefully read the Safety
Instruction.
Control Panel
Getting Started and Daily Oven Use
The rst time you switch on your new oven, you will need to set the language and the time of day�
Turn the Function knob in any direction, then turn the Browse knob to scroll through the list of available
languages� Once you have found your language of choice, press the button to conrm. Immediately
after, “12:00” will ash on the display indicating that you should set the time of day. To do so, turn the
Browse knob until the display shows the correct time of day, then press the button to conrm.
DAILY OVEN USE
1. Switching on the oven and selecting a cooking function
from the Main Menu
Turn the Function knob to switch on the oven and display the
Main Menu functions:
• Settings: To set the language, time of day, display brightness,
volume of the acoustic signal and energy savings�
• Traditional: For details, please see the Traditional Function Table�
• Special: For details, please see the Special Functions Table�
• Professional: Bakery, Pastry, Rotisserie, specic functions for the type of dish selected.
15
LIST OF FUNCTIONS
Turn the "Functions" knob to any position and the oven switches on: the display shows the functions or the
associated submenus.
A. Symbol for highlighted function
B. Highlighted function can be selected by pressing
C. Description of highlighted function
D. Other available and selectable functions
FIRST USE - SELECTING A LANGUAGE AND SETTING THE TIME
For correct use of the oven, when it is switched on for the first time you will have to select the desired
language and set the correct time.
Proceed as follows:
1. Turn the "Functions" knob to any position: the display will show the list of the first three available
languages.
2. Turn the "Browse" knob to scroll the list.
3. When the desired language is highlighted, press to select it. After language selection, the display
will flash 12:00.
4. Set the time by turning the "Browse" knob.
5. Confirm your setting by pressing .
Instructions for oven use
Traditional
Professional
Special functions
Traditional manual cooking functions
FUNCTION DETAILS
After selecting the desired function, the display will show further options and related details.
To move between the different zones, use the "Browse" knob: the cursor moves to the adjustable values,
following the order described above.
Press button to select the value, change it by turning the "Browse" knob and confirm with button .
Grill
--:--
COOK TIME
Medium
GRILL POWER
NO
PREHEAT.
--:--
END TIME
Zone 1
Zone 5
CURSOR
Zone 2
Zone 3
Zone 4
Start
Special functions
Traditional manual cooking functions
Professional
Traditional