
Owner's Manual
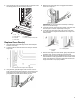
Table Of Contents
- BUILT-IN OVEN SAFETY
- Built-In Oven Safety
- OVEN MAINTENANCE AND CARE
- General Cleaning
- Self-Cleaning Cycle
- Steam Clean (on some models)
- INSTALLATION INSTRUCTIONS
- REQUIREMENTS
- Tools and Parts
- Location Requirements
- Electrical Requirements
- INSTALLATIONS
- Prepare Built-In Oven
- Remove Oven Door(s)
- Positioning Oven Feet for Multiple Cabinet Cutout Heights
- Make Electrical Connection
- Install Oven
- Install Deflector Kit (on some models)
- Replace Oven Door(s)
- Complete Installation
- SÉCURITÉ DU FOUR ENCASTRÉ
- Sécurité du four encastré
- ENTRETIEN ET RÉPARATION DU FOUR
- Nettoyage général
- Programme d’autonettoyage
- Steam Clean (nettoyage à la vapeur) (sur certains modèles)
- INSTRUCTIONS D’INSTALLATION
- SPÉCIFICATIONS
- Outils et pièces
- Exigences d’emplacement
- Spécifications électriques
- INSTALLATION
- Préparer le four encastré
- Enlever la/les porte(s) du four
- Positionner les pieds du four pour des ouvertures de découpe dans l’armoire
- Raccordement électrique
- Installation du four
- Installation de l’ensemble de déflecteurs (sur certains modèles)
- Réinstallation de la/des porte(s) du four
- Achever l’installation
- SEGURIDAD DEL HORNO INTEGRADO
- Seguridad del horno integrado
- MANTENIMIENTO Y CUIDADO DEL HORNO
- Limpieza general
- Ciclo de autolimpieza
- Steam Clean (Limpieza con vapor) (en algunos modelos)
- INSTRUCCIONES DE INSTALACIÓN
- REQUISITOS
- Herramientas y piezas
- Requisitos de ubicación
- Requisitos eléctricos
- INSTALACIONES
- Preparación del horno empotrado
- Retire las puertas del horno
- Ubicación de las patas del horno para múltiples alturas de corte del armario
- Hacer la conexión eléctrica
- Para instalar el horno
- Instale el kit de deflector (en algunos modelos)
- Vuelva a colocar las puertas del horno
- Finalización de la instalación
22
Complete Installation
1. Check that all parts are now installed. If there is an extra part,
go back through the steps to see which step was skipped.
2. Check that you have all of your tools.
3. Dispose of/recycle all packaging materials.
4. For oven cleaning, read the “Oven Maintenance and Care”
section.
Check Operation of Single and Double Ovens
1. Turn on power.
2. At first use, set up the languages, clock, and any other
preferences, if available. For more information, read the online
“Control Guide”.
3. Start a broil cycle.
NOTE: Odors and smoke are normal when the oven is used
the first few times.
4. Wait 5 minutes, then check for heat.
If Oven(s) Does Not Operate, Check the Following:
� Household fuse is intact and tight; or circuit breaker has
not tripped.
� Electrical supply is connected.
� See the online “Troubleshooting”.
5. Place the SatinGlide
™ Roll-Out Extension Rack for Smart
Oven+ Attachments in the lowest rack position in the unit to
make sure the correct accessory rack is on the bottom.
6. Press UPPER CANCEL/LOWER CANCEL on double ovens,
or press CANCEL on single ovens.
If you need Assistance or Service:
Please refer to the Quick Start Guide for contact information.