
Owner's Manual


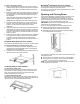


Table Of Contents
- REFRIGERATOR SAFETY
- Refrigerator Safety
- REFRIGERATOR CARE
- Cleaning
- Changing the LED Module
- Refrigerator Shelves
- Opening and Closing Doors
- Vacation and Moving Care
- INSTALLATION INSTRUCTIONS
- Unpack the Refrigerator
- Location Requirements
- Electrical Requirements
- Water Supply Requirements
- Connect the Water Supply
- Complete the Installation
- Install Air Filter (on some models)
- Install Produce Preserver (on some models)
- REFRIGERATOR FEATURES
- Crisper Humidity Control (on some models)
- Water and Ice Dispensers (on some models)
- Ice Maker and Storage Bin
- Water Filtration System
- DOOR AND HANDLE INSTRUCTIONS
- Door and Drawers
- Remove and Replace Handles
- Remove Refrigerator Doors and Hinges
- Reset Bottom Refrigerator Door Hinge
- Replace Refrigerator Doors and Hinges
- Remove and Replace Refrigerator Drawer
- Door Closing and Alignment
- PERFORMANCE DATA SHEET
- Performance Data Sheet
- SÉCURITÉ DU RÉFRIGÉRATEUR
- Sécurité du réfrigérateur
- ENTRETIEN DU RÉFRIGÉRATEUR
- Nettoyage
- Remplacer le module à DEL
- Tablettes du réfrigérateur
- Ouverture et fermeture des portes
- Précautions à prendre avant les vacances ou le déménagement
- INSTRUCTIONS D’INSTALLATION
- Déballage du réfrigérateur
- Exigences d’emplacement
- Spécifications électriques
- Spécifications de l’alimentation en eau
- Raccordement à la canalisation d’eau
- Terminer l’installation
- Installer le filtre à air (sur certains modèles)
- Installation du conservateur de produits frais (sur certains modèles)
- CARACTÉRISTIQUES DU RÉFRIGÉRATEUR
- Commande d’humidité dans le bac à légumes (sur certains modèles)
- Distributeur d’eau et de glaçons (sur certains modèles)
- Machine à glaçons et bac d’entreposage
- Système de filtration de l’eau
- INSTRUCTIONS POUR LA PORTE ET LA POIGNÉE
- Porte et tiroirs
- Pour enlever et réinstaller les poignées
- Démontage des portes et charnières du réfrigérateur
- Réinitialiser la charnière inférieure du réfrigérateur
- Réinstallation des portes et charnières
- Retrait et réinstallation du tiroir de congélation
- Fermeture et alignement des portes
- FICHE DE DONNÉES DE PERFORMANCE
- Fiche de données de performance

9
Water Supply Requirements
Gather the required tools and parts before starting installation.
Read and follow the instructions provided with any tools listed
here.
Tools Needed:
� Flat-blade screwdriver
� 7/16" and 1/2" Open-end or two
adjustable wrenches
� 1/4" Nut driver
� 1/4" Drill bit
� Cordless drill
� Connect to potable water supply only
Do not use with water that is microbiologically unsafe or of
unknown quality without adequate disinfection before or after
the system. Systems certified for cyst reduction may be used
on disinfected waters that may contain filterable cysts.
� All installations must meet local plumbing code requirements.
� Do not use a piercing-type or 3/16" (4.76 mm) saddle valve
which reduces water flow and clogs more easily.
� Use copper or PEX tubing and check for leaks. Install copper
or PEX tubing only in areas where the household temperatures
will remain above freezing.
� For models with water filters, the disposable water filter should
be replaced at least every 6 months.
Water Pressure
A cold water supply with water pressure of between 35 and 120
psi (241 and 827 kPa) is required to operate the water dispenser
and ice maker. If you have questions about your water pressure,
call a licensed, qualified plumber.
NOTE: If the water pressure is less than what is required, the flow
of water from the water dispenser could decrease or ice cubes
could be hollow or irregular shaped.
Reverse Osmosis Water Supply
IMPORTANT: The pressure of the water supply coming out of a
reverse osmosis system going to the water inlet valve of the
refrigerator needs to be between 35 and 120 psi (241 and
827 kPa).
If a reverse osmosis water filtration system is connected to your
cold water supply, the water pressure to the reverse osmosis
system needs to be a minimum of 40 to 60 psi (276 to 414 kPa).
If the water pressure to the reverse osmosis system is less than
40 to 60 psi (276 to 414 kPa):
� Check to see whether the sediment filter in the reverse
osmosis system is blocked. Replace the filter if necessary.
� Allow the storage tank on the reverse osmosis system to refill
after heavy usage. The tank capacity could be too small to
keep up with the requirements of the refrigerator.
NOTE: Faucet-mounted reverse osmosis systems are not
recommended.
� If your refrigerator has a water filter, it may further reduce the
water pressure when used in conjunction with a reverse
osmosis system. Remove the water filter. See “Water Filtration
System”.
If you have questions about your water pressure, call a licensed,
qualified plumber.
Connect the Water Supply
Read all directions before you begin.
IMPORTANT:
� Plumbing shall be installed in accordance with the
International Plumbing Code and any local codes and
ordinances.
� The water tubing on the back of the refrigerator (which is used
to connect to the household water line) is a PEX (cross-linked
polyethylene) tube. Copper and PEX tubing connections from
the household water line to the refrigerator are acceptable, and
will help avoid off-taste or odor in your ice or water. Check for
leaks. If PEX tubing is used instead of copper, we recommend
contacting Service to obtain current part numbers.
� Install tubing only in areas where temperatures will remain
above freezing.
� Connect to a potable water supply only.
Do not use with water that is microbiologically unsafe or of
unknown quality without adequate disinfection before or after
the system. Systems certified for cyst reduction may be used
on disinfected waters that may contain filterable cysts.
Tools Needed:
Gather the required tools and parts before starting installation.
� Flat-blade screwdriver
� 7/16" and 1/2" Open-end or two
adjustable wrenches
� 1/4" Nut driver
� 1/4" Drill bit
� Cordless drill
NOTE: Your refrigerator dealer has a kit available with a 1/4" (6.35
mm) saddle-type shutoff valve, a union, and copper or PEX
tubing. Before purchasing, make sure a saddle-type valve
complies with your local plumbing codes. Do not use a piercing-
type or 3/16" (4.76 mm) saddle valve which reduces water flow
and clogs more easily.
Connect to Water Line
IMPORTANT: If you turn on the refrigerator before the water line is
connected, turn off the ice maker.
1. Unplug refrigerator or disconnect power.
2. Turn off main water supply. Turn on nearest faucet long
enough to clear line of water.
3. Use a quarter-turn shutoff valve or the equivalent, served by a
1/2" copper or PEX household supply line.
NOTE: To allow sufficient water flow to the refrigerator, a
minimum 1/2" size copper or PEX household supply line is
recommended.
A. Bulb
B. Nut
C. Copper or PEX tubing (to
refrigerator)
D. Household supply line (½"
minimum)