
Manual
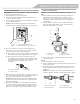
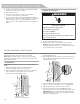
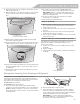
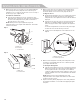
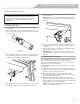
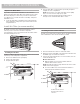


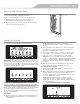
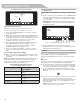
Table Of Contents
- REFRIGERATOR SAFETY
- PARTS AND FEATURES
- Remove and Replace Refrigerator Doors
- Remove and Replace Freezer Drawer Front
- Replace Right-Hand Refrigerator Door
- Connect the Water Supply
- Water Supply Requirements
- Electrical Requirements
- Refrigerator Leveling, Door Closing and Alignment
- Handle Installation and Removal
- Complete the Installation
- Water Filtration System
- Install Produce Preserver (on some models)
- Install Air Filter (on some models)
- Replace the Water Filter
- Using the Controls
- Opening and Closing Doors
- Accessories
- Installing the Status Indicator
- Cooling On/Off
- Water and Ice Dispensers
- Ice Maker and Ice Storage Bin (on some models)
- The Ice Dispenser
- REFRIGERATOR FEATURES
- Pizza Pocket and Drawer Divider
- Door Bins
- Drawer Divider
- Cleaning
- Vacation and Moving Care
- Lights
- Condenser Cleaning
- Operation
- Noise
- Temperature and Moisture
- Ice and Water
- Doors
- PERFORMANCE DATA SHEET

16
Replace the Water Filter
To purchase a replacement water lter, see “Accessories.”
Replace the disposable water lter when indicated on the water
lter status display or at least every 6 months. If water ow to
your dispenser or ice maker decreases noticeably, change the
water lter sooner.
1. Locate the water lter compartment in the right-hand side
of the refrigerator ceiling. Push up to release and lower the
compartment door.
2. Turn the water lter counterclockwise (to the left), and pull it
straight out of the compartment.
NOTE: There may be some water in the lter. Some spilling
may occur. Use a towel to wipe up any spills.
3. Install the replacement water lter by following steps 2
through 7 in the “Install the Water Filter” section.
Install Air Filter (on some models)
An air lter is 15 times more powerful than baking soda at
reducing common food odors inside the refrigerator.
Your refrigerator's accessory packet includes an air lter, which
must be installed prior to use.
Installing the Air Filter
Install the air lter behind the vented door, located on the rear wall
near the top of the refrigerator compartment.
1. Remove the air lter from its packaging.
2. Lift open the vented door.
3. Snap the lter into place.
Installing the Filter Status Indicator
The lter comes with a status indicator, which should be activated
and installed at the same time the air lter is installed.
1. Place the indicator face-down on a rm, at surface.
2. Apply pressure to the bubble on the back of the indicator until
the bubble pops to activate the indicator.
3. Lift open the vented air lter door. On some models, there are
notches behind the door.
Models with notches:
■ With the indicator screen facing outward, slide the
indicator down into the notches.
NOTE: The indicator will not easily slide into the notches if the
bubble has not been popped.
■ Close the air lter door, and check that the indicator is
visible through the window in the door.
A
A. Air lter
B
A
C
A. Status indicator window
B. Air lter status indicator
C. Notches
FILTERS AND ACCESSORIES