
Product Guide
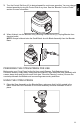
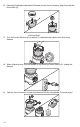
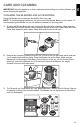

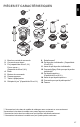
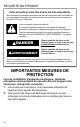

Table Of Contents
- PARTS AND FEATURES_SB_PG_W11669064A
- PRODUCT SAFETY_SB_OM/PG_W11669061A/W11669064A
- GETTING STARTED_SB_OM_W11669061A
- PRODUCT USAGE_SB_PG_W11669064A
- CARE AND CLEANING_SB_PG_W11669064A
- TROUBLESHOOTING_SB_PG_W11669064A
- Cord_Warranty and Service_NAR_Common_One Year
- PARTS AND FEATURES_SB_PG_W11669064A
- PRODUCT SAFETY_SB_OM/PG_W11669061A/W11669064A
- GETTING STARTED_SB_OM_W11669061A
- PRODUCT USAGE_SB_PG_W11669064A
- CARE AND CLEANING_SB_PG_W11669064A
- TROUBLESHOOTING_SB_PG_W11669064A
- Cord_Warranty and Service_NAR_Common_One Year
- PARTS AND FEATURES_SB_PG_W11669064A
- PRODUCT SAFETY_SB_OM/PG_W11669061A/W11669064A
- GETTING STARTED_SB_OM_W11669061A
- PRODUCT USAGE_SB_PG_W11669064A
- CARE AND CLEANING_SB_PG_W11669064A
- TROUBLESHOOTING_SB_PG_W11669064A
- Cord_Warranty and Service_NAR_Common_One Year

EN
11
3.
Turn the Control Dial from (O) to desired speed for continuous operation. You may change
desired speed by turning the Control Dial at any time. See the “Blender Function Guide”
section for more information.
4. When finished, turn the Blender off by returning Control Dial to (O). Unplug Blender from
electrical outlet.
NOTE: Always hold and raise the Small Batch Jar with Blade Assembly from the Blender
Base.
PREPARING THE CITRUS PRESS FOR USE
Before using your Citrus Press for the first time, wash Reamer, Pulp Basket and Juice
Container in warm, sudsy water. Rinse parts and wipe dry. Wipe clean the Gear Assembly with
a warm, damp cloth and dry with a soft cloth (see “Care and Cleaning” section). Be sure the
countertop beneath the Blender and surrounding areas are dry and clean.
USING THE CITRUS PRESS
1. Place the Gear Assembly on the Blender Base, make sure that it is fully seated in the
Base. Place the Juice Container on the Gear Assembly and twist clockwise to lock in
place.
1
2