
Owner's Manual


7
ENGLISH
USING THE COMMERCIAL BLENDER
IMPORTANT : When moving your Blender, always close the Front cover and support/lift
from the Blender base. Base will become disengaged from jar if carried by Blender jar
or Blender jar handle only. Do not lift by the cover or cover handle.
O U N C E S
8oz = 1Cup
60
56
52
48
44
40
36
32
28
12
8
16
20
24
4
O U N C E S
8oz = 1Cup
60
56
52
48
44
40
36
32
28
12
8
16
20
24
4
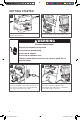
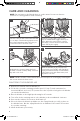
Add items (max. 60oz). Add liquids first,
then soft foods, then leafy greens, and ice
or frozen items last. Secure the lid.
1
OU NC E S
8oz = 1Cup
60
56
52
48
44
40
36
32
28
12
8
16
20
24
4
OU NC E S
8oz = 1Cup
60
56
52
48
44
40
36
32
28
12
8
16
20
24
4
Open the front cover. Place the blender
jar on the base, aligning with the jar pad.
Close the Front cover.
2
OU NC ES
8oz = 1Cup
60
56
52
48
44
40
36
32
28
12
8
16
20
24
4
OU NC ES
8oz = 1Cup
60
56
52
48
44
40
36
32
28
12
8
16
20
24
4
Turn the control dial to your desired speed,
time, or program.
Flip the START/STOP toggle switch up or
down to start. See the “Blender function
guide” for more details.
3
1
2
OU NC E S
8oz = 1Cup
60
56
52
48
44
40
36
32
28
12
8
16
20
24
4
OU NC E S
8oz = 1Cup
60
56
52
48
44
40
36
32
28
12
8
16
20
24
4
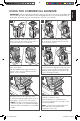
Using the Tamper (optional): Open front
cover. Remove the Ingredient cap only. Stir
or press contents down towards the blade.
When finished, replace the Ingredient cap
before resuming blending.
4
12
8
16
20
24
4
Using the Pulse mode (optional): Press
and hold the PULSE toggle switch up for a
faster pulse, or down for a slower pulse.
NOTE: The Pulse function may also be
used on its own as a separate blending
function while the Blender is in Standby
mode.
5
12
8
16
20
24
4
When finished, flip the START/STOP toggle
switch up or down to stop.
Allow the Blender to completely stop
before removing the lid or pouring out the
blended ingredients.
NOTE: Icy Drink cycle and variable timer
cycles will stop automatically at the
completion of the cycle.
6
W11341965A.indd 7 16/05/2019 14:20:23