KitchenAid" Kltchen_kld" No-Frost Refrigerator Models KSRS22Q KSRB22Q KSHS22Q KSPB22Q A Note toYou KSPS22Q KSRS25Q KSRB25Q ...................... 2 Impodonl Sofety Instructions ........................... 3 Paris ond Feolures ............... 4 Installing lhe Refdgerotor ..... 5 Using the Refrigerotor ........... 7 Codng for the Re_gerotor ........................ 21 Food Sloroge Guide .......... 24 If You Need Assidcr_ce or Service .......................... 26 wam:z_ .........................
.,q Note to You Thank you for buying a KitchenAicl ° home appliance. You have purchased a quality, world-classhome appliance, Years of engineering experience went Into Itsmanufacturing. To ensure that you enjoy many years of trouble-flee operation, we developed thisUse and Care Guide. It Isfullof valuable information on how to operate and maintain your home appliance properly and safely. Please read It carefully.
Important Safety Instructions To r_3=_:cethe risk of fire, e'.: :_ical shock, or Injury when ,__=!ng the refrigerator, follow .'-=-_-_=!c procautlons Including the following: • Read all Instructions before using the refrigerator. • Child entrapment and suffocations are not problems of the past. Junked or abandoned refrigerators are still dangerous.., even If they will 'just sitIn the garage for a few days." If you are getting rid of your old refrigerator, do It safely.
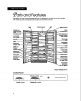
Parts and Features Thissection contains captioned Illustrations of your appliance. Use them to become familiar wilh where all pads and features are located and what 1hey look like. Ught Control panel Ught I Utilitybucket i Model and serial number label (on side wall) _aiw n compartment dispensers (number varles with model) Automatic Ice bln IIIII Ught n_ s,.,onaIll Wine/egg rack IIIII _.,u.a_,° IlUl freezer shelf I,,_ Slide-out freezer IIHI ,.
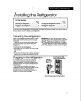
Installing the Refrigerator In This Section Page Page Cleaning the refrigerator .......................... 5 Plugging In the refrigerator ....................... 5 Locatlng the refrigerator properly ............ 6 Leveling the refrigerator ............................ 6 i I If you want your refrigerator to work properly, you need all you need to know to Install your refrigerator. Cleaning to Install It properly.
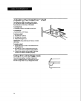
Locating the refrigerator properly 1. Allow 1/2Inch (1.25 cm) on each side of the refrigerator for ease of Installation. 2. The refrigerator back can be flush against the wall. 3. If _ refrigerator Isto be against a wall, you mlght want to leave ex_a space on the hinge side closest to the wall so the door can be opened wider. Leveling the refrigerator Your refrigerator has 2 front leveling rollersone on the left and one on the right. To adjust one or both of these, follow the directions below. 1.
Using the Refrigerator In This Section Page Page Setting the controls ................................... 7 Removing the freezer shelf ..................... 13 Changlng the control settings .................. 8 Removing the freezer baskets ............... 13 Removing the refrlgeratot door blns .......8 Uslngthe Ice maker ................................ 13 Adjusting the bin glldes ............................ 9 Removing the ice maker storage bln ...............................................
Changing the control settings To change the temperature settings, follow the steps below: 1. Adjust the Refrigerator Control first. 2, Walt at least 24 hours before making further adjustments. Thisglves the refrigerator and/or freezer time to reach the set temperature. 3. Adjust the Freezer Control If necessary. To make the refrlgerator or freezer colder, slide the control toward the number 4 setting. To make the refrigerator or freezer lesscold, slide the control toward the number I setting.
Adjusting the bin glides Use the bln glldesto secure odd-shaped Items Inthe door blnsor to separate other Items. To adjust lhe glides: I. Grasp gllde. 2. Move glide along bln. Removing the can dispensers Each dispenser holds 5 beverage cans In a convenient place, leaving more shelf space for larger Items. To remove dlslpenser: I. Uft dlspenser up. 2. Pull dlspenser stralght out. To replace dispenser: I. Hold back of dispenserabove desired guide. 2. Pushdispenser back and down until It stops.
Adjusting the RollerTracT" shelf The RollerTrac shelf has rollers which allow you to roll the shelf out for easier access to foods stored on the rear of the shelf. To roll shelf out: • Carefully pull front of shelf toward you. To roll shelf in: • Push shelf In until it stops. To remove shelf: 1. Tilt shelf up at front. 2. Uft shelf up at back, 3. Pull shelf straight out. IMPORTANT: Glass shelves are heavy. with care, Handle To replace sheff: I.
Removing the crispers and cover To remove crispers: 1. Roll crisper out to the stop. 2. Lift crisper front and pull out the rest of the way. To replace crispers: I. Posltlonback crisperrollers between roller of trackand track Itself. front 2. Push crisperup onto track. 3. Rollcrisperback until Itstops. To remove glass cover: 1. Remove top crisper. 2. 111tcover up at front. 3. lift cover at back and pull straight out, 4. Replace In reverse order. IMPORTANT: Glass shelves are heavy. with care.
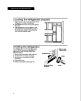
Adjusting the meat locker temperature The Meat LockerTemperatureControlallows you to adjustthemeat lockerstorage temperature. Cold alrflowsagalnstthemeat locker throughan openlng between thefreezer and therefrigerator. SUde_e controlup or down to allowmore or less cold alrthrough theopenlng.Thishelpskeep themeat locker colderthan therest oftherefrigerator. Removing the freezer door shelf fronts Remove thefreezer door shelf fronts for easlercleanlng.
Removing the freezer shelf To remove the shelf: 1. Uft the fight side of shelf off supports. 2. Slide shelf out of shelf support holes on left side of cabinet. 3. Replace In reverse order. Removing the freezer baskets To remove baskets: 1. Slide basket out to the stop. 2. Oft basket at front to clear the stop. 3. Slide basket out the rest of the way. To replace baskets: I. Place basket on the silcles. 2. Oftbasket at frontto clear the stops. 3. Slldebasket Inuntil Itstops.
Removing the ice maker storage bin The ice maker storage binholds up to 8.5pounds (3.8kg) of Ice.Remove unused Ice perlodically to reduce the potentialfor off-taste or odor bulld-upInIce. IMPORTANT: The first few the Ice maker may have from new plumbing and few batches of Ice away supply. batches of Ice from an off-taste. ThlsIs parts.Throw the first and make a new To remove storage bln: Remove the storage blnto supply large quanfitiesof Ice or forcleanlng. I.
Using the cold water and ice dispensers Personal Injury Hazard Tumbling Ice and pressure can break a ffaglle glass. Usea sturdyglass when dispensing ice or water. Failureto do so could resultin personal Injuryor breakage. The ice dispenser Ice dispenses from the Ice maker storage bin in the freezer. When the dispenser bar is pressed, a trapdoor opens In a chute between the dispenser and the Ice bin. Ice moves from the bin and falls through the chute.
The cold water dispenser Chilled water comes from a 50 oz. (1.5 L) tank behind the crisper drawers. Allow about 24 hours to chill the first tankful of water. When the refrigerator Isfirst hooked up, press the water dispenser bar until you draw and discard 2 to 3 quads (1.9 to 2.9 L) of water. ThIsremoves the air In the system and rinses the water tank and pipes. If the dIspenser Is not used regularly, dIspense enough water eve_, week to freshen the supply.
Dispenser/ice maker operating tips PROBLEM CAUSE SOLUTION Dbpensers won't work * Freezer door open * Close the freezer Ice dispenser won't work • IceblnnotproperlyInstalled • Make sure Ice bin is pushed •Wrong IceInbln • Dispenser not used for extended periods of time, causing Ice cubes to melt together Ice dlr_oenserstops worklng Off-taste or odor In Ice door. In all the way. • Use only crescents from Ice maker.
Removing the base grille To remove base grille: 1. Open both doors. 2. Pull base grille forward to release the support tabs from the metal clips. 3. Do not remove Tech Sheet fastened behlnd the base grllle, To replace base grille: 1. Line up base grille support tabs with metal clips. 2. Push base grille firmly to snap Into place. 3. Close the doors. See cleaning Instructionsfor defrost pan and condenser coils on page 22.
Changing the light bulbs Electrlcal Shock Hazard Before removing a light bulb, elther unplug the refrigerator or dlsconnect the elecJTlclty leading to the refrigerator at the main power supply. Failure to do so could result In personal Injury or electrical shock. To change refrlgerator llght: I. Disconnect refrigerator from power supply, 2. Reach behind Control Console to remove bulb. 3. Remove bulb and replace with a 40-watt tubular appllance bulb. 4. Reconnect refrigerator to power supply. i .
To change dispenser light: I. Disconnect refrigerator from power supply. 2. Reach through front of dispenser area to bulb. IMPORTANT:Not all commercial appliance bulbs will fit your refrigerator. Be sure to replace a bulb with one of the same size and shape. 3. Remove bulb and replace with a heavyduty tO-watt bulb. 4. Reconnect refrigerator to power supply. Understanding the sounds you may hear Your new refrigerator may make different sounds than your previous one.
aring for the Refrigerator In This Section Page Page Cleanlng the refrlgerator ........................ 21 Vacation and moving care ................... 22 Power Interruptions ............................... 23 Your new refrigerator-freezer isdesigned to give you many years of dependable service.
PART WHATTO USE HOW TO CLEAN Interlor walls Sponge, soft cloth or paper towel with mild detergent and warm water • Wash, rinse and dry well. Door liners and gaskets Sponge, soft cloth or paper towel with mild detergent and warm water • Wash, rinseand dry well, Do not use cleanlng waxes, concenlTatqKl detergents, bleaches, or cleaners containing petroleum or alcohol on plastic parts.
Moving Turn off the water supply to the Ice maker least one day before you move. When the last load of Ice drops Into the bin, turn the Ice maker off by raising the signal arm. Empty the Ice bin. Remove all food and pack It In dry ice. Unplug the refrigerator. Clean It thoroughl_ rinse well and dry. Take out all removable parts and tape them together so they wor rattle. Screw In the leveling legs, tape the door shut and tape the power supply cord to the cabinet.
. ood Storage Guide In This Section Page Page Storlng fresh food .................................... 24 Storingfrozen food ................................ 25 This section gives you helpful Information on how to store all types of food and for how long. For more information, see a reliable cookbook or a freezer guide. Storing fresh food Vegetables Condiments Leafy: Store small jars and bottles Remove store wrapping. Tear off bruised and discolored areas. Wash In cool water, drain.
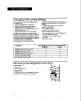
Storage chart for meats* TYPE APPROXIMATE TIME (DAYS) Chicken I to 2 Ground beef I to 2 Variety meats I to 2 Steaks and roasts 3 to 5 Cold cuts 3 to 5 Bacon 5 to 7 Cured meat 7 to 10 *If storing meat. longer than recommenaea. the time given, freezing is IMPORTANT:Use fresh fish and shellfishthe same day as purchased. Storing frozen food Prepackaged frozen food Store in original packaging on freezer door shelf or on freezer shelf.
If You Need Assistance or Service If you ever have questions or comments about your appliance, can call our toll-free Consumer Assistance Center telephone number, 1-800-422-1230, 24 hours a day. you This section is designed to save you the cost of a service call. Part 1 outlines possible problems, their causes, and actions you can take to solve each problem. Parts 2 and 3 tell you what to do If you still need assistance or service.
PROBLEM The motor seems to run too long CHECK IF WHATTO DO The room is too warm, too much food was put Into refrigerator at one time or the doors have been opened too often. The motor naturally runs longer on hot days or If the room Is too warm, as well as when a large amount of food has been put Into the refrigerator or the doors have been opened often. 2. If the problem is not due to one of the items listed in Step I: 4.
KitchenAid _ eestanding Refrigerator Warranty LENGTH OF WARRANTY: KITCHENAID WILL PAY FOR: ONE YEARFULL WARRANTY FROM DATE OF PURCHASE, Replacement parts and repair labor costs to correct defects In materials or workmanship. Service must be provided by an authorized KltchenAld servicing outlet. SECOND THROUGH FIFTHYEARFULL WARRANTY FROM DATE OF PURCHASE. ° KITCHENAID WILL NOT PAY FOR: A. Servicecallsto: I. Correct the Installation of the refrigerator. 2. Instruct you how to use the refrigerator.