INTEGRATED COMPACTOR Use & Care Guide For questions about features, operation/performance, parts, accessories or service, call: 1-800-422-1230 or visit our website at www.kitchenaid.com In Canada, for assistance, installation or service, call: 1-800-807-6777 or visit our website at www.KitchenAid.ca Table of Contents ............................................................................................................
TABLE OF CONTENTS COMPACTOR SAFETY ..................................................................2 INSTALLATION INSTRUCTIONS ..................................................3 Unpacking ....................................................................................3 Location Requirements ................................................................4 Electrical Requirements ...............................................................4 Undercounter Installation.................................
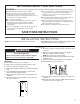
IMPORTANT SAFETY INSTRUCTIONS WARNING: When using an electrical appliance, basic precautions should always be followed, including the following: ■ ■ ■ ■ ■ Read all instructions before using the compactor. Close supervision is necessary when used by or near children. Do not allow to be used as a toy, or to run unattended at any time. Lock Key Switch when not in use and store key out of reach of children. Do not touch moving parts.
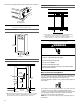
13. Remove the shipping base from the bottom of the compactor. Clearance Dimensions A B A. Leveling legs B. Shipping base Location Requirements Product Dimensions B A A. Leave 6" (15.2 cm) of clearance space to the right side of the compactor in order to remove the compactor bags. B. Leave 23" (58.4 cm) of clearance in front of the compactor in order to fully open or remove the compactor drawer. Electrical Requirements 34¹⁄₈" (86.7 cm) WARNING 15" (38.
Undercounter Installation NOTE: Proper installation is your responsibility. Make sure you have everything necessary for correct installation. It is the personal responsibility and obligation of the customer to contact a qualified installer to assure that electrical installation meets all National and Local codes and ordinances. Tools Needed Gather the required tools and parts before starting installation.
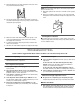
Installation Cabinet-face Mounting C A B D 1. Remove the 2 rubber bumpers from the lower corners of the inside drawer front. Set aside the bumpers and discard the screws. 2. Align the bottom of the custom panel with the bottom of the exterior drawer front and rest the panel on the rest tab. NOTE: The bottom of the custom panel should not extend below the bottom rest tab at the lower center of the exterior drawer front. 3.
COMPACTOR USE How Your Compactor Works 2. Place trash in compactor. ■ Wrap or cover wet or messy trash. The compacting ram is the part of the compactor which compresses the trash. The compacting ram does not go to the bottom of the drawer. You will not see compacting of trash the first few times you load the compactor. NOTE: The compactor drawer should be more than ¹⁄₂ full before the compactor can begin to compress the load. You may hear a noise when glass breaks.
Using the Air Filter or Freshener Installing a New Bag 1. Set the Air Filter switch to ON. The fan creates air movement in the compactor for odor removal. NOTE: The charcoal Air Flter works only when the Key-Knob is in the ON position. Do not use any kind of bag other than those designed especially for use in your compactor. Order replacement compactor bags through your local dealer or by calling the toll-free number on the cover or in the “Assistance or Service” section.
COMPACTOR CARE Your new compactor is designed to give you many years of dependable service. However, there are a few things you are expected to do in order to properly maintain your compactor. This section will tell you how to clean and care for your compactor. Changing the Air Filter or Freshener It is recommended that you use either the charcoal air filter or the air freshener in the filter compartment.
3. Grasp the drawer on the sides and pull it out the rest of the way. Set the drawer down gently. Cleaning the Ram NOTE: You may want to wear gloves since there may be bits of glass on the ram cover. 1. Wipe glass particles off of the ram cover with a cloth or paper towels. 2. Remove foods with a clean sponge or soft cloth and a mild detergent in warm water. Rinse and dry thoroughly with a soft cloth. 4. Vacuum the inside of the cabinet.
ASSISTANCE OR SERVICE Before calling for assistance or service, please check “Troubleshooting.” It may save you the cost of a service call. If you still need help, follow the instructions below. When calling, please know the purchase date and the complete model and serial number of your appliance. This information will help us to better respond to your request. If you need replacement parts If you need to order replacement parts, we recommend that you use only factory specified parts.
KITCHENAID® COMPACTOR WARRANTY ONE YEAR LIMITED WARRANTY For one year from the date of purchase, when this major appliance is operated and maintained according to instructions attached to or furnished with the product, KitchenAid or KitchenAid Canada (hereafter “KitchenAid”) will pay for factory specified parts and repair labor to correct defects in materials or workmanship. Service must be provided by a KitchenAid designated service company.