
Instruction Sheet

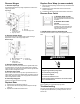


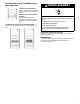

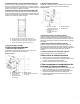
Table Of Contents

2
Reverse Hinges
1. Remove top hinge
Unscrew and remove the top hinge. Replace the screws in the
empty hinge holes.
Top Hinge
A. Hinge pin
B. Phillips-head
countersink screw
C. Hinge pin sleeve
D. Top hinge
E. Hex-head hinge screw
2. Remove bottom hinge
Unscrew and remove the bottom hinge screws and hinge.
Replace the screws in the empty hinge holes.
Bottom Hinge
A. Hex-head hinge screw
B. Hinge pin sleeve
C. Phillips-head
countersink screw
D. Hinge pin
E. Bottom hinge
3. Remove bottom screws
Remove the screws from the bottom of the opposite side of the
ice maker cabinet. Turn the top hinge upside down so that the
hinge pin points up. Place the hinge on the bottom opposite side
of the ice maker and tighten screws.
4. Remove top screws
Remove the screws from the top of the opposite side of the ice
maker cabinet. Turn the hinge upside down so that the hinge pin
points down. Place the hinge on the top opposite side of the ice
maker and tighten the screws.
5. Insert top hinge pin
Insert the top hinge pin into the top hinge.
Replace Door
1. Place the door on the bottom hinge pin.
2. Align the door with the top hinge hole and replace the top
hinge pin.
3. Replace the handle and handle screws.
Replace Door Wrap (on some models)
1. Place the door wrap flange onto the door top and ensure that
it fits correctly.
2. Rotate the door wrap downward until it covers the door
surface completely.
3. Install the two hex-head screws into the bottom of the door.
Reverse Door Catch
1. Remove white screws
Remove the white decorative screws
from the opposite side of the door and
set aside.
2. Remove door catch
screws
Remove the screws from the
magnetic door catch and place the
door catch and the screws on the
opposite side of the door.
3. Install white screws on opposite side
Install the white decorative screws on the opposite side of the
door.
WARNING
Electrical Shock Hazard
Plug into a grounded 3 prong outlet.
Do not remove ground prong.
Do not use an adapter.
Do not use an extension cord.
Failure to follow these instructions can result in death,
fire, or electrical shock.
4. Plug in ice maker
Plug ice maker into a grounded 3–prong outlet.
Troubleshooting
See your Owner’s Manual or visit our website and reference
Frequently Asked Questions to possibly avoid the cost of a
service call.