
Installation


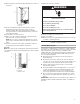


Table Of Contents
- Ice Maker SAFETY
- INSTALLATION INSTRUCTIONS
- SÉCURITÉ DE LA MACHINE À GLAÇONS
- INSTRUCTIONS D’INSTALLATION
- Déballage de la machine à glaçons
- Exigences d’emplacement
- Spécifications électriques
- Spécifications de l’alimentation en eau
- Vacances ou longue période d’inutilisation
- Raccordement à la canalisation d’eau
- Installation de la pompe de vidange (sur certains modèles)
- Raccord au drain
- Inversion du sens de la porte – porte à ouverture latérale uniquement
- Ajustement de l’aplomb
- Nettoyage
- SEGURIDAD DE LA FÁBRICA DE HIELO
- INSTRUCCIONES DE INSTALACIÓN
- Cómo desempacar la fábrica de hielo
- Requisitos de ubicación
- Requisitos eléctricos
- Requisitos de suministro de agua
- Vacaciones o tiempo prolongado sin uso
- Conexión del suministro de agua
- Instalación de la bomba de desagüe (en algunos modelos)
- Conexión de desagüe
- Reversión de puertas— Solo lado de apertura
- Nivelación
- Limpieza
7
14. Remove wiring cover. Refer following illustration for location of
the screws.
15. Route vent tube through plastic retainer that is located
underneath top deck in open pump area as shown in
illustration. Using cable tie, tie the vent tube to the black
suction tube which is located behind the wiring cover. Refer
"Vent Tube" illustration.
16. Secure wiring cover back in place.
17. Attach 1/2" I.D. x 10 ft (3 m) drain tube to pump discharge
tube. See “Parts Locations” illustration.
NOTE: Do not connect outlet end of drain tube to a closed
pipe system to keep drain water from backing up into the ice
maker.
18. Connect ice maker to water supply and install ice maker as
specied by the product installation instructions.
Vent Tube
NOTE: Do not pinch, kink or damage the vent tube. Check that it
is not damaged or pinched or kinked between the cabinet and the
ice maker.
19. Check all connections for leaks.
20. Plug in ice maker or reconnect power.
21. Turn on ice maker.
22. Wait for rinsing cycle, approximately 5 minutes, to be sure the
ice maker is operating properly.
Drain Connection
Gravity Drain System
Connect the ice maker drain to your drain in accordance with all
state and local codes and ordinances. If the ice maker is provided
with a gravity drain system, follow these guidelines when
installing drain lines. This will help keep water from owing back
into the ice maker storage bin and potentially owing onto the
oor, causing water damage.
■ Drain lines must have a minimum of 5/8" (15.88 mm) I.D.
(inside diameter).
■ Drain lines must have a 1" drop per 48" (2.54 cm drop per
122 cm) of run or 1/4" drop per 12" (6.35 mm per 30.48 cm) of
run and must not have low points where water can settle.
■ The oor drains must be large enough to accommodate
drainage from all drains.
■ The ideal installation has a standpipe with a 1¹⁄
2
" (3.81 cm) to
2" (5.08 cm) PVC drain reducer installed directly below the
outlet of the drain tube as shown. You must maintain a 1"
(2.54 cm) air gap between the drain hose and the standpipe.
■ Do not connect the outlet end of the drain tube to a closed
pipe system to keep drain water from backing up into the ice
maker.
IMPORTANT: A drain pump is necessary when a oor drain is not
available. A Drain Pump kit, Part Number 1901A, is available for
purchase.
A
B
A. Wiring cover
B. Screws
A. Vent tube
B. Cable tie
C. Plastic retainer
A
B
C
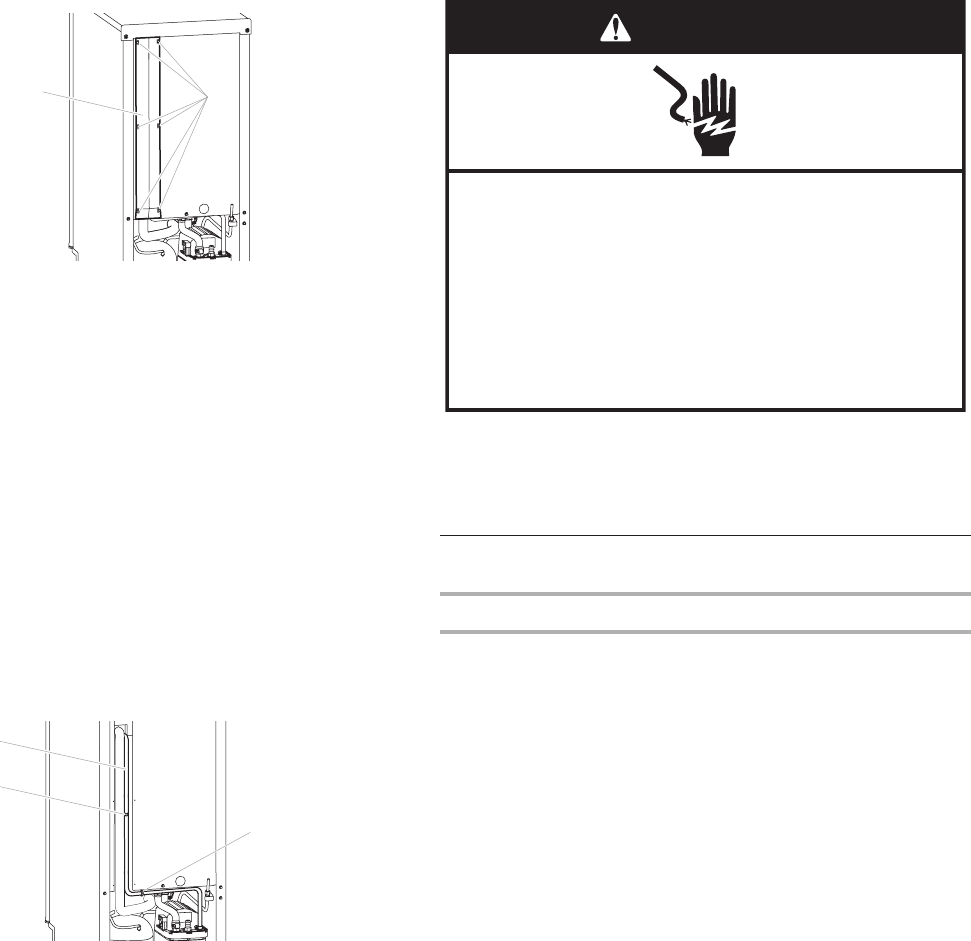
Electrical Shock Hazard
Plug into a grounded 3 prong outlet.
Do not remove ground prong.
Do not use an adapter.
Do not use an extension cord.
Failure to follow these instructions can result in death,
fire, or electrical shock.
WARNING