
Owner's Manual
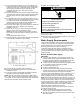
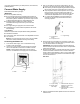

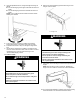
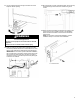
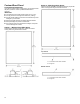
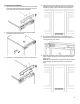
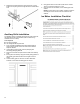
Table Of Contents
- ICE MAKER SAFETY
- Ice Maker Safety
- IMPORTANT CONSUMER INFORMATION
- Important Consumer Information
- ICE MAKER MAINTENANCE AND CARE
- How Ice Maker Works
- Normal Sounds
- Water Filtration System
- Interior Cleaning
- Exterior Cleaning
- Vac Extn Time Without Use
- INSTALLATION INSTRUCTIONS
- Unpack Ice Maker
- Location Requirements
- Electrical Requirements
- Drain Connection Requirements
- Drain Pump Installation (on some models)
- Water Supply Requirements
- Connect Water Supply
- Connecting the Drain
- Leveling and Securing
- Custom Wood Panel
- Auxiliary Grille Installation
- SECURITE DE LA MACHINE A GLACONS
- Sécurité de la machine à glaçons
- RENSEIGNEMENTS IMPORTANTS POUR LE CONSOMMATEUR
- Renseignements importants pour le consommateur
- ENTRETIEN ET REPARATION DE LA MACHINE A GLACONS
- Comment utiliser la machine à glaçons
- Sons normaux
- Système de filtration d’eau
- Nettoyage de l’intérieur
- Nettoyage des surfaces externes
- Vacances ou longue période d’inutilisation
- INSTRUCTIONS D'INSTALLATION
- Déballage de la machine à glaçons
- Exigences d’emplacement
- Electrical Requirements
- Exigences concernant le raccordement au drain
- Installation de la pompe de vidange (sur certains modèles)
- Spécifications de l’alimentation en eau
- Raccordement à la canalisation d’eau
- Raccordement de la vidange
- Leveling and Securing
- Panneau de bois personnalisé
- Installation de la grille auxiliaire

15
7. Thread the nut onto the end of the tubing. Tighten the nut by
hand. Then tighten it with a wrench two more turns. Do not
overtighten.
NOTE: To avoid rattling, be sure the copper tubing does not
touch the cabinet’s side wall or other parts inside the cabinet.
A. Line to ice
maker
B. Compression
nut
C. Compression sleeve
D. Supplied line from maker
8. Install the water supply tube clamp around the water supply
line to reduce strain on the coupling. For custom panel
models, skip this step.
9. Turn shutoff valve On.
10. Check for leaks. Tighten any connections (including
connections at the valve) or nuts that leak.
Connecting the Drain
After ensuring that the drain system is adequate, follow these
steps to properly place the ice maker:
WARNING
Electrical Shock Hazard
Plug into a grounded 3 prong outlet.
Do not remove ground prong.
Do not use an adapter.
Do not use an extension cord.
Failure to follow these instructions can result in death,
fire, or electrical shock.
1. Plug ice maker into a grounded 3–prong outlet.
WARNING
Excessive Weight Hazard
Use two or more people to move and install or uninstall
appliance.
Failure to do so can result in back or other injury.
2. Style 1 For gravity drain system, push the ice maker into
position so that the ice maker drain tube is positioned over the
PVC drain reducer. See “Gravity Drain System.”
Style 2 For drain pump system, connect the drain pump outlet
hose to the drain. See “Drain Pump System.”
NOTE: Do not connect outlet end of drain tube to a closed
pipe system to avoid drain water backing up into the ice maker.
3. Recheck the ice maker to be sure that it is level. See “Leveling
and Securing.”
4. Turn on ice maker. Wait for rinsing cycle, approximately
5 minutes, to be sure the ice maker is operating properly.
5. If it is required by your local sanitation code, seal the cabinet to
the floor with an approved caulking compound after all water
and electrical connections have been made.
Leveling and Securing
It is important for the ice maker to be level in order to work
properly. Depending upon where you install the ice maker, you
may need to make several adjustments to level it. You may also
use the leveling legs to lower the height of the ice maker for under
counter installations.
Tools Needed:
Gather the required tools and parts before starting installation.
� Level
� Adjustable wrench
NOTE: It is easier to adjust the leveling legs if you have another
person to assist you.
WARNING
Excessive Weight Hazard
Use two or more people to move and install or uninstall
appliance.
Failure to do so can result in back or other injury.
1. Move the ice maker to its final location. Be sure to cover the
floor with cardboard or hardboard to avoid damaging it.
NOTE: If this is a built-in installation, move the ice maker as
close as possible to the final location.
For standard models:
2. Place the level on top of the ice maker to see whether the ice
maker is level from front to back and side to side.
3. Push up on the top front of the ice maker, and then locate the
leveling screws that are on the bottom front of the ice maker.