
Owner's Manual
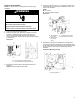
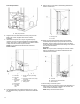

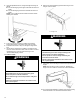
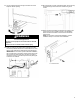
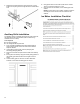
Table Of Contents
- ICE MAKER SAFETY
- Ice Maker Safety
- IMPORTANT CONSUMER INFORMATION
- Important Consumer Information
- ICE MAKER MAINTENANCE AND CARE
- How Ice Maker Works
- Normal Sounds
- Water Filtration System
- Interior Cleaning
- Exterior Cleaning
- Vac Extn Time Without Use
- INSTALLATION INSTRUCTIONS
- Unpack Ice Maker
- Location Requirements
- Electrical Requirements
- Drain Connection Requirements
- Drain Pump Installation (on some models)
- Water Supply Requirements
- Connect Water Supply
- Connecting the Drain
- Leveling and Securing
- Custom Wood Panel
- Auxiliary Grille Installation
- SECURITE DE LA MACHINE A GLACONS
- Sécurité de la machine à glaçons
- RENSEIGNEMENTS IMPORTANTS POUR LE CONSOMMATEUR
- Renseignements importants pour le consommateur
- ENTRETIEN ET REPARATION DE LA MACHINE A GLACONS
- Comment utiliser la machine à glaçons
- Sons normaux
- Système de filtration d’eau
- Nettoyage de l’intérieur
- Nettoyage des surfaces externes
- Vacances ou longue période d’inutilisation
- INSTRUCTIONS D'INSTALLATION
- Déballage de la machine à glaçons
- Exigences d’emplacement
- Electrical Requirements
- Exigences concernant le raccordement au drain
- Installation de la pompe de vidange (sur certains modèles)
- Spécifications de l’alimentation en eau
- Raccordement à la canalisation d’eau
- Raccordement de la vidange
- Leveling and Securing
- Panneau de bois personnalisé
- Installation de la grille auxiliaire

17
11. Use ice maker leveling legs to align ice maker door to the
adjacent cabinet opening.
WARNING
Excessive Weight Hazard
Use two or more people to move and install or uninstall
appliance.
Failure to do so can result in back or other injury.
12. Slide ice maker into the cabinet while managing the utility
connection positions behind the ice maker. Be sure to cover
the floor with cardboard or hardboard to avoid damaging it.
IMPORTANT: For the custom panel model flush installation,
the ice maker utility connections must be routed out through
the slot in the ice maker rear panel. Anytime ice maker is
removed for service, do the same process when placing the
unit back in the cabinets.
13. Be sure that the ice maker is at desired depth. Secure the top
and bottom hinges to the side of the cabinet using wood
screws.
14. Attach the cabinet brackets (provided with ice maker) to the
holes in the front of ice maker as shown in the illustration.
Attach the cabinet brackets to the side of the cabinet with
wood screws.
NOTE: For the custom wood panel installation, continue
installation at step 6 of “Custom Panel Installation.”
A. Cabinet bracket