
Installation


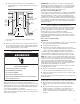


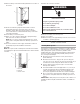


Table Of Contents
- Ice Maker SAFETY
- INSTALLATION INSTRUCTIONS
- SÉCURITÉ DE LA MACHINE À GLAÇONS
- INSTRUCTIONS D’INSTALLATION
- Déballage de la machine à glaçons
- Exigences d’emplacement
- Spécifications électriques
- Spécifications de l’alimentation en eau
- Vacances ou longue période d’inutilisation
- Raccordement à la canalisation d’eau
- Installation de la pompe de vidange (sur certains modèles)
- Raccord au drain
- Inversion du sens de la porte – porte à ouverture latérale uniquement
- Ajustement de l’aplomb
- Nettoyage
- SEGURIDAD DE LA FÁBRICA DE HIELO
- INSTRUCCIONES DE INSTALACIÓN
- Cómo desempacar la fábrica de hielo
- Requisitos de ubicación
- Requisitos eléctricos
- Requisitos de suministro de agua
- Vacaciones o tiempo prolongado sin uso
- Conexión del suministro de agua
- Instalación de la bomba de desagüe (en algunos modelos)
- Conexión de desagüe
- Reversión de puertas— Solo lado de apertura
- Nivelación
- Limpieza

10
Reverse Hinges
1. Unscrew and remove the top hinge. Replace the screws in the
empty hinge holes.
2. Remove the screws from the bottom of the opposite side of
the ice maker cabinet. Turn the top hinge upside down so
that the hinge pin points up. Place the hinge on the bottom
opposite side of the ice maker and tighten screws.
3. Remove the “old” bottom hinge screws and hinge. Replace
the screws in the empty hinge holes.
4. Remove the screws from the top of the opposite side of the
ice maker cabinet. Turn the hinge upside down so that the
hinge pin points down. Place the hinge on the top opposite
side of the ice maker and tighten the screws.
5. Remove the top hinge pin.
Replace Door
1. Place the door on the bottom hinge pin.
2. Align the door with the top hinge hole and replace the top
hinge pin.
3. Replace the handle and handle screws.
Replace Door Wrap (on some models)
1. Place the door wrap ange onto the door top and ensure that
it ts correctly.
2. Rotate the door wrap downward until it covers the door
surface completely.
3. Install the two hex-head screws into the bottom of the door.
Top Hinge
Bottom Hinge
Reverse Door Catch
1. Remove the white decorative screws from the opposite side
of the door and set aside.
2. Remove the screws from the magnetic door catch and place
them on the opposite side of the door.
A
C
D
E
B
A. Hinge pin
B. Phillips-head countersink screw
C. Hinge pin sleeve
D. Hinge
E. Hex-head hinge screw
A
B
E
D
C
A. Hex-head hinge screw
B. Hinge pin sleeve
C. Phillips-head countersink screw
D. Hinge pin
E. Hinge