
Installation


10
8. Repeat steps 6 and 7 on the second hinge.
NOTE: Keep track of where each door hinge was originally
located, at the top or bottom of the unit.
Preparing the Bottom Hinges
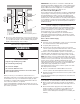
1. Once both hinges are removed, unscrew the grill cover by
using a TORX T20
†
screwdriver.
NOTE: The door may fall open. This is normal.
2. Remove the black screw cover from the grill by opening the
grill cover, pushing the screw cap inwards, and sliding it out to
the side. Remove the hinge shim.
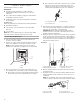
3. To attach the black screw cover to the opposite side, rst pull
the grill cover out.
4. Place the black screw cover between the grill and the screws.
Install the hinge shim on the opposite side, making sure the
notches face down and out.
NOTE: Make sure all of the covers's edges are behind the lip
of the grill, or it will not stay in place.
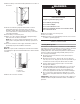
5. Once the cover is secure, push the grill cover back into its
original position, and replace the grill screws.
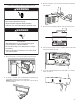
Reversing the Hinges
1. Place the hinge shim on the opposite side of the ice maker.
NOTE: The hinge shim is notched on the bottom-inner side to
indicate proper placement. Flip the hinge shims as needed to
make sure that the notches are facing in and down.
Black screw cover
Hinge shim
†TORX and T20 are trademarks of Acument Intellectual Properties, LLC.