
Installation Instructions
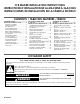


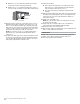
Table Of Contents
- Ice maker SAFETY
- INSTALLATION INSTRUCTIONS
- Unpack the Ice Maker
- Vacation or Extended Time Without Use
- Location Requirements
- Electrical Requirements
- Water Supply Requirements
- Drain Connection Requirements
- Door Reversal
- Drain Pump Installation (on some models)
- Connect Water Supply
- Leveling and Securing
- Custom Wood Panel
- Connecting the Drain
- Auxiliary Grill Installation
- Deep Clean
- SÉCURITÉ DE LA MACHINE À GLAÇONS
- INSTRUCTIONS D’INSTALLATION
- Déballage de la machine à glaçons
- Vacances ou longue période d’inutilisation
- Exigences d’emplacement
- Spécifications électriques
- Spécifications de l’alimentation en eau
- Exigences concernant le raccordement au drain
- Inversion de la porte
- Installation de la pompe de vidange (sur certains modèles)
- Raccordement à la canalisation d’eau
- Mettre de niveau et sécuriser
- Panneau de bois personnalisé
- Raccordement de la vidange
- Installation de la grille auxiliaire
- Nettoyage en profondeur
- SEGURIDAD DE LA FÁBRICA DE HIELO
- INSTRUCCIONES DE INSTALACIÓN
- Cómo desempacar la máquina de hielo
- Vacaciones o tiempo prolongado sin uso
- Requisitos de ubicación
- Requisitos eléctricos
- Requisitos del suministro de agua
- Requisitos para la conexión del desagüe
- Cambio del sentido de apertura de la puerta
- Instalación de la bomba de desagüe (en algunos modelos)
- Conexión del suministro de agua
- Nivelado y asegurado
- Panel de madera personalizado
- Conexión del desagüe
- Instalación de la rejilla auxiliar
- Limpieza intensa

6 7
Reversing the Hinges and End Caps
1. Install the hinge screws (placed aside in step 10 of “Door
Panel and Hinge Removal”) half way on the desired side of the
cabinet.
2. Take the original top hinge, ip it and place it in the bottom
hinge position on the opposite side. Slide onto the cabinet
hinge screws. The hinge tabs on the hinges should always
face towards each other.
3. Take the original bottom hinge, ip it and place it in the top
hinge position on the opposite side. Slide onto the cabinet
hinge screws.
4. Fully tighten the top and bottom hinge screws.
Final Door Placement
NOTE: Before placing the door back on the ice maker, check all
installed parts to ensure there are no exposed screws, all screw
cover caps are on, and the door is facing the correct way with the
stainless steel door facing out.
1. Slide the door onto the hinges. Using Torx T25 screwdriver
install the screws (removed in the step 6 of “Removing the
Hinges” section) onto the door.
2. Reinstall the plastic screw cover to original locations on the
hinges.
3. Reinstall the top and bottom end caps on the door (the top
right end cap is now the bottom left end cap and vice versa).
NOTE: For custom wood install skip this step.
4. Place the steel door panel back on the door once all screws
are tightened. For custom door panel, skip this step.
A
8. Unscrew the door hinge screws completely from top and
bottom hinges and place them aside.
9. Remove the door and place it aside. Swap the hinge screws
to the opposite side.
10. Remove the screws and hinges from the cabinet with the
Torx T25 screwdriver and place them aside.
11. Remove the screw cap cover and replace on the other side.
Preparing the Bottom Hinges
1. Unscrew and remove the grill cover using a Torx T20
screwdriver. Place them aside.
2. Remove the screw cover and place it on the other side as
shown in the illustration.
3. Reinstall the grill cover.
Crush Hazard
Articulated hinges are self closing and many pinch
points exist prior to cabinet installation.
Do not operate, or close, the hinges while they are
removed from the ice maker.
Failure to follow these instructions can result in crush,
cut, or pinch injuries.
WARNING
A
A. Grill cover screws
†
Torx,T20 and T25 are trademarks of Acument Intellectual Properties, LLC.
A. Hinge tab