
Installation Instructions
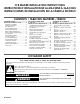


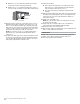
Table Of Contents
- Ice maker SAFETY
- INSTALLATION INSTRUCTIONS
- Unpack the Ice Maker
- Vacation or Extended Time Without Use
- Location Requirements
- Electrical Requirements
- Water Supply Requirements
- Drain Connection Requirements
- Door Reversal
- Drain Pump Installation (on some models)
- Connect Water Supply
- Leveling and Securing
- Custom Wood Panel
- Connecting the Drain
- Auxiliary Grill Installation
- Deep Clean
- SÉCURITÉ DE LA MACHINE À GLAÇONS
- INSTRUCTIONS D’INSTALLATION
- Déballage de la machine à glaçons
- Vacances ou longue période d’inutilisation
- Exigences d’emplacement
- Spécifications électriques
- Spécifications de l’alimentation en eau
- Exigences concernant le raccordement au drain
- Inversion de la porte
- Installation de la pompe de vidange (sur certains modèles)
- Raccordement à la canalisation d’eau
- Mettre de niveau et sécuriser
- Panneau de bois personnalisé
- Raccordement de la vidange
- Installation de la grille auxiliaire
- Nettoyage en profondeur
- SEGURIDAD DE LA FÁBRICA DE HIELO
- INSTRUCCIONES DE INSTALACIÓN
- Cómo desempacar la máquina de hielo
- Vacaciones o tiempo prolongado sin uso
- Requisitos de ubicación
- Requisitos eléctricos
- Requisitos del suministro de agua
- Requisitos para la conexión del desagüe
- Cambio del sentido de apertura de la puerta
- Instalación de la bomba de desagüe (en algunos modelos)
- Conexión del suministro de agua
- Nivelado y asegurado
- Panel de madera personalizado
- Conexión del desagüe
- Instalación de la rejilla auxiliar
- Limpieza intensa

14 15
Custom Panel Installation
1. Remove screws and the top metal bracket using the Phillips
screwdriver. Remove and place them aside. Skip this step and
go to the step 4 if the door reversal has been completed.
2. Remove the top and bottom end caps using the Phillips
screwdriver and place them aside.
3. Reinstall top metal bracket using screws removed in the
step 1.
4. Lightly press the custom panel onto the door using double
sided adhesive tape. Adjust height of the panel to align with
the adjacent cabinetry. Press the panel rmly against door.
5. From inside the door, install the wood screws through the
slotted holes in the metal brackets.
Continue to “Leveling and Securing” section at step 5.
6. Adjust the panel side to side to achieve a desired gap on both
sides. Install the remaining screws through the door bracket
into the panel.
NOTE: Be sure that the panel is aligned with adjacent cabinet
before installing the remaining screws to secure the door
panel.
7. Replace the top and bottom end caps into the door. Fix the
bottom end cap using screw through the bottom metal
bracket hole.
Custom Wood Panel
Custom Panel Dimensions
If you plan to install a custom overlay panel, you will need to
make the panel yourself or consult qualied cabinetmaker or
carpenter
IMPORTANT:
■ The thickness of overlay panel must be 3/4" (1.91 cm).
■ Overlay panel must not weigh more than 8lbs (3.62 kg).
■ Overlay panels weighing more than recommended may cause
damage to your ice maker.
■ Match wood grain direction with that of adjacent cabinets.
■ Sand panel edges to provide a smooth nish.
■ Use moisture sealer on both sides and all edges of the panel
to avoid damage from outside.
Option 1 - Without Hinge-Side Spacer
To allow proper clearance for the door, prepare the custom
overlay panel using the dimension shown.
Option 2 - With Hinge-Side Spacer
To achieve a ush installation with adjacent cabinets, prepare the
custom overlay panel using the dimensions shown.
Top of Panel
Bottom of Panel
14¹⁷⁄₃₂"
(36.9 cm)
29¹⁄₂"
(74.9 cm)
1
¹⁄₄
"
(3.18 cm)
1
¹⁄₄
"
(3.18 cm)
1/4"
(6.35 mm)
1/4"
(6.35 mm)
3/4"
(1.91 mm)
3/4"
(1.91 mm)
14⁵⁄₈"
(37.1 cm)
29¹⁄₂"
(74.9 cm)
B
A
A. Front-visible surface when installed
B. Hinge Side
B
A
A. Front-visible surface when installed
B. Hinge Side