
Installation Instructions


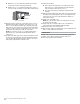
Table Of Contents
- Ice maker SAFETY
- INSTALLATION INSTRUCTIONS
- Unpack the Ice Maker
- Vacation or Extended Time Without Use
- Location Requirements
- Electrical Requirements
- Water Supply Requirements
- Drain Connection Requirements
- Door Reversal
- Drain Pump Installation (on some models)
- Connect Water Supply
- Leveling and Securing
- Custom Wood Panel
- Connecting the Drain
- Auxiliary Grill Installation
- Deep Clean
- SÉCURITÉ DE LA MACHINE À GLAÇONS
- INSTRUCTIONS D’INSTALLATION
- Déballage de la machine à glaçons
- Vacances ou longue période d’inutilisation
- Exigences d’emplacement
- Spécifications électriques
- Spécifications de l’alimentation en eau
- Exigences concernant le raccordement au drain
- Inversion de la porte
- Installation de la pompe de vidange (sur certains modèles)
- Raccordement à la canalisation d’eau
- Mettre de niveau et sécuriser
- Panneau de bois personnalisé
- Raccordement de la vidange
- Installation de la grille auxiliaire
- Nettoyage en profondeur
- SEGURIDAD DE LA FÁBRICA DE HIELO
- INSTRUCCIONES DE INSTALACIÓN
- Cómo desempacar la máquina de hielo
- Vacaciones o tiempo prolongado sin uso
- Requisitos de ubicación
- Requisitos eléctricos
- Requisitos del suministro de agua
- Requisitos para la conexión del desagüe
- Cambio del sentido de apertura de la puerta
- Instalación de la bomba de desagüe (en algunos modelos)
- Conexión del suministro de agua
- Nivelado y asegurado
- Panel de madera personalizado
- Conexión del desagüe
- Instalación de la rejilla auxiliar
- Limpieza intensa

16 17
Deep Clean
Interior Components
1. Unplug ice maker or disconnect power.
2. Open the storage bin door and remove any ice that is in the
bin.
3. Remove the drain cap from the water pan and drain
thoroughly. Replace the drain cap securely on the water pan.
If the drain cap is loose, water will empty from the water pan,
and you will have either thin ice or no ice.
4. Pull out on the bottom of the cutter grid cover until the snaps
release to remove.
NOTE: On some models, remove the screw from the cutter
grid cover.
5. Unplug the wiring harness from the left side of the cutter grid.
6. Unplug the ice level sensor from the right side of the cutter
grid. Pull the ice level sensor down and forward away from the
cutter grid.
7. Remove the right-hand and left-hand screws. Lift the cutter
grid up and out.
NOTE: Make sure the plastic spacer from the right-hand side
of the cutter grid bracket stays with the cutter grid.
8. Remove the mounting screw that holds the water pan in
place. Pull out on the front of the water pan.
9. Disconnect the pump bracket from the water pan and unplug
the water pan drain pump.
10. Remove, clean and replace the ice scoop holder and ice
scoop.
NOTE: On some models, the ice scoop holder is located in
the upper left of the unit, and on other models, the ice scoop
holder is located in the lower left of the unit.
On Some Models
■ Remove the holder by removing the 2 screws.
■ Wash the ice scoop holder and ice scoop along with the
other interior components using the following instructions.
■ Replace the ice scoop holder by replacing the screws.
On Some Models
■ After removing the ice scoop, remove the holder by
removing the 2 screws.
NOTE: On some models, remove the holder by lifting up
on the ice scoop holder and then out.
A
B
A. Cutter grid cover
B. Screw (on some models)
A
A. Cutter grid cover
A
B
C
D
E
F
A. Cutter grid harness
B. Screw
C. Cutter grid
D. Ice level sensor harness
E. Plastic spacer
F. Screw
A
B
C
D
A. Water pan
B. Water pan screw
C. Drain cap
D. Drain pump cover
B
A
A. Screw
B. Ice scoop holder
Connecting the Drain
After ensuring that the drain system is adequate, follow these
steps to properly place the ice maker:
1. Style 1—For a gravity drain system, be sure that the ice
maker drain tube is positioned over the PVC drain reducer.
See the “Gravity Drain System” section.
Style 2—For a drain pump system, connect the drain
pump outlet hose to the drain. Refer the “Drain Supply
Requirements” section.
NOTE: Do not connect outlet end of drain tube to a closed
pipe system to avoid drain water from backing up into the ice
maker.
2. Plug in ice maker or reconnect power.
3. Turn on ice maker. Wait for rinsing cycle, approximately
5 minutes, to be sure the ice maker is operating properly.
4. If it is required by your local sanitation code, seal the cabinet
to the oor with an approved caulking compound after all
water and electrical connections have been made.
Auxiliary Grill Installation
The auxiliary grill is an optional part that can be used to align
the toe grill with the rest of the cabinets (while not obstructing
ventilation of the ice maker).
Tools required:
■ Torx T20 screwdriver
■ 1/8" straight drill bit and power drill
1. First, complete all installation steps and install leveled ice
maker into the cabinet. Ensure ice maker is ush with the
adjacent cabinets.
2. Unpack kit by removing outer cushion packaging and discard
packaging material.
3. Remove screws that are taped onto the inside of the auxiliary
grill.
4. Place grill onto cabinetry. Align part so that grating pattern on
the auxiliary grill matches that of the toe grill on the ice maker.
5. Center auxiliary grill on cut out for ice maker. Mark hole
locations on each side of auxiliary grill on cabinet.
6. Using power drill and a 1/8" drill bit, drill holes in cabinet. This
is to t screws of size 8-18 x 0.750.
7. Using the Torx T20 screwdriver, screw auxiliary grill into
cabinet.
NOTE: For future service of ice maker, auxiliary kit must be
removed prior to the removal of the ice maker from the cabinets.
WARNING
Excessive Weight Hazard
Use two or more people to move and install ice maker.
Failure to do so can result in back or other injury.
Electrical Shock Hazard
Plug into a grounded 3 prong outlet.
Do not remove ground prong.
Do not use an adapter.
Do not use an extension cord.
Failure to follow these instructions can result in death,
fire, or electrical shock.
WARNING