
Installation Sheet


10
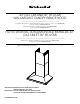
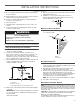
Install Vent Covers
When using both upper and lower vent covers, push lower cover
down onto hood and lift upper cover to ceiling, and then install
with two 4.2 x 8 mm screws.
NOTE: For vented installations, the upper vent cover may be
reversed to hide slots.
Secure the bottom of the duct with 2 - 4.2 x 8 mm screws.
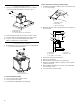
Complete Installation
1. For non-vented (recirculating) installations only, install
charcoal filters over grille on blower housing. See the “Range
Hood Care” section.
2. Install metal filters. See the “Range Hood Care” section.
3. Check the operation of the range hood blower and light. See
the “Range Hood Use” section.
NOTE: To get the most efficient use from your new range hood,
read the “Range Hood Use” section.
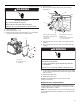
RANGE HOOD USE
The range hood is designed to remove smoke, cooking vapors and
odors from the cooktop area. For best results, start the hood before
cooking and allow it to operate several minutes after the cooking is
complete to clear all smoke and odors from the kitchen.
The range hood controls are located on the front side of the canopy.
Control Panel
Controls and Features
NOTES:
■ To activate the controls, press and release the desired button.
■ The control feature button will be lit when a control feature is
turned On.
Sleep Mode
The range hood automatically enters Sleep Mode when not in
use. After 10 minutes of no range hood activity, all of the control
button lights will turn Off. To deactivate Sleep Mode, press any
button.
Auto Sense
Auto Sense allows the range hood fan to turn on automatically
when it senses heat higher than its allowable temperature limit.
When Auto Sense is On, the fan speed will increase or decrease
based on the temperature Auto Sense is measuring.
Auto Sense can be manually increased by pressing a higher fan
speed. The fan will run at the selected speed for 10 minutes
before returning to the speed selected for Auto Sense.
A. Upper vent cover
B. Lower vent cover
C. 4.2 x 8 mm screws
D. Bracket
A
B
C
D
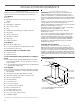
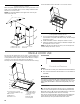
A. Louver holes (non-vented
[recirculating] installations only)
B. Duct covers
C. LED lights (2)
D. Perimetric cover
E. Metal grease filters
(located behind the
perimetric cover)
F. Canopy
G. Halogen light
H. Control panel
A
B
C
D
E
F
G
H