Kitchen Aid" 36" AND 42" (91.4 CM AND 106.7 CM) ISLAND CANOPY RANGE HOOD Uae SC ati Inst are Guide For questions about features, operation/performance, parts, accessories or service, call: 1-800-422-1230 or visit our website at www.kitchenaid.com in Canada, for assistance, installation and service, call: or visit our website at www.
TABLE OF CONTENTS RANGE HOOD SAFETY .. INSTALLATION REQUIREMENTS. Tools and Parts... Location Requirements Venting Requirement: Electrical Requirements INSTALLATION INSTRUCTIONS. Prepares Location... Install Range Hood... Make Electrical Connection . Install Duct Covers Complete Installation RANGE HOOD USE. Display. Light... Timer Fan Speed RANGE HOOD CAR Cleaning... WIRING DIAGRAM .. ASSISTANCE OR SERVICE. In the USA. . Accessories In Canada...
SHOCK, OR INJURY TO PERSONS, OBSERVE THE FOLLOWING: ® Use this unit only in the manner intended by the manufacturer. If you have questions, contact the manufacturer. = Before servicing or cleaning the unit, switch power off at the service disconnecting means cannot be locked, to the service panel. Installation work and electrical wiring must be done by and standards, including fire-rated construction. ® Do not operate any fan with a damaged cord or plug.
For vented installations, you will also need: m1 veal or roof cap m Metal vent system For non-vented (recirculating) installations, you will also need: w Recirculating Kit Part Number W10344055 for non-vented {recirculating} installations only. See “Assistance or Service” section to order. wm 8” (15.2 cm) round metal vent duct, Length required is determined by ceiling height. Parts supplied Remove parts from packages. Check that all parts are included.
The chimneys can be adjusted for different ceiling heights. See the following chart. Vented Installations Min. ceiling height Max. ceiling height Electric cooking 79 Rem 9' 10" (3.0m) surface Gas cooking 8' (2.44 my} 9' 10" (3.0m) surface Non-vented (recirculating) installations Min. ceiling height Max. ceiling height Electric cooking 7'9° (2.36 mm) 10° 4" (3.15 m) surface Gas cooking m) 10° 4" (3.
Calculating Vent System Length To calculate the length of the system you need, add the equivalent feet (meters) for each vent piece used in the system. Vent piece 6" {15.2 em} round 45° elbow 2514 elbow 50ft Maximum equivalent vent length is 35 #£ (10.7 m). Example Vent System 90° elbow je—snus my Wall cap Ln The following example falls within the maximum vent length of VIBRANT mY) 190° elbow 1 wall cap =0.0f0.0m B (2.4 my) straight =80f 24m) System length =13 {3.
Range Hood Mounting Screws Installation 4 Determine and mark the center line on the ceiling where the range hood will be installed, considering the requirements for ceiling support structures, See the “Location Requirements” section. Make sure the range hood is centered over the cooking surface. Tape template in place on the ceiling at the marked center line. Use a pencil to mark the mounting screws, wire access and duct hole locations on the ceiling.
Connect Vent System 1. Install vent system. 2. Push duct over the exhaust outlet, Seal all connections with vent clamps. Non-Vented {recirculating} Installation 1. Attach the air deflector to the upper horizontal support using 4 mounting screws. A. Deflector B, Mounting screws 2. Measure the length of 8” (15.2 om) duct needed to connect the transition to the deflector, NOTE: Vent should fit up inside the deflector 1" {2.5 cm) minimum. 3. Install vent between the transition and the deflector.
5. Use UL listed wire connectors and connect black wires (C) together. 6. Use UL listed wire connectors and connect white wires together, RK Electrical Shock Hazard Electrically ground blower. Connect ground wire fo green and yellow ground wire in terminal box. Failure to do sa can result in death or electrical shack. 7. Connect green (or bare} ground wire from home power supply to yellow-green ground wire {F} in terminal box using UL listed wire connectors. 8. Tighten strain relief screw, 9.
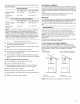
Control Panel A A Power decrease 8. Power increase C. Display D. Light E. Timer Grease Filter Saturation Alarm After 30 hours of fan operation, the display will show “Clean Grease Filter” when the fan is active. When this icon shows in the display, the installed grease filters should be washed. Ses “Range Hood Care” section. m To reset the grease filter saturation alarm, press and hold the POWER INCREASE button for 5 seconds.
RANGE HOOD CARE IMPORTANT: Clean the hood and grease filters frequently according to the following instructions. Replace grease filters before operating hood. Exterior Surfaces: To avoid damage 10 the exterior surface, do not use steel wool or soap-filled scouring pads. Always wipe dry to avoid water marks. Cleaning Method: wm Lidded detergent soap and water, or all-purpose cleanser m Wipe with damp soft cloth or nonabrasive sponge, then rinse with clean water and wipe dry.
GND L N WIRING DIAGRAM Electronic User Interface Electronic Power Board CON BE1CAA| Woolongong Pea CON cons’ CON ¥ Nd Y CONT CONS vie, CONG [016016101010101010 CON § Olin Motor Motor Resistance Characteristics {Ohms} Power Supply 120 VAC Blurred 8 Blue Gray 143 Frequency 80 HZ COLOR TABLE COLOR TABLE Blue Black | 9.8 (ma) BK. ® RED rower Abe ow ri wore resorption fle Blue White | 21.8 (min) Ex ¥-G | YELLOW GREEN Current 0) Room Temp. | 78.
ASSISTANCE OR SERVICE When calling for assistance or device, please know the purchase date and the complete model and serial number of your appliance. This information will help us to better respond ta your request. If you need replacement parts If you need to order replacement parts, we recommend that you use only factory specified parts. Factory specified parts will fit right and work right because they are made with the same precision used to build every new appliance.
KITCHEN AID” VENTILATION WARRANTY LIMITED WARRANTY For one year from the date of purchase. when this major appliance is operated and maintained according to instructions attached fo or furnished with the product, Kitchen Aid brand of Whirlpool Corporation or Whirlpool Canada LP thereafter “Kitchenware) will pay for Factory Specified Parts and repair labor to correct defects in materials or workmanship. Service must be provided by a Kitchen Aid designated service company.
SÉCURITÉ DE LA HOTTE DE CUISINIÈRE Votre sécurité et celle des autres est trais importante. Nous donnas de nombreux messages de sécurité importants dans ce manuel et sur votre appareil ménager. Assurez-vous de toujours lire tous les messages de sécurité et de vous y conformer.
IMPORTANTES INSTRUCTIONS DE SÉCURITÉ AVERTISSEMENT : POUR traduire LE RISQUE D’INCENDIE, CHOC électrique OU DOMMAGES CORPORELS, RESPECTER LES INSTRUCTIONS SUIVANTES : = Utiliser cet appareil uniquement dans les applications envisagées par le fabricant.
EXIGENCES D'INSTALLATION Pistils el plies Rassembler les outils et pièces nécessaires avant d'entreprendre Installation. Lire et observer les instructions fournies avec chacun des outils de la liste ci-dessous.
Dimensions du produit 125 Roeser. 83.5 em) 4 wap 3% omy ove | Ey ion hin. 1 aia. LA— 36" (81,2 om) or 42" (106,4 CI) oT 27" (52.6 6) “Installations avec décharge a 'extérieur uniquement “Installations sans décharge a l'extérieur {recyclage) uniquement Dimensions d’installation HE w A. Autour sous plafond 8. Hauteur sous hotte entre je plafond et fe bas de la hotte : AC-D = B ©. Hauteur sous hotte maximale suggérée minimum a 36" 91.4 cm) maximum. D.
Installations dans une région a climat froid Dans le circuit d'évacuation, on devrait installer un clapet anti reflux additionnel pour minimiser le reflux d'air froid, ainsi qu'un élément d'isolation thermique pour minimiser le transfert de chaleur par conduction vers 'extérieur. Le clapet anti-reflux doit être place du c61é air froid par rapport a I'élément d'isolation thermique.
£1 Observer les dispositions de fous les codes ef réglemente en rigueur. Vérifier que installation électrique a été correctement effectue ot qu'elle est conforme aux spécifications de la plus récente édition des normes National Relectrice Code. ORGANSIN norme CSA Code canadien de {'électricités, partie 1 et ©22.2 N° 0-M91 (dernière édition) et de tous les codes et règlements en vigueur loyaux.
8, Acheminer le câble d'alimentation du domicile selon les prescriptions du Code national de I'électricité, des normes CSA ou des codes ef rengagements locaux. i faut que la {longueur du conduit de 12” et des conducteurs soit suffisante depuis le tableau de distribution (avec fusibles ou disjoncteurs) pour réaliser le raccordement dans le bolier de connexion de Ia hotte. REMARQUE : Ne pas reconnecter la source de courant électrique avant terminé installation.
2. Mes ruer la longueur de conduit d'évacuation de 8" {15,2 cm) 4. Acheminer le cordon d'alimentation du domicile a travers le nécessaire pour le raccordement entre Je raccord de serre-câble, dans le bolier de connexion. transition et le déflecteur. REMARQUE : Le conduit devrait être inséré d’au moins 12,5 om) a Intérieur du déflecteur. 3. Installer le conclut d’évacuation entre le raccord de transition et le déflecteur.
Nation de fuis 1. Fixer les supports de cache-conduits verticaux a aide des 4 vis Vis B. Supports de tache-conduit verticaux 2. Faire coulisser les cache-conduits en place jusqu'a ce gue les ressorts émettent un déclic. A B A. Section supérieure du sauf-conduit 8. Ressort 3. Fixer les sections inférieures du cache-conduit en plaquant ure bride en plastique 4 chaque coin (4 sont nécessaires). A, Section supérieure du cache-corset B. Section inférieure du cache-conduit C. Bride en plastique 3.
m Pour réinitialiser I'alarme de saturation du filtre 4 graisse, appuyer sur le bouton POSER increvable (augmentation de fa puissance) pendant 5 secondes, LUlcone “Clean Grasse Tilter” {nettoyer le filtre a graisse} disparaît de [‘affichage. Alarme de saturation du filtre & charbon Après 120 heures de fonctionnement du ventilateur, |'affichage indique “Replace Charcler Tilter” {remplacer le filtre & charbon) lorsque le ventilateur est activé.
ENTRETIEN DE LA HOTTE Moellonnage IMPORTANT : Nettoyer fréquemment la hotte et les filtres a = graisse en suivant les instructions suivantes. Réinstaller les filtres Filtres d’installation sans décharge a Extérieur a graisse avant de faire fonctionner la hotte. {recyclage} Surfaces externes : Le filtre & charbon rets pas lavable. Celui-ci devrait durer pendant six mois dans des conditions d'utilisation normales. Remplacer par l'ensemble de filtre a charbon numéro W10272088.
JAE Terre LN SCHÉMA DE CÂBLAGE Interface utilisateur Slectronigue BE1F6A SE11ZA Carte des circuits i d’alimentation électronique Oolong BE1CAA| PL PZ PAA _P7_o6 cons’ Con iA Nd VONT CONS Nr] MAR JANE CONF DEFOE CON § Bis ERRE Caractéristiques Résistance du du moteur moteur (ohms) Alimentation 120VCA Bleu Rouge 1 Bleu Ifs 43 TABLEAU DES TABLEAU DES Fréquence SRE Bleu-Noir | 9,8 (max) Absorption BU W BLANC do courant aww } 21.5 (ins ro % TE Bleu Blanc 8 (min) VE JAUNE-VERT = Y. 7A Tempe. amb.
ASSISTANCE OU SERVICE Lors d'un appel pour assistance ou service, veuillez connaître la date d’archal, le numéro de modelé ef le numéro de série complets de Appareil. Ces renseignements nous aideront & mie répondre a votre demande. Si vous avez besoin de pièces de rechange Bi vous avez besoin de commander des pièces de rechange, nous vous recommandons d’ employer uniquement les piges spécificatrices par Fusion.
GARANTIE DU SYSTÈME DE VENTILATION kitchenette” GARANTIE LIMITÉE Pendant un an a compter de Ia date d'achat, lorsque ce gros appareil ménager est utilisé ef entretenu conformément aux instructions jointes 4 ou fournies avec le produit, la marque KitchenAid de Whirlpool Corporation ou Whirlpool Canada LP {ci-après désignées “KitchenAid"} paiera pour les pièces spécifies par 'usine et la main-d' couvre pour corriger les vices de matériaux ou de fabrication.