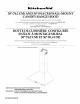
Kitchen Aid 30" (76.2 CM) AND 36" (91.4 CM) WALL-MOUNT CANOPY RANGE HOOD Installation In stock saved Use & For questions about features. operaticn/performance parts, accessories or service, call; 1-800-253-1301. in Canada, for assistance. installation and service, call: 1-806-807-6777 ar visit our website at. www.whirlpoet.com or www.whirlpook.
TABLE OF CONTENTS RANGE HOOD SAFETY .. INSTALLATION REQUIREMENTS. Tools and Parts Location Requirements Venting Requirement: Electrical Requirements INSTALLATION INSTRUCTIONS. Prepare Location... install Range Hoo Connect Vent System Make Electrical Connection . Install Vent Covers Complete Installation RANGE HOOD USE. Range Mood Controls RANGE HOOD CARE Cleaning... WIRING DIAGRAM ASSISTANCE OR SERVICE. in the USA...
IMPORTANT SAFETY INSTRUCTIONS WARNING: TO REDUCE THE RISK OF FIRE, ELECTRIC SHOCK, OR INJURY TO PERSONS, OBSERVE THE FOLLOWING: Use this unit only in the manner intended by the manufacturer. If you have questions, contact the manufacturer. ® Before servicing or cleaning the unit, switch power off at service panel and lock the service disconnecting means to prevent power farm being switched on accidentally.
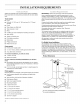
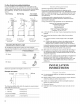
INSTALLATION REQUIREMENTS Sandstone Pa Gather the required tools and parts before starting installation. Read and follow the instructions provided with any tools listed here. Tools needed wm Level w Drill with 114" (3.0 cm), %" (9.5 mm), and 34s" (7.
Cabinet Dimensions 70 (18.4 min. {15.2 om) min. Vent and power supply cable entry location 15" (38.1 om} Side Side cabinet cabinet 46” (76.2 cm) or | 26m 91am pe bottom of canopy | fo cooking | surface | Center line Cooking surface “For non-vented {recirculating} installations IMPORTANT: Minimum distance “X”: 24” (61.0 em} from electric cooking surface. Minimum distance “X”: 27" (68.6 cm} from gas cooking surfaces. Suggested maximum distance “X": 36" (91.
For Non-Vented (recirculating) Installations If it is not possible to vent cooking fumes and vapors to the outside, the hood can be used in the non-vented (recirculating) version, using a Re circulation Kit (which includes charcoal filters and a deflector), To order, see the “Assistance or Service” section. Roof Venting Non-vented {recirculating} ~ TE Wall Venting A. Roof cap A. Wall cap A Deflector B.6" (15.2 cm) B.&" (15.2 om) B.6" (5.
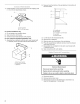
3. Select a flat surface for assembling the range hood. Place covering over that surface. Excessive Weight Hazard Use two of more people to move and install range hood. Failure to do so can result in back or other injury. 4. Using 2 or more people, lift range hood onto covered surface. Range Hood Mounting Screws Installation 5. Determine and mark the center line on the wall where the canopy hood will be installed. 8. Select a mounting height between a minimum of 24” (81.
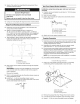
2. Measure from the bottom of the alr deflector to the bottom of Correct Vent Sy the hood outlet. 1. Install transition on top of hood (if removed for shipping} with sheet metal screws. A, Vent transition B.3.5 x 9.5 mm screw A Air deflector For vented installations only: B. Vent clamp . [SS X= length fo cut vent duct 1. Fitment system over transition piece. vert dust 2. Seal connection with clamps. £. Exhaust outlet 3. Check that back draft dampers work properly. .
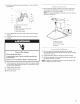
4. Run home power supply wiring through '4" strain relief into terminal box. A. UL listed wire connectors B. White wires OC. Black wires D. Green for hare} wire connected to yellow-green rives E Home power supply 5. Use UL listed wire connectors and connect white wires (8) together. 8. Use UL listed wire connectors and connect black wires (C} together. EET 4 Electrical Shack Hazard Electrically ground blower. Connect ground wire to green and yellow ground wire in terminal box.
RANGE HOOD USE The range hood is designed to remove smoke, cooking vapors and odors from the cook top area. For best results, start the hood Range Hind before coaching and allow it to operate several minutes after the Li ” Kir lech to cl il smoke and odors from coating is complete to clear all smoke and odors from the The hood controls are located on the front panel on the right side of the range hood. nis A, Light On/Off button B. Blower On/Off button C. Blower speed minimum button D.
RANGE HOOD CARE IMPORTANT: Clean the hood and grease filters frequently according to the following instructions. Replace grease filters before operating hood. Exterior Surfaces: To avoid damage to the exterior surface, do not use steel wool or soap-filled scouring pads Always wipe dry to avoid water marks. Cleaning Method: wm Cicada detergent soap and water, or all-purpose cleanser m Wipe with damp soft cloth or nonabrasive sponge, then rinse with clean water and wipe dry. 4.
ASSISTANCE OR SERVICE When calling for assistance or service, please know the purchase date and the complete model and serial number of your appliance. This information will help us to better respond ta your request. If you need replacement parts If you need to order replacement parts, we recommend that you use only factory specified parts. Factory specified parts will fit right and work right because they are made with the same precision used to build every new appliance.
KITCHENAID® VENTILATION WARRANTY LIMITED WARRANTY For one year from the date of purchase. when this major appliance is operated and maintained according to instructions attached fo or furnished with the product, Kitchen Aid brand of Whirlpool Corporation or Whirlpool Canada LP thereafter “Kitchenware) will pay for Factory Specified Parts and repair labor to correct defects in materials or workmanship. Service must be provided by a Kitchen Aid designated service company.
SÉCURITÉ DE LA HOTTE DE CUISINIÈRE Votre sécurité et celle des autres est trais importante. Nous donnas de nombreux messages de sécurité importants dans ce manuel et sur votre appareil ménager. Assurez-vous de toujours lire tous les messages de sécurité et de vous y conformer.
IMPORTANTES INSTRUCTIONS DE SÉCURITÉ AVERTISSEMENT : POUR TRADUIRE LE RISQUE incendie, CHOC électrique OU DOMMAGES CORPORELS, RESPECTER LES INSTRUCTIONS SUIVANTES : Utiliser cet appareil uniquement dans les applications envisagées par le fabricant.
EXIGENCES D'INSTALLATION Cutis ef Rassembler les outils et composants nécessaires avant d'entreprendre installation. Lire ef observer les instructions fournies avec chacun des outils de la liste ci-dessous. Outils nécessaires wm Niveau m Perceuse avec forets de 1%" (3.0 cm). 3%" (8.
Dimensions du placard Tr 15,4 om) 27 (5,1 om) main. 6" {15.2 om) min.” G9" (16,8 om) Point d'entrée du circuit 75" (18,8 am) of Évacuation et du câble | sédimentation f suraigus 5" (38.1 om) Placard Placard adjacent «| adjacent 30" (76,2 cm) out 26" (91.
REMARQUE : On déconseille 'emplit de conduit flexible. Un conduit flexible peut causer une rétrogression et des turbulences de ['air, ce qui réduit considérablement fa performance. La sortie a I'extérieur du circuit d'évacuation peut se faire a travers le toit ou & travers un mur. Pour la sortie & travers un mur, on doit employer un raccord couds Décharge par l’arriéré Le raccord coudé & 90” peut référer installé immédiatement au-dessus de la hotte.
INSTRUCTIONS D'INSTALLATION Troll Fe ml est recommandé d'installer le circuit d'évacuation avant de procéder a [installation de la hotte. m Avant d’exécuter les découpages, vérifier la disponibilité d'un dégagement suffisant dans le plafond ou le mur pour le conduit d'évacuation. m Avant de sélectionner la hotte & installer, mesurer la hauteur fibre sous plafond ef la hauteur maximum disponible sous fa hotte. 1. Déconnecter la source de courant électrique. 2.
Installations sans décharge & I'extérieur {recyclage} uniquement : 1. Assembler le déflecteur d'air sur la bride du cache-conduit a l'aide des 2 vis de montage fournies avec la trousse de recyclage. Hou deux personnes au moins, suspendre la hotte aux 2 crochets de montage, a travers les encoches de montage & arriéré de la hotte. Fru A. Bride de cache-conduit B. Vis Déflecteur 2. Mesurer la distance encire le bas du déflecteur d'air et le bas A. Vis do montage de la sortie de la hotte. 8.
: irrigue 8. Connecter ensemble les conducteurs noirs {C) 4 l'aide de connecteurs de fils (homologation ULL AVERTISSEMENT A AVERTISSEMENT Risque de chou électrique Déconnecter la source de courant électrique avant Entretien. Replacer piques et panneaux avant de faire la remise en marche. Le non-respect de ces instructions peut causer un décès ou un choc électrique. 1. Déconnecter la source de courant électrique. 2. Ôter le couvercle de la bête de connexion. 3.
A horeca Vie Achever Pour les installations sans décharge a Extérieur recyclage) uniquement, installer les filtres & charbon sur Ja grille du figement du ventilateur. Voir a section “Entretien de la hotte”. installer les filtres métalliques. Voir 1a section “Entretien de la hotte”. Nation Contrôler le fonctionnement du ventilateur de la hotte et de la lampe. Voir la section “Utilisation de la hotte™.
ENTRETIEN DE LA HOTTE IMPORTANT : Nettoyer fréquemment la hotte et les filtres a graisse en suivant les instructions suivantes. Réinstaller les filtres. a graisse avant de faire fonctionner la hotte. Surfaces externes : Ain d'éviter d'endommager la surface externe, ne pas utiliser de tampons en laine d’acter ou de tampons & récurer savonneux. Toujours essuyer pour éviter de laisser des traces d'eau.
ASSISTANCE OU SERVICE Lors ¢'un appel pour assistance ou service, veuillez connaître la Pour plus d’assistance date d'achat, le numéro de modale et le numéro de série Si vous avez besoin de plus d’assistance, vous pouvez complets de l'appareil. Ces renseignements nous aideront 4 soumettre par écrit toute question ou préoccupation & mieux répondre a voler demande.
GARANTIE DU SYSTÈME DE VENTILATION kitchenette” GARANTIE LIMITÉE Pendant un an a compter de Ia date d'achat, lorsque ce gros appareil] manager est utilisé ef entretenu conformément aux instructions jointes 4 ou fournies avec le produit, la marque KitchenAid de Whirlpool Corporation ou Whirlpool Canada LP {cl-après désignées “KitchenAid") paiera pour les pièces spécifiées par 'usine et la pour corriger les vices de matériaux ou de fabrication.