
SIDE BY SIDE BUILT-IN REFRIGERATOR Use & Care Guide


9
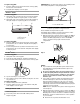
To dispense ice:
1.
Press button for the desired type of ice.
2.
Press a sturdy glass against the ice dispenser lever. Hold the
glass close to the dispenser opening so ice does not fall
outside of the glass.
IMPORTANT:
You do not need to apply a lot of pressure to
the lever in order to activate the ice dispenser. Pressing hard
will not make the ice dispense faster or in greater quantities.
3.
Remove the glass to stop dispensing.
NOTE:
The first few batches of ice may have an off-flavor
from new plumbing and parts. Throw the ice away. Also, take
large amounts of ice from the ice bin, not through the
dispenser.
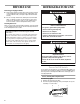
The Water Dispenser
If you did not flush the water system when the refrigerator was
first installed, press the water dispenser bar with a glass or jar
until you draw and discard 2 to 3 gal. (8 to 12 L) or approximately
6 to 7 minutes of water after water begins dispensing. It will take
3 to 4 minutes for the water to begin dispensing. The water you
draw and discard cleans the system and helps clear air from the
lines. Allow several hours for the refrigerator to cool down and
chill water.
IMPORTANT:
Depending on your model, the small removable
tray at the bottom of the dispenser is designed to catch small
spills and allow for easy cleaning. There is no drain in the tray.
The tray can be removed from the dispenser and carried to the
sink to be emptied or cleaned.
To dispense water:
1.
Press a glass against the water dispenser lever.
2.
Remove the glass to stop dispensing.
NOTE:
Dispense enough water every week to maintain a fresh
supply.
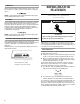
The Dispenser Light
The dispenser area has a light. It can be turned on manually by
pressing the ON button at the right-hand side of the control
panel. The red indicator above the ON button will appear.
When you use the dispenser the lever will automatically turn the
light on.
NOTE:
See the “Changing the Light Bulbs” section for
information on changing the dispenser light bulb.
The Dispenser Lock
(on some models)
Your dispenser can be turned off for easy cleaning or to prevent
accidental dispensing by small children and pets. To turn off the
dispenser, press the LOCK button. The indicator will appear
above the LOCK button, and the ice and water dispensers will
not work. To unlock the dispenser, press the UNLOCK button
until the indicator appears. Then continue to dispense ice or
water as usual.
NOTE:
The lock feature does not shut off power to the
refrigerator, to the ice maker, or to the dispenser light. It simply
deactivates the dispenser levers.
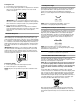
Water Filtration System
The Base Grille Water Filter Status Light
The water filter indicator display will help you know when to
change your water filter cartridge. The display or light is located
at the top of the refrigerator compartment.
NOTE: Do not use with water that is microbiologically unsafe
or of unknown quality without adequate disinfection before
or after the system. Systems certified for cyst reduction may
be used on disinfected waters that may contain filterable
cysts.
A new water filter should display a reading of 99% and will
continue to decrease as the filter life is used. When display reads
10%, it is time to order a replacement filter. It is recommended
that you replace the base grille water filter cartridge when the
water filter indicator light changes to 0% OR when water flow to
your water dispenser or ice maker decreases noticeably. (See
“Changing the Base Grille Filter” later in this section.)
After changing the water filter cartridge, reset the water filter
status light by pressing and holding the RESET for 2 seconds.
The indicator light will change to 99% when the filter indicator is
reset.
LIGHT
OFF ON
DISPENSER
LOCK
UNLOCK