
Installation Instructions
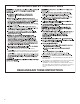

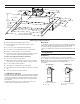
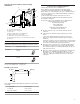
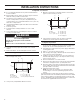
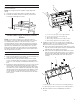
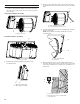
Table Of Contents
- RANGE HOOD SAFETY
- INSTALLATION REQUIREMENTS
- INSTALLATION INSTRUCTIONS
- RANGE HOOD USE
- RANGE HOOD CARE
- WIRING DIAGRAM
- ASSISTANCE OR SERVICE
- SÉCURITÉ DE LA HOTTE DE CUISINIÈRE
- EXIGENCES D’INSTALLATION
- INSTRUCTIONS D’INSTALLATION
- Installation du moteur du ventilateur interne de la caisse de la hotte
- Installation du moteur du ventilateur en ligne (externe) de la caisse de la hotte
- Réalisation des connexions électriques du système du moteur du ventilateur en ligne
- Réalisation des connexions de l’alimentation électrique à la caisse de la hotte
- Achever l’installation et vérifier le fonctionnement
- UTILISATION DE LA HOTTE
- ENTRETIEN DE LA HOTTE
- SCHÉMA DE CÂBLAGE
- ASSISTANCE OU SERVICE

10
Install Hood Liner Internal Blower Motor
1. Install the hood liner blower motor assembly inside the
hood liner canopy with the wiring connection to the left for
the single motor system and to the front or top for the dual
motor system.
Single Blower Motor Assembly
Dual Blower Motor Assembly
2. Slide the left mounting plate ange under the motor
mounting bracket.
3. Run the power supply wires and connector from the range
hood through the hole in the right end of the motor mounting
plate.
4. Push the right end of the motor mounting plate up and snap
it into the spring tab.
NOTE: The spring tab should be outside the slot in the
mounting plate.
5. Align mounting holes in motor mounting plate with motor
mounting clip nuts and install 6 x 16 mm screws and 6.4 mm
lock washers (quantity two for single motor; quantity ve for
dual motor).
A
A. Wiring connection
A
A. Wiring connection
BA
A. Motor mounting bracket
B. Mounting plate left ange
A
B
A. Motor mounting plate hole
B. Power supply wires and connector
A
B
A. Motor mounting plate
B. Spring clip
A
B
C
A. Screw with lock washer
B. Mounting hole in motor mounting plate
C. Clip nut (6 mm)
B
A
A. Wiring box connector
B. Power supply connector from range hood